We noticed you are blocking ads. DO THE TON only works with community supporters. Most are active members of the site with small businesses. Please consider disabling your ad blocking tool and checking out the businesses that help keep our site up and free.
You are using an out of date browser. It may not display this or other websites correctly.
You should upgrade or use an alternative browser.
You should upgrade or use an alternative browser.
1983 Suzuki GR650 XD Cafe Build
- Thread starter jessejamez
- Start date
Hoosier Daddy
Earache my eye...
New parts always make me smile... keep up the good work!
jessejamez
1983 Suzuki GR650X
Hoosier Daddy
Earache my eye...
Just saw your PM... Did you get you rear brake issue figured out?
Can you post a pic on here?
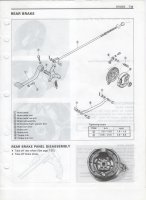
Are the linings on both shoes the the same length?
I think, the trailing shoe should be the longer of the two if they are different.
GAWD Drum brakes... it's been Sooooo long.")
Can you post a pic on here?
Are the linings on both shoes the the same length?
I think, the trailing shoe should be the longer of the two if they are different.
GAWD Drum brakes... it's been Sooooo long.
jessejamez
1983 Suzuki GR650X
no its on my bike ill try to get u a pic asap thank you
im thinkin it has to be something with the brake cam (#7),, possibly flipeed the wrong way or somethin cus it works great just in the opposite directions. now that i got the manual ill be able to start figurin shit out easier but
i still need that damn starter cylinder cover and fuse box cover.
and someother piece of shit thing that pisses me off and cant think of the name i think its the blinker generator but i could be wrong
Attachments
Big R
Heaven is so far away.
It doesn't matter which way the brake cam (#7) is, it operates the same. The brake shoes are identical, so that's out of the question as well. What did you say it's doing? If you have new brake shoes and everything is assembled properly, I can't imagine how it could work in one direction and not the other.
If you are keeping the fuse box in the original location, don't worry about the cover for now. Just put a couple dabs of dielectric grease on the fuses for weather resistance. The starter motor cover is much more important - but not so much to stop you from working on everything else. Just keep an eye on ebay for one. It is a VERY complicated shape to fab up yourself. And the blinker generator is called a flasher relay (on this bike at least). Some other / older bikes called it the blinker relay or the winker relay among others.
And you don't need to cuss to make friends.
jessejamez
1983 Suzuki GR650X
ok when i spin the rear tire as if the bike is going forward, and i hit the brake the brakes lock up as if u were rolling backwards, try it on your bike.. roll backwards and hit the brake.. it locks up riht? thats what mine does when its going forward. when i spin the tire backwards and ease on the brake the back tire slowly comes to a stop like its supposed to. something has gotta be upside down or something in thereand im in the progress of putting the bike together how i want it and get the engine started so im not gonna take the wheel off for a couple weeks, im workin on the carbs now then the engine gaskets gas oil, check the suspension and take it back apart for paint so somethin is backwards in there i just dont know what
Hoosier Daddy
Earache my eye...
Yes, now that you explained it that way it seems right, the brakes apply more forward than backwards. pushing the tire is no resistance and they should "stop" the tire. Backwards they may not. I think the proper term (if I remember right) is "Self Energizing Brakes" for the forward motion makes the shoes rock forward and grab more, gives better braking.
I thought you were riding it when it locked up... : :-[
I thought you were riding it when it locked up... :
:-[jessejamez
1983 Suzuki GR650X
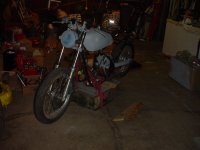
ENGINE IS GOING BACK TOGETHER NICELY.. THEY SENT ME PARTS FOR THE WRONG CARBS SO I HAVE TO RETURN THEM AND GET THE RIGHT ONES I HAVE THE BIKE HOW I WANT IT SO NOW IM GONNA STRIP AND PRIME THE FRAME THEN START PAINTING EVERYTHING AND PUTTING THE BIKE TOGETHER FOR THE FINAL TIME! IM GOIN WITH MATTE BLACK AND LIGHT GREEN PAINT SCHEME I THINK ATILL NOT CERTAIN ON THAT BUT I KNOW IT WILL BE MATTE BLACK AND SOMETHING ELSE, I HAVE LOTS OF VYNIL STICKERS TO MAKE A REALLY COOL PAINT JOB
Attachments
jessejamez
1983 Suzuki GR650X
Hoosier Daddy
Earache my eye...
Plans to paint the side covers or polish them?
jessejamez
1983 Suzuki GR650X
im not sure about the tool box ill probly put it on with a few "just incase" tools ya know? im goin to MMI in pheonix and this is the only vehicle im bringin so I really need it to be trustworthy which hopefully it will be with the only 724 miles i bought it with, im just a little worried about the electric, im gonna spend extra time on that and check all connections, maybe buy some new connectors for quick trouble shooting im really hoping the rectifier doesnt go out on me.. u said u have a GR what were your first problems and at how many miles? should i do the recommended sprocket change?
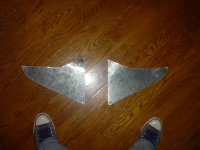
the side panels r getting a vynil sticker fully covering them, they r made from the same stuff as THE STREET SIGNS SO NO RUST, and they r getting the same vynil as on a street sign! lol awesome huh? ill post the pictures ive chose for the panels. (city on left panel, kurt cobain on right panel)
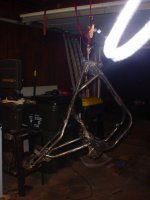
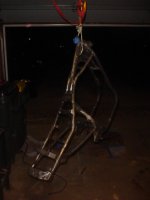
im going to start stripping the frame paint/rust today and the other parts I didnt get too before i did a practice build to see where everything would go and how i wanted it. its REALLY light in weight now so i hope i added atleast 20hp, i took off around 50 lbs for sure!
im still choosing a COLOR SCHEME AND AM OPEN FOR SUGGESTIONS!! im gonna use rustoleum rattle can for sure. and so far im thinking matte black and gloss light green. links to colors r below.
i still need a starter selanoid cover REALLY BAD any suggestions? IT LOOKS LIKE IM GONNA BE FABBING MY OWN WHICH IS NOT AS EASY AS I THOUGHT IT WOULD BE AND IM TERRIBLE AT EBAY.
THE FUSE BOX COVER IM MISSING ALSO BUT NOT AS HARD TO COVER. ILL PUT SOME HEAVY PLASTIC AROUND IT LOL GOTTA DO WHAT I GOTTA DO TO MAKE THIS BIKE RELIABLE.
http://www.rustoleum.com/CBGProduct.asp?pid=354
http://rustoleum.com/CBGProduct.asp?pid=25
the side panels r getting a vynil sticker fully covering them, they r made from the same stuff as THE STREET SIGNS SO NO RUST, and they r getting the same vynil as on a street sign! lol awesome huh? ill post the pictures ive chose for the panels. (city on left panel, kurt cobain on right panel)
im going to start stripping the frame paint/rust today and the other parts I didnt get too before i did a practice build to see where everything would go and how i wanted it. its REALLY light in weight now so i hope i added atleast 20hp, i took off around 50 lbs for sure!
im still choosing a COLOR SCHEME AND AM OPEN FOR SUGGESTIONS!! im gonna use rustoleum rattle can for sure. and so far im thinking matte black and gloss light green. links to colors r below.
i still need a starter selanoid cover REALLY BAD any suggestions? IT LOOKS LIKE IM GONNA BE FABBING MY OWN WHICH IS NOT AS EASY AS I THOUGHT IT WOULD BE AND IM TERRIBLE AT EBAY.
THE FUSE BOX COVER IM MISSING ALSO BUT NOT AS HARD TO COVER. ILL PUT SOME HEAVY PLASTIC AROUND IT LOL GOTTA DO WHAT I GOTTA DO TO MAKE THIS BIKE RELIABLE.
http://www.rustoleum.com/CBGProduct.asp?pid=354
http://rustoleum.com/CBGProduct.asp?pid=25
Attachments


jessejamez
1983 Suzuki GR650X
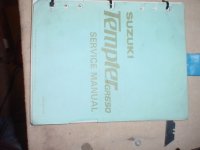
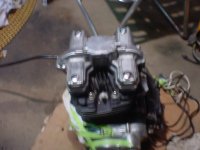
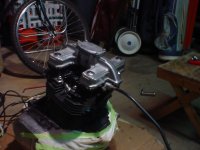
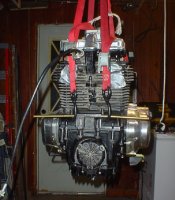
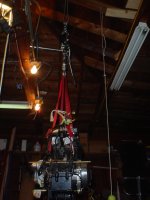
HERES THE ENGINE ALL PUT TOGETHER WITH NEW GASKETS AND GASKET SEALER/MAKER, THREAD LOCK, AND TORQUED TO SPECIFICATIONS. (THANK GOD FOR THE SERVICE MANUAL BIG RICH SAVED ME $70 AND MY DIGNITY WITH THIS BUIL I OWE 75 PERCENT OF THIS BUILD TO HIM AND I CANT THANK HIM ENOUGH) WHICH WERE GONNA TURN OVER AND CHECK COMPRESSION ON TONIGHT! AND I FINALLY BOUGHT A ACTUAL 6 TON ENGINE LIFT WHICH U CAN SEE IN THE PICS. WHEN WE OPENNED UP THE CARBS I NOTICED WHY THE BIKE ONLY HAD 724 MILES ON IT. YOU CAN TELL SOMBODY WAS WORKING ON IT THE LEFT CHOKE IS SHAVED DOWN, THE LEFT FLOAT IS BENT IN, BUT WE FOUND THE PROBLEM RIGHT AWAY AND Y IT SAT IN A BARN FOR 20 SOME YEARS, THE MAIN NEEDLE VALVE UNDER THE FLOATS HAS AN OBLONG SHAPED HOLE WHICH IM GUESSING CAME STRAIGHT FROM THE FACTORY. LUCKY FOR ME, UNLUCKY FOR THE YOUNG OWNER BEFORE ME WHO DIDNT WANT TO SPEND MONEY ON NEW NEEDLE SEATS... THE CARB KEPT TAKING IN GAS AND FLOODING SO HE THOUGHT THE CHOKE WAS STINKING OR THE FLOATS WERE STUCK IT ALL DAWNED ON ME WHEN MY DAD SPOTTED THE OBLONG HOLE UNDER THE NEEDLE. ALL TOGETHER THIS BIKE IS GOIN TO COST ME ABOUT $900 AND ITS ONLY GOT 724 MILES ON IT( I CAN TELL BECAUSE ITS GOT ORIGINAL TIRES AND BRAKE PADS AND EVERYTHING). DAMN I GOT LUCKY AND ITS NEVER BEEN TITLED ( I FOUND OUT FROM A FRIEND WITH CONNECTIONS WITH THE CHICAGO POLICE, THEY RAN THE VIN FOR ME THANK GOD, AT FIRST I THOUGHT I WAS SCREWED ON THE TITLE) SO I AM ALSO GONNA BE THE FIRST LICENSED/TITLED OWNER (YES I BOUGHT IT WITH NO TITLE AND GOT SOOO LUCKY) LOL. THIS IS MY FIRST STREET BIKE EVER AND I GOT TOO DAMN LUCKY! ITS GONNA BE SICK WHEN IM DONE IVE PUT MY SWEAT AND BLOOD INTO THIS BUILD AND I REALLY WANT IT TO BE A TOP NOTCH HEAD TURNER/PANTY DROPPER LOL FINGERS CROSSED
Attachments
kwazykid
Been Around the Block
I've had my GR less than a year. My dad bought it for me along with another for him. Mine was in pretty good shape when I got it. A little engine work and it has been great. I haven't gone on any super long trips with it though, Max 200-250 miles at a time. If you really want to know about GR's talk to Big Rich (which it looks like you've already done) or go to http://gr650.messageboard.nl/forum/index.php. That's a really great resource for all things GR, it's kinda dead right now but there's lots of useful info.
Hope that helps! Engine looks great btw.
Hope that helps! Engine looks great btw.
jessejamez
1983 Suzuki GR650X
ya i filled her up with oil last night and hooked it up to the new battery i bought and man it was cranking real nice, u could feel the compression coming out of the spark plug holes like crazy! so now its on to stripping and priming the frame and a couple other little parts, clean up the engine and maybe put some paint high heat paint on that. and put it in the frame, my next picture will be painted parts, then an engine in a frame
jessejamez
1983 Suzuki GR650X

jessejamez
1983 Suzuki GR650X
i started with aircraft stripper in the tough spots where i couldnt sand and it worked great when i coated it on thick but then when i got all the hard spots with the stripper i switched to hand sanding and roughed up the paint. btw dont mind the ghosts in the picture lol i have no idea what that is