Follow along with the video below to see how to install our site as a web app on your home screen.
Note: This feature may not be available in some browsers.
We noticed you are blocking ads. DO THE TON only works with community supporters. Most are active members of the site with small businesses. Please consider disabling your ad blocking tool and checking out the businesses that help keep our site up and free.
detailing, detailing..part satin black part stainless.
You know when you cut the access hole slightly off where it should have gone and then have to dick about ovalling it out?.........that!
An hour or so on the swingarm and it came out close to what I wanted......clean but not overly polished. A session on the bugger tomorrow should have it looking spick n span
Just some of the materials I used included.
RAL 7036 grey is incoming along with more U-Pol Acid8 etch. Hope to be assembling next weekend...watch this space
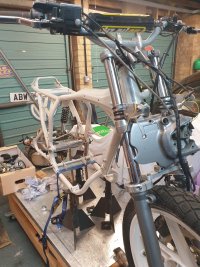
Frame is now painted, swingarm installed along with front end and oil tank carrier.
I missed a spacer for the lower head bearing race which meant the yoke contacted the headstock....bugger, had to knock out the race again and insert the spacer. All stitchedbup now. Good progress so far.
Engine is back from Andy my neighbour with the kicker tension coil spring relocated, hoping it'll stay put this time....I fancy kicking it once in a while
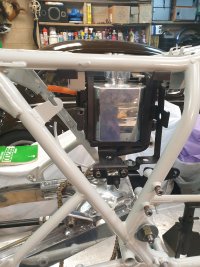
Rear brake master gubbins installed and tarted up with dome nut, I like the look.
Managed to run the flexi and brake light loom through an opened up loop, neatly deals with both runs.
Shaping up....I'm really liking the light grey frame, looks sharp against the black n shiny
That's the RD350LC Microns cleaned up good enough to slot onto the GT200 modified port mounts.
Really didn't want to overdo restoring, being as they're in good used nick.....just a bit of surface rust, wire brushed and treated with WURTH Rust Converter.
Then a good go on the black enamel with Autosol and Silvo on the semi-shiney end cans.
They bear the signs of a previous life which i want to keep.
Got to have a bush made up 19o/d x11.8mm i/d made up...unless I can find some thickwall steel tube, for the rear brake pedal pivot. Also, have a couple of tophat spacers turned shorter on the rear axle....so the rear wheel can be installed....but not before I prime the oil pump first. Lots to do
20 days since the painted frame was ready to build up.
Today was a good day. Matthew, my son came up to finalise the electrics, modify the loom, add a shut off relay for the handlebar run/stop switch as well a re-run the loom around the frame.
Everything works!!
Got the engine fired up too...yay! It's running up too fast, but tweeking the carbs/throttle will see it behave.
Rear wheel in and will tighten so the R clip will sit nicely, but chain could do with a link removing.
I couldn't resist throwing the bodywork on just to get a look
Still a good few jobs to do.....thanks for checking in.
Thanx, got a lot done today. I couldn't have done it without my lad taking on the electrics.
Exhaust brackets to be made for the rear. I fancy the tube with open ends style.
Quite pleased with how my hotch-potch footpeg/brake pedal/master cyclinder/reservoir set up worked out.
Now you see it....
Nothing too conventional but perfectly serviceable I hope? I'm not entirely 100%on the blue reservoir pipe routing but routing inside the subframe put it a little too close for comfort to the swingarm travel....a possible shear scenario.
...now you don't. Ignore the ropey wire on the battery...soon to be remade.
Well, I think my plan for a rear exhaust mount worked out OK.
Managed to shoehorn in the front guard too. Shaped the Delrin spacers I had made to follow the contour of the modified ex CBX front guard into something simple but effective...I hope.
I've not discounted the idea of a small mud flap if the spray is too agressive.
The flat matt black is raw WURTH stonechip.....it marks up easily, so I may give it a coat of regular matt black....or leave it
From this POV it looks a touch high, but viewed from above it sits fine.
Headlight unit to install next....need to rejig/connect the speedo idiot light loom into a 6way connector and tidy/tape the rest.
This site uses cookies to help personalise content, tailor your experience and to keep you logged in if you register.
By continuing to use this site, you are consenting to our use of cookies.


")