69 Honda CL450 Scrambler Restoration

jchek779

Leave the gun. Take the cannoli.
Hey Guys,

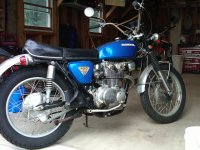
I'm Jay and I have a motorcycle problem. I've been lurking for years and have finally started my first vintage bike project - 1969 Honda CL450 Scrambler.

Background - I was given this bike over 5 years ago. From what I can gather, this bike hadn't been on the road since the late 70's, but sat in this guys garage the whole time. Once I brought it home, it sat around in the shed the past few years while I remodeled a house, raced motocross, and worked on my hot rod. I didn't have anything major lined up for the winter months, so I decided to lay into this bike. I'd love nothing more than to chop/cut this bike all up, but it's just too 'together' for me to 'get to work'

The Plan - Since 95+% of this bike is original, I'm going to restore as much of the original components as possible, while making some finish upgrades where I see fit (powder coat frame, etc). The chrome has the typical surface rust and corrosion, and much of the aluminum is hazed with oxidation. Nothing a little elbow grease can't fix. The tank has a minor dent, but I think a paintless dent removal place can handle it.

Here we go...
 

Attachments

  • IMG00006-20100812-1515.jpg
    IMG00006-20100812-1515.jpg
    647.5 KB · Views: 582
Before starting the teardown, I put oil in each of the cylinders and was able to roll it over with the kickstarter. I was pretty happy to find 150psi of compression in each cylinder, but had no spark. I ordered a set of Emgo universal coils, plug wires, and a condenser and was able to get spark on both sides. I made a quick coil mount to locate the coils in approximately the stock location. I'm not 100% happy with the outcome, and plan to readdress this later on.

The carbs didn't have gas in them and cleaned up fairly easily in a couple of steps using Amsoil foaming carb cleaner.

The tank had some fuel left in it - it came out glowing orange and smelled like varnish. The good news is, only spotty surface rust as viewed from the gas cap inwards. I've tried to use rust dissolver and a length of chain to clean it up as best I can. There is still some surface rust in a few spots.
 

Attachments

  • 2012-09-26_18-19-54_158.jpg
    2012-09-26_18-19-54_158.jpg
    1.4 MB · Views: 522
  • 2012-12-14_10-28-41_578.jpg
    2012-12-14_10-28-41_578.jpg
    469.2 KB · Views: 507
I spent last Friday peeling the entire bike apart. This went fairly smooth - I bagged and labeled all of the fasteners as I went and methodically knocked this thing out. I spent a good part of Saturday degreasing parts of the bike, and Sunday was used to clean up the chrome. I love the trick of using aluminum foil and water to clean the corrosion and rust off of chrome.

The frame, swingarm, center stand, and all the other black steel parts were dropped off at a local powder coater on Monday. I won't have much time to work on the bike due to the holidays, so the 10 day lead time on the PC work is fine with me.

My next plans are to knock the motor apart to inspect and rebuild where necessary, rebuild the forks with new oil and seals, and to keep polishing chrome and aluminum.

There was a lot of grease and grime under the front sprocket cover. I thought I had read somewhere that these things have a chain oiler that uses crankcase lube on the chain? I'm guessing it can be plugged to prevent the mess it created. I have no problem lubing the chain on my own. Does anyone have any info on this?
 

Attachments

  • 2012-12-14_14-17-36_501.jpg
    2012-12-14_14-17-36_501.jpg
    904 KB · Views: 459
Wow - nice bike and great start!

I'm not an expert on that engine, but you might also find a leaky shifter rod seal and/or leaky clutch pushrod seal which are often both on the left side of the engine near the countersprocket.
 
Finally got back to the bike yesterday. With the frame and other steel parts at the powder coater, I'm working on polishing and cleaning the rest of the bike.
Yesterday I laid into the forks. The snap rings were slightly corroded into place, so some whacks with a hammer and drift were required to get them free. Following that, I used a golf club shaft to prevent the bottom-out cone from spinning while removed the M6 machine screw from the bottom of the fork leg.

The lower fork tubes were corroded and pitted. I started the polishing process with 180 grit to remove the pitting, then 220-320-400-800-1000-and finally 1500. I followed the 1500 up with Mothers Mag and Aluminum polish. I'm pretty happy with the results. I wasn't after a mirror finish - just looking to restore the legs to clean and straight. There are plenty of threads on polishing steps, so I'll save the progression photos. The 2nd shows the contrast between 1500 and the final polish with the mothers m+a. I really like the satin look left at 1500, and will likely employ that on my next custom build.

I'm short on time today, but will be looking to get the forks complete on Tuesday.
 

Attachments

  • 2012-12-30_08-38-00_562.jpg
    2012-12-30_08-38-00_562.jpg
    1.1 MB · Views: 461
  • 2012-12-30_11-32-27_212.jpg
    2012-12-30_11-32-27_212.jpg
    997.3 KB · Views: 452
Made some more progress today - I got the forks buttoned up and started on the engine disassembly.

The fork rebuild was pretty straight forward. I used some masking tape and a 10mm socket + extension to get the bottoming cone back in the outer fork tube. I cut a thin plastic bag and wrapped that around the upper end of the fork stanchion to prevent any seal damage. Some oil on the damper, leg, and plastic bags and grease on the bushing/seal lip got things ready to go together. I tapered down the end of some 1.5" PVC with the DA and some 80 grit to fit inside the outer tube and drove the seals deep enough to expose the snap ring groove.

I didn't add any oil because I've come across 2 different oil volume specs - I've read in some forum posts that 165cc goes in each leg, but the service manual I downloaded is calling for 235cc - Any ideas on which is right?

I also got into the engine. I started by soda blasting the complete engine. I made new intake boot gaskets with no through hole to plug off the intake, along with expansion plugs and some silicone in each ex port and the starter opening. The 34oz siphon feed media blast gun from Harbor Freight turned out to work really well. The 20oz gravity feed just blew baking soda around. The inline dryer was absolutely necessary. After a rinse off and blow dry, the engine was up on the bench ready to be torn down.

I'm at the point that the cam chain needs to be broken. After striking out at the local bike shop (out of stock), I landed a chain break tool at HF. Some quick mods and it should be able to do the job first thing tomorrow morning.
 

Attachments

  • 2013-01-02_13-30-25_423.jpg
    2013-01-02_13-30-25_423.jpg
    986.4 KB · Views: 456
  • 2013-01-02_12-28-05_707.jpg
    2013-01-02_12-28-05_707.jpg
    1.4 MB · Views: 458
  • 2013-01-01_15-45-10_872.jpg
    2013-01-01_15-45-10_872.jpg
    1 MB · Views: 413
I tore into the engine this morning. Things went pretty straight forward.
I have attached a few pics of the chain break tool I bought at Harbor Freight last night. Some simple modification with the cut off wheel and I was in business. I had to shorten the pin to get the entire tool inside the intake cam opening, as well as grind a relief in the receiving end to better encompass the chain link on the opposite side. It did damage the adjacent chain link, but it didn't matter since I'll be replacing the cam chain any way. For riveting the new master link, I plan to grind a slight taper into the pin.

As far as the engine goes, things seem to look pretty good and as expected. The pistons and cylinders don't have any vertical scoring - I'm hoping a hone and new std rings will get me up and running again. I did notice that a portion of the comp rings on 1 piston was collapsed, but I was planning to re-ring it to begin with.

I didn't plan on taking the valves out and doing a valve job, but after the cyl head failed the acetone test, I'll be doing a complete rebuild on the head (which I should have any way).

Now that I can feel my toes again, I'm back out to the garage to split some cases.

edit - the pic of my cylinders makes them look horrible. They're not that bad!!
 

Attachments

  • 2013-01-03_10-47-01_411.jpg
    2013-01-03_10-47-01_411.jpg
    569.5 KB · Views: 409
  • 2013-01-03_10-56-54_191.jpg
    2013-01-03_10-56-54_191.jpg
    1.9 MB · Views: 415
  • 2013-01-03_12-33-19_119.jpg
    2013-01-03_12-33-19_119.jpg
    1.4 MB · Views: 423
  • 2013-01-03_12-13-57_8.jpg
    2013-01-03_12-13-57_8.jpg
    1.7 MB · Views: 448
I finished tearing down the engine this morning. I have amassed a handful of special tools from all of the bikes and sleds I've worked on through the years. I have a few flywheel pullers and a 17mm socket that I milled to remove the balance shaft nut on Honda 4t MX engines. Nothing I had "in stock" would fit the bill, but I lucked out last night and was able to score the flywheel puller and oil filter nut socket at my local dealer in stock!

The rings were pretty frozen on the clutch side piston, and the circlip on the mag side piston had the opening at the install relief in the piston. This could have been a big issue had I decided to start this engine before tearing it down. In all the moto and snowmobile motors I've built, I always install the circlips with the opening facing up, that way at BDC (fastest deceleration) the circlip mass is already centralized at the bottom of the groove.

To yank the flywheel and oil filter, I used a trick that came in handy working on Honda CRF450R motocross engines - I cut the edges off a penny and slide it between the next meshing teeth of the primary and clutch gears. The copper is soft enough that it doesn't harm the gear teeth and typically wedges itself in there so that it stay pretty well put until you're ready to remove it.

The cases split pretty easy. I was removing the shift drum bearing retainer (last screw in the case) and my impact driver bit crumbled and wrecked the Phillips slots in the screw. A quick slot made with the dremel and a 1-1/2" cut off disk and I was back in business with the impact.

The easy part is now done. Now it's time to get this stuff C.L.E.A.N. and start buttoning it back up. I'm going to find a local machine shop to see if they can hone the cylinders for me. Following that, I'll order some new rings and get to slamming this beast back together.
 

Attachments

  • 2013-01-04_14-02-40_694.jpg
    2013-01-04_14-02-40_694.jpg
    1.6 MB · Views: 413
  • 2013-01-04_11-40-04_609.jpg
    2013-01-04_11-40-04_609.jpg
    1.5 MB · Views: 440
  • 2013-01-03_16-13-38_532.jpg
    2013-01-03_16-13-38_532.jpg
    1.5 MB · Views: 430
  • 2013-01-03_14-47-22_557.jpg
    2013-01-03_14-47-22_557.jpg
    1.5 MB · Views: 421
I worked on the bike for a large part of Saturday, but don't really have much to show for it. I was able to clean and soda blast the engine cases, foot peg hinges, exhaust pipe collars, and a few other small parts. It was 100% humidity and my water trap really couldn't keep up, but for the most part, the siphon feed blast gun worked pretty good. I also got around to prepping and painting the engine cases using dupli-color cast aluminum high temp paint.
 

Attachments

  • 2013-01-12_12-22-05_325.jpg
    2013-01-12_12-22-05_325.jpg
    1.4 MB · Views: 412
  • 2013-01-12_14-59-48_610.jpg
    2013-01-12_14-59-48_610.jpg
    983.5 KB · Views: 392
  • 2013-01-13_14-00-40_138.jpg
    2013-01-13_14-00-40_138.jpg
    989.2 KB · Views: 427
Looking good so far! I love the restoration / resto-mod threads, so I'm on board.
 
Made slight progress last night before the temps sank into the 20's and froze me out of the garage.
The carbon build up on the ex valves was so tough that the wire wheel on my drill wouldn't touch it. I soaked them in vinegar for 2 days and that was enough to soften the carbon up that the wire wheel would remove it. Following that, I was able to lap in my valves. The only trouble I had was the lapping stick I have wouldn't stick to the ex valves. Some 1/4" fuel hose on the valve stem did the trick though.
It's a great feeling to start getting moving in the opposite direction and have something coming together rather than coming apart. I have all I need to start getting the motor back together now and should make good progress this weekend.
 

Attachments

  • 2013-01-17_19-14-31_688.jpg
    2013-01-17_19-14-31_688.jpg
    1.2 MB · Views: 406
  • 2013-01-17_20-09-24_196.jpg
    2013-01-17_20-09-24_196.jpg
    1.2 MB · Views: 419
Unfortunately, I don't have a lot of progress to report. It's been pretty cold in the mornings here, so I haven't been getting out into the garage much. I brought all of my dull/corroded aluminum parts in the house and I've been wet sanding in my spare bathtub. Then I'll head out in the garage and polish/buff with my cordless drill and 3-1/2" buffing wheels. It's not ideal and by no means am I after a show shine, but they'll look good going down the street at 40mph. The attached pic makes things look a lot more dull than they really are. You couldn't check your hair in the cam caps, but they'll shine enough for you to floss your teeth.

I'm picking up my new piston circlips and rings today from my Honda dealer. That should be everything I need to get the engine back together.
 

Attachments

  • 2013-01-21_18-35-07_771.jpg
    2013-01-21_18-35-07_771.jpg
    549.8 KB · Views: 390
NBraun said:
Looks like your getting some good progress. How do you like those blasting guns?

The siphon feed gun worked great for shooting baking soda. That's what I've used on everything so far. It should be noted though, that those abrasive blast guns use A LOT of air. I have a 30 gal compressor and it runs non-stop when shooting.
 
I'm not 100% sure if the surface of these covers is the clear coat coming apart, or if it's pitting from oxidation. I laid a few coats of aircraft paint stripper on these but it didn't seem to make a bit of difference. What I do know is it's a bitch to sand through. 80 grit sandpaper was a workout trying to cut through this stuff, and even then I couldn't work the sandpaper into all of the nooks and fillets in these covers and around the bolt holes. Over the past few days, I've spent just as much time trying to figure out how not to have to hand sand these parts as I have sanding them. What I found was that a carbon steel brush and a brass brush turning 40,000 RPM in a dremel makes pretty quick work of this stuff and gets in and around the bolt holes. The resulting surface finish ends up being able to clean up with 220 grit sandpaper.

Here's some things to note if you follow this technique. Wear safety glasses and a large face shield. Steel wires come flying off that brush and embed themselves in your skin. Arms, legs, face, and neck. A mess is going to be made. I'd suggest doing this outside of the garage (or in your spare bathroom where its warm this time of year like I'm doing).

Here's a before and "in-progress" shot after working the wire brush with the dremel.
 

Attachments

  • 2013-01-24_18-30-00_666.jpg
    2013-01-24_18-30-00_666.jpg
    1.4 MB · Views: 352
  • 2013-01-24_18-30-10_857.jpg
    2013-01-24_18-30-10_857.jpg
    1 MB · Views: 355
I don't have a whole lot of progress to report again. I spent the majority of my weekend trying to figure out polishing aluminum. I hand sanded everything in steps up to 800 grit, then got on my new buffer. The black rouge was like taking a spotlight and shining it on every 80 or 100 grit scratch that I failed to sand out. I have some 150/220/320 grit greaseless polishing pastes coming my way. Hopefully, this will do the job of cleaning up any remaining sandpaper scratches in the covers.

I started working on engine reassembly as well. I got the kickstarter mechanism installed, then moved on to the shift drum, tranny, and crank. My new EK 219H timing chain came to me as an endless chain...it wasn't a big deal grinding 2 pin rivets off and punching out the pins, but I was aggravated by the principle of having to cut up a chain that cost $40. I'm almost over it...

I was ready to put the case halves together last night, but realized that I was out of stock of M6 pan head bolts to keep the windage tray in place. So I quit what I was doing and went in the house to have a beer.

Should get going again tonight and really start making progress.
 

Attachments

  • 2013-01-21_18-35-58_345.jpg
    2013-01-21_18-35-58_345.jpg
    848.3 KB · Views: 347
  • 2013-01-30_18-07-04_89.jpg
    2013-01-30_18-07-04_89.jpg
    1.4 MB · Views: 363
  • 2013-01-30_17-59-23_788.jpg
    2013-01-30_17-59-23_788.jpg
    1.4 MB · Views: 350
Here's something I wanted to share with you guys real quick - I used to leave my Dremel and associated arbors/bits in the box the dremel came it. It used to piss me off when I had to fish around the bottom of a box for whatever bit I was looking for. I grabbed some of the green foam that faux flower displays are set in from Wal-Mart for about $2 along with a rubbermaid container for another $2, and Viola! - A dremel/bit container to keep things organized.
 

Attachments

  • 2013-01-30_18-06-49_138.jpg
    2013-01-30_18-06-49_138.jpg
    1.3 MB · Views: 359
Back
Top Bottom