
We noticed you are blocking ads. DO THE TON only works with community supporters. Most are active members of the site with small businesses. Please consider disabling your ad blocking tool and checking out the businesses that help keep our site up and free.
You are using an out of date browser. It may not display this or other websites correctly.
You should upgrade or use an alternative browser.
You should upgrade or use an alternative browser.
'73 CB250 - Doing it right this time round.
- Thread starter Green199
- Start date
tweakedlogic said:Just upgrade your regulator so it doesn't get cooked. As long as you don't need a starter, or leave the lights on for a long time, your good.
Oh ok....I have upgraded my rectifier from the shit selenium one to a bridge one, but will look into a new reg. I have the dimensions, just need to check there is enough room under there!
")
firebane said:To mount your airfilters make sure you use metal tubing with rubber clamps. I ran some rubber tubing on my bike and anytime you would throttle up the rubber tubing just collapsed!
Did you have any supports? I was planning on running rubber, and having metal supports to hold the rubber in place....or Ill start looking for metal tubing too.

Thanks maritime...its not perfect, but by the time I ride it get it dirty and inevitably spill petrol on it, atleast I wont be annoyed I ruined a £200+ paint job...just a £30 one haha.
Yet again I seem to have finished the looks side before getting it finalised and running...Can not get my head around this bloody wiring!
Yet again I seem to have finished the looks side before getting it finalised and running...Can not get my head around this bloody wiring!
Maritime
Over 10,000 Posts
LOL, I know it is hard to do the get it run before you make it pretty, I managed it with the CX but Barely. Not sure if they have the 2K clear in a rattle can on your side of the pond but I used that on the CX and it is like glass and fuel won't hurt it. You need to where coveralls and googels and a respirator to spray it though. Toxic shit, but holy hell it is good clear coat.
Maritime said:LOL, I know it is hard to do the get it run before you make it pretty, I managed it with the CX but Barely. Not sure if they have the 2K clear in a rattle can on your side of the pond but I used that on the CX and it is like glass and fuel won't hurt it. You need to where coveralls and googels and a respirator to spray it though. Toxic shit, but holy hell it is good clear coat.
I kind of wish I bought the 2kstuff to be honest. I ended up getting some petrol resistant lacquer which was meant to be gloss, and is just nothing of the sort. Its more satin now, which is not what I wanted.
Ill give it a look and see if it will be able to go over the top. I used acrylic paint and lacquer, so not sure if 2k is for enamel or not.
I may just leave it, the satin helps to hide a few of the dents (im really poor at bodywork!! haha) and im guessing if it was gloss they would show much easier.
I may just leave it, the satin helps to hide a few of the dents (im really poor at bodywork!! haha) and im guessing if it was gloss they would show much easier.
axeugene27
Over 1,000 Posts
I would clear over it with the spray 2k wet sand down to 2ooo grit get some basic rubbing compound and a cutting wheel for your drill. Just did my titan tank it turned out great 2nd time using 2k first time i just left it and it looked good but some inconsistencies this time looks great. Try wetsanding the laquer (have to be careful with your decals though if they aren't cleared over) and then cutting with a compound
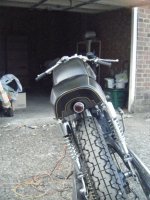
Heres a few more of the paint.
The paint really isnt perfect, neither is the bodywork...but hey ho.
<img src="http://imageshack.us/a/img94/7435/q19v.jpg" alt="Image Hosted by ImageShack.us"/>
<img src="http://imageshack.us/a/img543/4602/1ryw.jpg" alt="Image Hosted by ImageShack.us"/>
<img src="http://imageshack.us/a/img43/6498/dhme.jpg" alt="Image Hosted by ImageShack.us"/>
<img src="http://imageshack.us/a/img802/8862/qt8m.jpg" alt="Image Hosted by ImageShack.us"/>
<img src="http://imageshack.us/a/img849/3629/1z23.jpg" alt="Image Hosted by ImageShack.us"/>
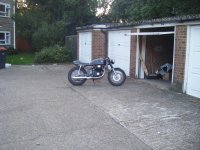
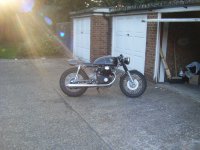
Heres a couple with the tank just resting on the frame before I put it on properly.
<img src="http://imageshack.us/a/img41/5158/hcby.jpg" alt="Image Hosted by ImageShack.us"/>
<img src="http://imageshack.us/a/img853/4617/qyqs.jpg" alt="Image Hosted by ImageShack.us"/>
<img src="http://imageshack.us/a/img600/6066/sphm.jpg" alt="Image Hosted by ImageShack.us"/>
<img src="http://imageshack.us/a/img543/3452/xrk7.jpg" alt="Image Hosted by ImageShack.us"/>
<img src="http://imageshack.us/a/img196/648/3lo7.jpg" alt="Image Hosted by ImageShack.us"/>
<img src="http://imageshack.us/a/img10/4373/vxbr.jpg" alt="Image Hosted by ImageShack.us"/>
Maybe a return of the fairing in the very distant future! haha
<img src="http://imageshack.us/a/img802/9288/in4y.jpg" alt="Image Hosted by ImageShack.us"/>
The paint really isnt perfect, neither is the bodywork...but hey ho.
<img src="http://imageshack.us/a/img94/7435/q19v.jpg" alt="Image Hosted by ImageShack.us"/>
<img src="http://imageshack.us/a/img543/4602/1ryw.jpg" alt="Image Hosted by ImageShack.us"/>
<img src="http://imageshack.us/a/img43/6498/dhme.jpg" alt="Image Hosted by ImageShack.us"/>
<img src="http://imageshack.us/a/img802/8862/qt8m.jpg" alt="Image Hosted by ImageShack.us"/>
<img src="http://imageshack.us/a/img849/3629/1z23.jpg" alt="Image Hosted by ImageShack.us"/>
Heres a couple with the tank just resting on the frame before I put it on properly.
<img src="http://imageshack.us/a/img41/5158/hcby.jpg" alt="Image Hosted by ImageShack.us"/>
<img src="http://imageshack.us/a/img853/4617/qyqs.jpg" alt="Image Hosted by ImageShack.us"/>
<img src="http://imageshack.us/a/img600/6066/sphm.jpg" alt="Image Hosted by ImageShack.us"/>
<img src="http://imageshack.us/a/img543/3452/xrk7.jpg" alt="Image Hosted by ImageShack.us"/>
<img src="http://imageshack.us/a/img196/648/3lo7.jpg" alt="Image Hosted by ImageShack.us"/>
<img src="http://imageshack.us/a/img10/4373/vxbr.jpg" alt="Image Hosted by ImageShack.us"/>
Maybe a return of the fairing in the very distant future! haha
<img src="http://imageshack.us/a/img802/9288/in4y.jpg" alt="Image Hosted by ImageShack.us"/>
LONG UPDATE ALERT:
Ok, been tinkering over the last few days and figured a few things out.
To attach the rear of the seat, I am going to Jb weld some nuts onto the holes already drilled into the seat pan. I will then simply bolt the seat to this, securing it at the rear as the front is already secure.
I was looking at using some dzus fasteners, or other forms of quick release fasteners but this seems the easier option. Plus I could then use the stainless allen head sockets ive used throughout the bike tying it all together.
I had also discovered that my new oem honda cable does not thread into my universal throttle housing. It is also massively too long so I need to shorten it, and then I can hopefully fit it into the throttle housing I have.
<img src="http://imageshack.us/a/img197/4482/1wo0.JPG" alt="Image Hosted by ImageShack.us"/>
<img src="http://imageshack.us/a/img69/4475/9ibs.jpg" alt="Image Hosted by ImageShack.us"/>
While I was doing this, I realised that the clip ons extend a bit far out, in other words, they are too long. So I started to move them in.
<img src="http://imageshack.us/a/img94/3364/wuz3.jpg" alt="Image Hosted by ImageShack.us"/>
There. Looking better already.
Then ran into a problem with the right hand side.
<img src="http://imageshack.us/a/img841/2176/hf1l.jpg" alt="Image Hosted by ImageShack.us"/>
<img src="http://imageshack.us/a/img706/5752/r1aq.jpg" alt="Image Hosted by ImageShack.us"/>
The master cylinder will not pass the mounting brackets for the clip ons. I was thinking I could either get a new master cylinder and brake assembly which would fit, or make a shim to just push the master out 1mm or 2, just allowing it to pass the bracket when I slide the bar through.
I was talking to Sonreir and Maritime about my wiring, and my plans for an on/off switch for the running light while im starting the bike. They mentioned running the switch to basically interrupt the earth for this.
I did notice that my ignition had 4 wires, red, black, and 2 browns...the browns had been cut by the po and heat shrinked. This is meant to be for the running lights, so im going to extend that to the switch and run it off the hotside.
So at least I have now figured my wiring out....just have to do it now! haha
<img src="http://imageshack.us/a/img96/3000/4vc0.jpg" alt="Image Hosted by ImageShack.us"/>
....
Also, I really really really really need to sort my rear sets.
The shift side is fine, doesn't hit anything and is comfortable.
<img src="http://imageshack.us/a/img17/8185/4qa6.jpg" alt="Image Hosted by ImageShack.us"/>
<img src="http://imageshack.us/a/img209/3596/p9jv.jpg" alt="Image Hosted by ImageShack.us"/>
But the brake side is not.
There is no way really of using the lever I have without moving it somewhere else. Its too low so basically just ends up resting on the silencer.
<img src="http://imageshack.us/a/img9/2606/36vg.jpg" alt="Image Hosted by ImageShack.us"/>
I could make a riser or something to move it up and a tad back but dont think it will be very comfy.
The position for the actual peg is comfy, and has no trouble clearing the kickstarter....its just the bloody lever....and the linkage.
<img src="http://imageshack.us/a/img716/6089/6oay.jpg" alt="Image Hosted by ImageShack.us"/>
Re: '73 CB250 - Need electrical help!
So I finished my loom and installed it. I connected a 12v battery to it to see if I could get any form of life from the ole girl but nothing happened.
I thought I had probably screwed up the loom somewhere, so I moved on to just seeing If I could get a spark at all.
Connected the points, condenser, and the coils together as they should, then connected the coils to 12v.
I opened the points with a screwdriver to see if they would spark. I thought they were meant to spark as soon as they open, so the spark jumps the gap. but that doesnt happen. Instead, I only get a spark from the points when they open completely up, and the bottom 'piece' touches the cam bit in the middle. Is this right?
With this setup, if I ground the spark plugs and kick her over, I get no spark from the plugs or the points. Can anybody please give me some help or advice. Perhaps ways to troubleshoot if my components are working, or even if its set up right.
Cheers, Charlie.
Ok, I just tested the coils to try and trouble shoot this problem.
Left Coil
+ to - : 4.9 Ohm
+ to HT lead (With 5k Ohm resistor cap installed): 14.3k Ohm
- to HT lead (With 5k Ohm resistor cap installed): 14.3k Ohm
Right Coil
+ to - : 5.4 Ohm
+ to HT lead (With 5k Ohm resistor cap installed): 27.1k Ohm
- to HT lead (With 5k Ohm resistor cap installed): 27.1k Ohm
It should be noted that the positive wires for both coils are joined into 1 connector, which is where the reading was measured from. I'm not sure whether this affect anything or not.
Ok, I guess I had a short somewhere.
I stripped all of the components off of the bike, cleaned connections and mounting points, and then put them back on the bike.
I get a spark at the plugs when I physically open the points the entire way with a screwdriver, but still not when I try to kickstart it.
The moving part of the point has to open fully up and touch the centre cam (which presses the heel of the point to open it) for it to spark. Is this right? And if so, why do I not get a spark when I try to kick it over?
Majorly need some help on this guys! Cheers.


