We noticed you are blocking ads. DO THE TON only works with community supporters. Most are active members of the site with small businesses. Please consider disabling your ad blocking tool and checking out the businesses that help keep our site up and free.
You are using an out of date browser. It may not display this or other websites correctly.
You should upgrade or use an alternative browser.
You should upgrade or use an alternative browser.
'73 CB250 - Doing it right this time round.
- Thread starter Green199
- Start date
xb33bsa said:if you have the clutch off and rotating the shafts it should catch gears easily
have you tried jut rotating the drum somehow other than the shift shaft ?
It looks like its struggling to catch gears because the mechanism doesn't rotate the 'star' drum enough with each shift.
ok the make sure that the drum is seated in a detent before a shift
also tryin to rotate the drum manually it should rotate with pretty low resistace once past the detent ball pocket
did you look at the detent ball and spring ? try pulling that out then the drum should rotate real easy
also tryin to rotate the drum manually it should rotate with pretty low resistace once past the detent ball pocket
did you look at the detent ball and spring ? try pulling that out then the drum should rotate real easy
xb33bsa said:ok the make sure that the drum is seated in a detent before a shift
also tryin to rotate the drum manually it should rotate with pretty low resistace once past the detent ball pocket
did you look at the detent ball and spring ? try pulling that out then the drum should rotate real easy
I make sure its 'clicked' into position which i'm guessing the drum seating in the detent.
Then when I try and shift it it doesn't reach the next detent.
I can rotate the drum manually relatively easily, but it doesn't seem to rotate that much. It only seems to rotate around 1/3 of a turn until it stops.
I have loosened the detent ball, but not fully removed it because I don't have a magnet to remove the ball.
If the amount of rotation seems ok, could it be the pins which sit behind the 'star'?
it could be the pins behind the star are very loose or worn
is the issue when shiffting up as well as down a gear ?
you can make a take the clutch pushrod or similar piece of steel rod and magnetize it but you really dont need to pull the ball out just remove the detent bolt dealy it should really loosen up the drum
process of eleminatiion
is the issue when shiffting up as well as down a gear ?
you can make a take the clutch pushrod or similar piece of steel rod and magnetize it but you really dont need to pull the ball out just remove the detent bolt dealy it should really loosen up the drum
process of eleminatiion
xb33bsa said:yes but it has a roller engaging that star
Ahhh got ya, the one on the rear side of the retainer.
Yeah the roller is fine, doesn't look worn and isnt loose.
I think it is something to do with the shift drum. I have a load of oil leaks so what I think I may do is pull the engine and have a proper look inside. Will allow me to replace some gaskets and check gasket surfaces too. I can then double check the bottom end and get it all working right on the bench, then whack it back in.
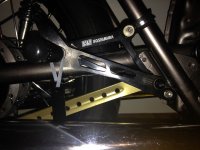
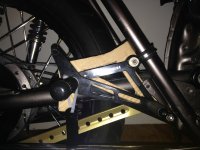
In the meantime ive done a bit of Cardboared Aided Design, and got some drafts for a number plate bracket, and some weld-on rear set mounts to replace the ones I have P-clipped on now.
I plan to have the brackets welded on (which have an extra arm to allow my exhaust bracket to mount to it), and just use the actual footpegs and arms from my current set up.
Anyone have any input to the thickness I should have them in to provide enough support?
Attachments
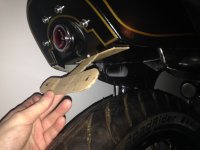
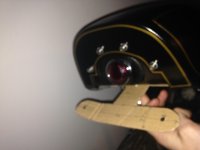
Got the brackets refined and passed them off to a friend to get them cut out for me!
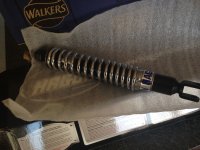
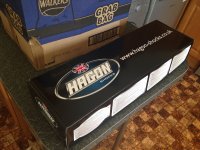
Soon I'll get that motor out and check the entire bottom end out. But in the meantime, whilst I was sat in the garage I noticed the rear had gotten a lot softer recently somehow, so I dropped the bomb on these!
Soon I'll get that motor out and check the entire bottom end out. But in the meantime, whilst I was sat in the garage I noticed the rear had gotten a lot softer recently somehow, so I dropped the bomb on these!
Attachments
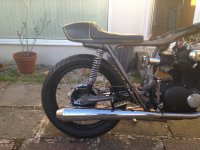
Certainly are. Really itching to get this done and dusted now, but I there's still just a few things to sort out. They look frigging awesome on the back though!
Ordered some PJ1 paint to repaint my engine in while I have it out to sort the gear issue. The one I originally used is shit!
Once that's done, it should just be welding the pieces I am having cut out on, sorting the cables out and then just the brake linkage and she's good to go!
Maybe a bit more powderwork in there too! haha
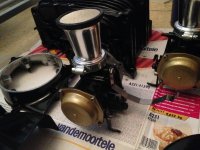
So while I wait, I just tidied up my coil setup as it was a bit ratty again!
Ordered some PJ1 paint to repaint my engine in while I have it out to sort the gear issue. The one I originally used is shit!
Once that's done, it should just be welding the pieces I am having cut out on, sorting the cables out and then just the brake linkage and she's good to go!
Maybe a bit more powderwork in there too! haha
So while I wait, I just tidied up my coil setup as it was a bit ratty again!
Attachments
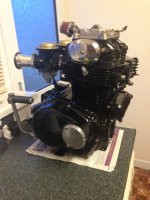
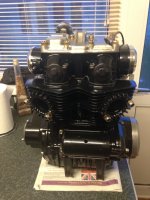
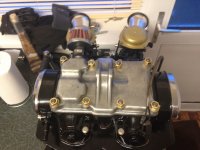
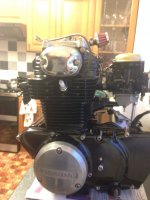
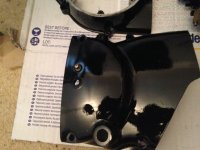
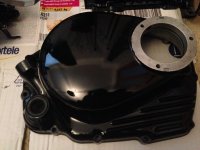
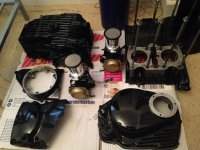
So, while I had the bottom end apart to sort the shifting issue I thought I'd repaint the motor. The original paint was very soft and chalky, and being matt black showed every single bit of dirt and oil etc.
Got some PJ1 gloss paint and have been respraying it in my homemade booth. Had to make it out of leftovers but it blocked any wind and dust etc. The paint goes on easy and looks pretty good. Cured it with a heat gun so im hoping its as petrol resistant as I have read online.
I haven't been able to locate the shifting issue, everything seemed ok during disassembly, so im thinking it could be the pins behind the star mechanism on the shift drum. That or the shifting arm. I'll check the spring etc during a dry build.
Attachments
settintrendz
Adam Berg
Lookin real good. Nice and clean. Great lines.
You mentioned some pages back that you got the rearsets from a shop there in the UK if I recall correctly. Also that they had a couple of issues with holes or something. They look decent. Are they not genuine Yosh units? A knock off?
You mentioned some pages back that you got the rearsets from a shop there in the UK if I recall correctly. Also that they had a couple of issues with holes or something. They look decent. Are they not genuine Yosh units? A knock off?
settintrendz said:Lookin real good. Nice and clean. Great lines.
You mentioned some pages back that you got the rearsets from a shop there in the UK if I recall correctly. Also that they had a couple of issues with holes or something. They look decent. Are they not genuine Yosh units? A knock off?
Thanks! I've been checking in on your build. You've got some great fabrication skills!
They were cheap knock offs from a company called CarbonMoto. They aren't too bad, but the countersink for the footpeg bolt is in the wrong side. No real issues as I actually plan on replacing the mounting brackets with some different steel ones to be welded on. The arms and pegs will be used though!
xb33bsa said:the bike looks real pretty !! those screened stacks will not work though, you will lose way to much power and besides letting your engine eat dirt is not a good idear
You've mentioned this to me before xb33bsa! ;D
I've got some foam filters to replace the screen on the backburner til the engine is together, and a plate of plexiglass is going between the rear frame downtubes to act as a mudguard!
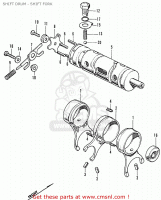
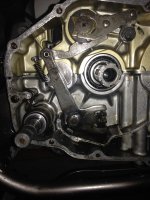
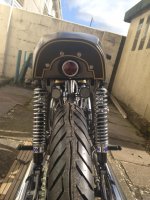
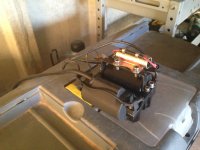
Right. I do believe I have sorted my shifting issue. Looks like I was missing the spacer for the roller mechanism (number 10 in the picture below).
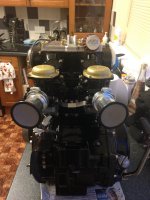
Pulled it from my spare engine and installed it, and it now shifts through all the gears. So the motor is now back together with the new paint, and some new brass and stainless hardware throughout.
Pulled it from my spare engine and installed it, and it now shifts through all the gears. So the motor is now back together with the new paint, and some new brass and stainless hardware throughout.