We noticed you are blocking ads. DO THE TON only works with community supporters. Most are active members of the site with small businesses. Please consider disabling your ad blocking tool and checking out the businesses that help keep our site up and free.
You are using an out of date browser. It may not display this or other websites correctly.
You should upgrade or use an alternative browser.
You should upgrade or use an alternative browser.
'74 CB360 cafe project - (New clutch springs and back to analog gauges.)
- Thread starter 3DogNate
- Start date

axeugene27
Over 1,000 Posts
Re: '74 CB360 cafe project (de-funking stage)
nice polishing work man i know how time consuming that stuff can be but i admire that alot of guys just paint those covers. I painted my engine case black but am already regretting it black shows every knick. I will prob strip it down and repaint it at some point. engine is looking stellar though look forward to see what you come up with here.
nice polishing work man i know how time consuming that stuff can be but i admire that alot of guys just paint those covers. I painted my engine case black but am already regretting it black shows every knick. I will prob strip it down and repaint it at some point. engine is looking stellar though look forward to see what you come up with here.
3DogNate
"You Meet the Nicest People on a Honda"
'74 CB360 cafe project (de-funking stage)
Luckily I have a monster 14" pedestal buffer to cut some of the work down. I just wet sanded the covers with 400 then 600 grits and went straight to the buffer through 3 grades of compound. I'll likely get the engine wrapped up this week and then get onto the frame and seat next.
Sent from my iPad using Tapatalk HD
Luckily I have a monster 14" pedestal buffer to cut some of the work down. I just wet sanded the covers with 400 then 600 grits and went straight to the buffer through 3 grades of compound. I'll likely get the engine wrapped up this week and then get onto the frame and seat next.
axeugene27 said:nice polishing work man i know how time consuming that stuff can be but i admire that alot of guys just paint those covers. I painted my engine case black but am already regretting it black shows every knick. I will prob strip it down and repaint it at some point. engine is looking stellar though look forward to see what you come up with here.
Sent from my iPad using Tapatalk HD
3DogNate
"You Meet the Nicest People on a Honda"
Re: '74 CB360 cafe project (de-funking stage)
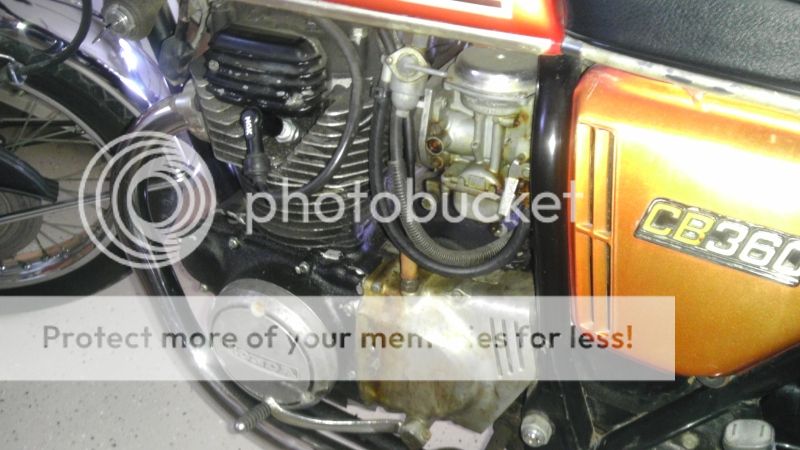
The covers on the left side weren't so bad to do. The right side is a huge pain in the butt, mine had a lot of pitting and a few scars. I had to work with files, a dremel and start sanding with 120 grit and work up from there... I worked a few hours yesterday on it. I'm gonna finish it with 600 grit and a buff tonight. I want to be sure that when people see my bike that they "know" I put the needed work in the right places... and didn't skimp on money or labor. (Though I'm being careful not to just throw money at it. Even if it feels like it.
CB360TON said:I’m on fence polished or powder coated engine covers.
Polished is preferred, a lot of work that comes with polishing is not.
The covers on the left side weren't so bad to do. The right side is a huge pain in the butt, mine had a lot of pitting and a few scars. I had to work with files, a dremel and start sanding with 120 grit and work up from there... I worked a few hours yesterday on it. I'm gonna finish it with 600 grit and a buff tonight. I want to be sure that when people see my bike that they "know" I put the needed work in the right places... and didn't skimp on money or labor. (Though I'm being careful not to just throw money at it. Even if it feels like it.
Re: '74 CB360 cafe project (de-funking stage)
Exactly the problem I had. I ended up with paint after spending hours trying to get them smooth enough to even consider polish. I'm still pleased with the way they came out, too.
3DogNate said:The covers on the left side weren't so bad to do. The right side is a huge pain in the butt, mine had a lot of pitting and a few scars. I had to work with files, a dremel and start sanding with 120 grit and work up from there... I worked a few hours yesterday on it. I'm gonna finish it with 600 grit and a buff tonight. I want to be sure that when people see my bike that they "know" I put the needed work in the right places... and didn't skimp on money or labor. (Though I'm being careful not to just throw money at it. Even if it feels like it.
Exactly the problem I had. I ended up with paint after spending hours trying to get them smooth enough to even consider polish. I'm still pleased with the way they came out, too.
axeugene27
Over 1,000 Posts
Re: '74 CB360 cafe project (de-funking stage)
you have a bench grinder? it really wasn't too bad at all polishing my covers the left covers look great on your bike man is the right cover that bad>
you have a bench grinder? it really wasn't too bad at all polishing my covers the left covers look great on your bike man is the right cover that bad>
3DogNate
"You Meet the Nicest People on a Honda"
Re: '74 CB360 cafe project (de-funking stage)
I actually do not have a bench grinder... Not really a fan of them. I use a belt/disc sander as a grinder and have a big dedicated 14" pedestal buffer for polishing. I keep saying that I need to pickup a bench grinder and just install wire wheels though...
I would have had the left side done in an hour if it were'nt for the pitting. My bike wasn't the best maintained bike before I got it... The pitting wasn't that noticeable until I started polishing... then the pitted parts just looked like dark spots... So then I had to get after that. Plus there are a lot of ithght curves (which is exactly where most of the pitting was located.) I am polishing the right side cover form my spare engine. The one that is on the good engine might be in better condition but I did not remove it yet... as I figured I'd just remove the old and replace it with the polished one in a single sitting.
Nothing wrong with paint as long as it's done well. Your engine looks GREAT...Sonreir said:Exactly the problem I had. I ended up with paint after spending hours trying to get them smooth enough to even consider polish. I'm still pleased with the way they came out, too.
axeugene27 said:you have a bench grinder? it really wasn't too bad at all polishing my covers the left covers look great on your bike man is the right cover that bad?
I actually do not have a bench grinder... Not really a fan of them. I use a belt/disc sander as a grinder and have a big dedicated 14" pedestal buffer for polishing. I keep saying that I need to pickup a bench grinder and just install wire wheels though...
I would have had the left side done in an hour if it were'nt for the pitting. My bike wasn't the best maintained bike before I got it... The pitting wasn't that noticeable until I started polishing... then the pitted parts just looked like dark spots... So then I had to get after that. Plus there are a lot of ithght curves (which is exactly where most of the pitting was located.) I am polishing the right side cover form my spare engine. The one that is on the good engine might be in better condition but I did not remove it yet... as I figured I'd just remove the old and replace it with the polished one in a single sitting.
axeugene27
Over 1,000 Posts
Re: '74 CB360 cafe project (de-funking stage)
I think if you got a bench grinder and polished with it you would quickly become a fan of them. ;D
I think if you got a bench grinder and polished with it you would quickly become a fan of them. ;D
3DogNate
"You Meet the Nicest People on a Honda"
Re: '74 CB360 cafe project (de-funking stage)
3/4 hp 3400 rpm Baldor motor with 2.5:1 reduction for 1350rpm / 1.8hp at the wheel.
I'll take a picture... 8)
Oh, I've had several over the years and they don't get much use at my shop... I end up giving them away to friends. I don't have one out of preference.axeugene27 said:I think if you got a bench grinder and polished with it you would quickly become a fan of them. ;D
crazypj said:A 14" polisher probably has a 2hp+ motor, much better than a bench grinder
carbs are on the way, I sent tracking number
3/4 hp 3400 rpm Baldor motor with 2.5:1 reduction for 1350rpm / 1.8hp at the wheel.
I'll take a picture... 8)
axeugene27
Over 1,000 Posts
Re: '74 CB360 cafe project (de-funking stage)
i just see you making the tim the tool man grunting noise with that comment
i just see you making the tim the tool man grunting noise with that comment


axeugene27
Over 1,000 Posts
Re: '74 CB360 cafe project (de-funking stage)
bow down that thing is wicked,
bow down that thing is wicked,
3DogNate
"You Meet the Nicest People on a Honda"
'74 CB360 cafe project (de-funking stage)
Nah, it's quite smooth operating.. .just don't present an edge to it.
I build custom guitars for a hobby... The buffer is for buffing out guitar finishes... It just happens to be awesome for metal too.
crazypj said:That's scary looking, you could loose an arm if something got caught
Nah, it's quite smooth operating.. .just don't present an edge to it.
axeugene27 said:bow down that thing is wicked,
I build custom guitars for a hobby... The buffer is for buffing out guitar finishes... It just happens to be awesome for metal too.
3DogNate
"You Meet the Nicest People on a Honda"
'74 CB360 cafe project (de-funking stage)
Piston rings came today.
Installed and starting to get back together.
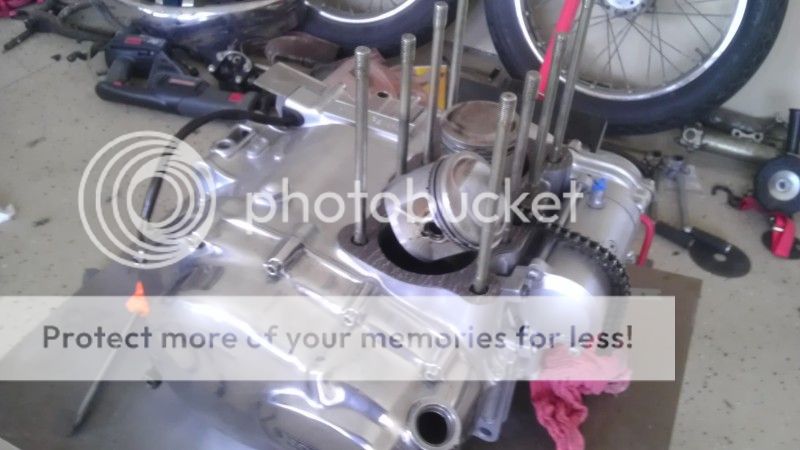

My valve spring compressor came today. I'm gonna remove the valves and get that casting cleaned up and ready for paint after grilling some bacon cheddar burgers.
Piston rings came today.
Installed and starting to get back together.
My valve spring compressor came today. I'm gonna remove the valves and get that casting cleaned up and ready for paint after grilling some bacon cheddar burgers.
3DogNate
"You Meet the Nicest People on a Honda"
Re: Re: '74 CB360 cafe project (de-funking stage)
Yes, I made sure that I kept them oriented
A bit of blue thread locker on the threads. The soda blaster is just an airgun and bit of hose... Nothing worth showing. I'm sure I'll slip a shot in eventually.
crazypj said:Check springs before you take them out, they have a top and bottom
Yes, I made sure that I kept them oriented
trek97 said:everything is lookin super so far. did you use a drop of sealant or anything on those stainless bolt threads...stainless is the worst about galling w aluminum.
lets see some pics of the homemade soda blaster.
A bit of blue thread locker on the threads. The soda blaster is just an airgun and bit of hose... Nothing worth showing. I'm sure I'll slip a shot in eventually.


