Follow along with the video below to see how to install our site as a web app on your home screen.
Note: This feature currently requires accessing the site using the built-in Safari browser.
We noticed you are blocking ads. DO THE TON only works with community supporters. Most are active members of the site with small businesses. Please consider disabling your ad blocking tool and checking out the businesses that help keep our site up and free.
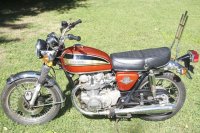
I'm guessing it's time to start a thread. Picked this bike up in October for $650. Couple dings and dents as well as some surface rust on all the chrome. Came with a title from original owner so I was going home with it no matter what. The guy started it and it sounded a little choppy so at least I knew that much. He noted that it would need the swingarm bushings replaced.
I'm going to list it here in the cafe section but I plan on keeping the original tank, covers, and seat until it's up and running again. After that I'll look into the proper tank and tail. I'm flip flopping on the final product because of all the awesome things I've seen members of this site do.
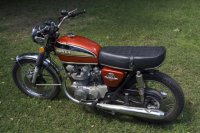
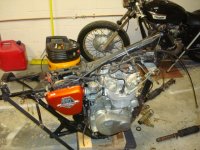
1st pic is right off the trailer. 2nd is after losing the sissy bar and some other dead weight.
Of course, after getting it back home it was impossible to start. I did manage to get it going a couple times and although it ran like ass, I circled the yard. 2 things...the swingarm had MAJOR play and when I turned left the throttle pegged wide open...holy crap!
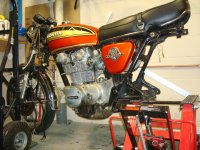
I'm about a month or so into the tear down. Found a few things I wasn't excited about but nothing that can't be rectified.
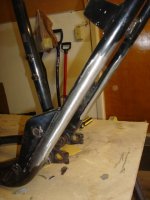
First, after I removed the swingarm I found out that the pivot shaft collar was MISSING. That explains the ridiculous sway in the rear. Thank god I didn't take this thing down the road. Bought a swingarm off a 360 just to get the collar but could possibly use it to get a lower stance.
Forks are bent so I'll make a call to Forking by Frank for those...1" under maybe?
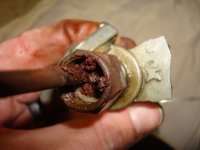
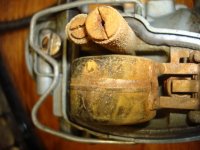
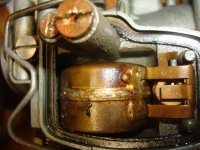
Also found out why it didn't want to run. Check the nastiness in the petcock.
Tank had the typical rust inside...here we go!
This is the first time I've taken a bike all the way down. Was surprised at how quick it was. More evidence as to why the bike didn't want to run. One carb was bone dry and the other had a mangled float.
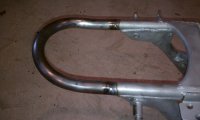
Moving along with the big stuff. I decided to cut the rear footrest mounts off. I definitely didn't want to use them as rear sets so I didn't think they would be useful for anything else. Also cut the rear of the frame off under the seat. I didn't want to attempt to bend steel for a loop so I picked one up at DCC.
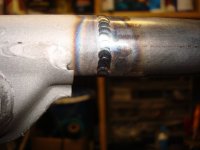
A friend of a friend was able to TIG it up and it came out ridiculously perfect.
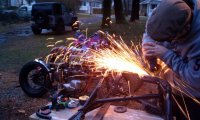
I blasted the frame at a different friend of a friend's. All the other bits I am blasting in my new Harbor Freight jobber. Works great so far and at 179.99 out the door you can't beat it. The wheels are disassembled so I need to get them painted/powdercoated...
Damn... that looks way better than the one I fabbed. I should have spent the cash on the one from DCC and then made friends with a guy with a TIG welder.
Damn... that looks way better than the one I fabbed. I should have spent the cash on the one from DCC and then made friends with a guy with a TIG welder.
I made the decision to buy after my buddy cut the loop off a Triumph frame to use as a doner. It was smaller diameter tube and a much bigger radius. We cut the middle out to get it to fit and I started to get a little nervous about the end result. I kept thinking that if I end up with a true cafe tail I would want the loop to look nicey-nice.
You and me both. This guy took a class at the local vocational school and got one of those certifications. His teacher saw he had the skills and told him about a welding job available at BASF so that's what he does now. He makes some pretty sick bicycle frames right now, we're trying to get him to fab a jig to do motorcycle frames!
Those welds look delicious. I really envy you guys that can work outside in February. 8 degrees outside as I type with the windchill hovering around -20. Have I mentioned I hate Ohio?
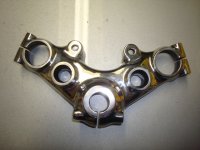
Oh mama! Learning how to polish. This is just with the emery cake. All of the aluminum is in decent shape so I can't wait to get it all cleaned up. Stainless spokes and nips on the way from Buchanan's and I'm dropping off the frame and hoops tomorrow for powdercoat. I'm apprehensive about using powder on the frame because I think down the road I might do a mod which would require some grinding but I gotta move forward.
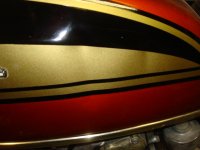
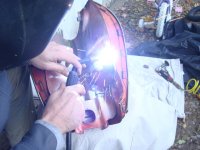
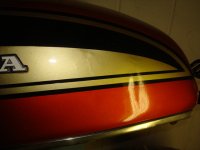
So my tank had these 2 dents in it with a slight crease, not drastic but just enough that I couldn't pop it out with a super suction cup. Also attempted to slide a prybar wrapped in a towel and cinched with duck tape in there to force it out but I couldn't avoid pressing on the filler neck. So I decided to just neatly open the tank from the underside just enough to access the dents. Worked for the most part. There's still a slight deformation and the decal/stripe suffered a bit but I had to get this far anyway if I ever want to bondo and paint it. Had a friend weld it up and I did the whole POR15 dance the next day. Hard to tell in the pics maybe but came out real nice..
how did you purge the tank to keep it from exploding... i'm gonna be doing some tank welding(if life ever gets out of the way) & was just wondering what you did... thanx.
how did you purge the tank to keep it from exploding... i'm gonna be doing some tank welding(if life ever gets out of the way) & was just wondering what you did... thanx.
My friend asked me that too when I told him to weld the sucker back up. After I told him I had already shot showers of sparks in there from cutting he fired up the mig. We were lucky, that's it.
how did you purge the tank to keep it from exploding... i'm gonna be doing some tank welding(if life ever gets out of the way) & was just wondering what you did... thanx.
This site uses cookies to help personalise content, tailor your experience and to keep you logged in if you register.
By continuing to use this site, you are consenting to our use of cookies.

")


