
You may also find that you can put the business end of a grease gun into the brake line fitting and force the piston out. Doing it with compressed air has always given me the jitters, but I try not to use high-caliber popguns in the shop.
We noticed you are blocking ads. DO THE TON only works with community supporters. Most are active members of the site with small businesses. Please consider disabling your ad blocking tool and checking out the businesses that help keep our site up and free.
You are using an out of date browser. It may not display this or other websites correctly.
You should upgrade or use an alternative browser.
You should upgrade or use an alternative browser.
CB360 - Monoshock Brat
- Thread starter compoundcycles
- Start date
crazypj
Split personality, I fake being smart
I made a fitting for grease gun to caliper 30+ yrs ago. (used to do a lot of them, particularly as they were almost new at the time ") )
)
Made a new one about 6 months ago as I forgot I had it, then found the original :
Makes life really really easy (so easy it's boring )
a fun way to remove stuck piston (in a real dangerous sort of way) is block up all the holes with bolts and copper washers then heat it up with a propane torch until fluid boils ;D
Piston will travel at least 50 ft or more
7alive, he doesn't ride very hard or would have already found the limitations of running without a fork brace,plus, that pic isn't a 110 tyre on front
BTW, does anyone know which GM car uses the 1.5" phenolic piston? ( I like the idea of lightweight, non corroding, low heat transference brake piston)
)Made a new one about 6 months ago as I forgot I had it, then found the original :
Makes life really really easy (so easy it's boring
) a fun way to remove stuck piston (in a real dangerous sort of way) is block up all the holes with bolts and copper washers then heat it up with a propane torch until fluid boils ;D
Piston will travel at least 50 ft or more
7alive, he doesn't ride very hard or would have already found the limitations of running without a fork brace,plus, that pic isn't a 110 tyre on front
BTW, does anyone know which GM car uses the 1.5" phenolic piston? ( I like the idea of lightweight, non corroding, low heat transference brake piston)
Re: Re: CB360 - Monoshock Brat
None that i know of, but there is a guy over in SOHC4 that is turning them down from Toyota pistons. I bought two and they are perfect and only about $30.
crazypj said:BTW, does anyone know which GM car uses the 1.5" phenolic piston? ( I like the idea of lightweight, non corroding, low heat transference brake piston)
None that i know of, but there is a guy over in SOHC4 that is turning them down from Toyota pistons. I bought two and they are perfect and only about $30.
compoundcycles
Been Around the Block
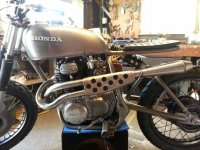
I was getting excited about fabbing up a leg guard for the exhaust. I got this far then did the rest in photochop. After seeing this I'm leaning towards fully wrapping the pipes instead of going with a guard. Any thoughts? Would wrapping the headers give me much better performance with the 2 into 1?
Attachments

M
maduncle
Guest
I love the leg guard - do it!
Really suits the mad scrambler look of the bike.
You might want to do more holes and a bit smaller though.
Really suits the mad scrambler look of the bike.
You might want to do more holes and a bit smaller though.
MJPriceisright
Coast to Coast
damn dude that guard looks awesome, agreed, smaller holes, but go for it!
JustinLonghorn
No Purple Hearts, No Blue Ribbons
Yep. Go with the guard, sir.
stroker crazy
crazy as a fox
Definitely the guard, definitely smaller holes!
Crazy
Crazy
MotorbikeBruno
Over 1,000 Posts
This thing gets better and better!!!!
compoundcycles
Been Around the Block
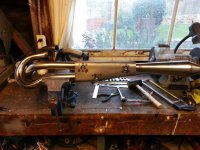
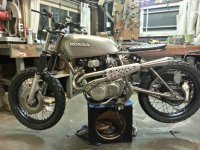
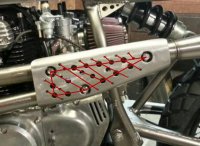
Thanks for the encouragement everyone. It took me nearly all day to finish up the leg guard but I'm pretty happy with it now. I pounded the shape a little thinner towards the end of the exhaust and countersunk the mounts. I kept wasting time in photoshop trying to mock up a hole pattern that looked cool but in the end I just started drilling until it was covered.
Attachments

compoundcycles
Been Around the Block
stroker crazy
crazy as a fox
Way better than wrap!
Crazy
Crazy
7aliveatlast7
the bearded hessian
how did you go about mounting that to the pipes? looks really sick!


