We noticed you are blocking ads. DO THE TON only works with community supporters. Most are active members of the site with small businesses. Please consider disabling your ad blocking tool and checking out the businesses that help keep our site up and free.
You are using an out of date browser. It may not display this or other websites correctly.
You should upgrade or use an alternative browser.
You should upgrade or use an alternative browser.
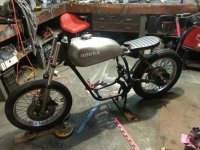
CB360 - Monoshock Brat
- Thread starter compoundcycles
- Start date
compoundcycles
Been Around the Block
7aliveatlast7
the bearded hessian
i'd be willing to wrap the seat for you if you want! pm me when you're ready, i'll give you my address and we'll get it taken care of ") that things gonna look tops when the painted motor is back in.
that things gonna look tops when the painted motor is back in.
that things gonna look tops when the painted motor is back in.compoundcycles
Been Around the Block
7aliveatlast7 said:i'd be willing to wrap the seat for you if you want! pm me when you're ready, i'll give you my address and we'll get it taken care of
That would be awesome. Thanks for the offer. I'll hit you up when I get to that stage.
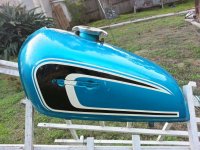
In the meantime here's some Sunday monoshock inspiration. This thing is so flawless.


compoundcycles
Been Around the Block
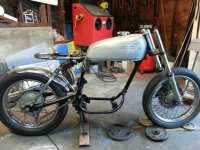
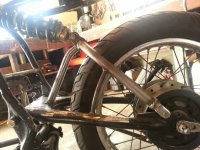
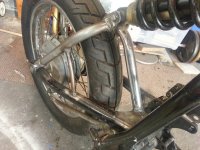
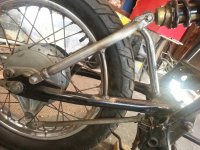
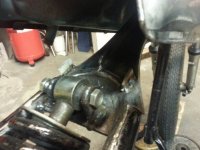
I really wanted to keep the swingarm as clean as possible, without adding extra bracing. The more and more I thought about it...I'd rather be safe than sorry. I used some thinner tubing that would draw less attention and tried to make it follow the lines of the tire. Hopefully when all painted and done it'll look good.
Attachments
MotorbikeBruno
Over 1,000 Posts
I'd say you did a good job, doesn't stick out too crazily. I dig it.
neevo
Over 1,000 Posts
crazypj said:Me too, I like the non-brace brace 8)
Triangulation has effect of making tubes shorter therefore stiffer
Surely that's a good thing PJ... or was that your point?
compoundcycles
Been Around the Block
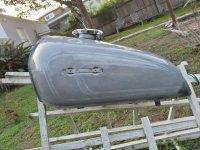
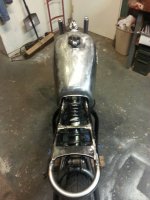
I made a small riser so the rear of the gas tank would barely clear the upper shock mount. Then I welded up two tabs on either side of the riser so it fits snugly into place and won't slide side to side. I think I'm going to try and make some leather straps with buckles that will buckle down either side of the gas tank to the frame. Or maybe using some large snaps would be cool. Just something to keep the rear of the tank from lifting if I roll over a bump.
Started on the tank finish as well. Hit it with first pass of a wire brush, then a coat of wd40 to keep it from rusting overnight. I don't want to go for a mirror finish, just something smooth. Whats the next best step to get rid of swirl marks from wire brushing?
Started on the tank finish as well. Hit it with first pass of a wire brush, then a coat of wd40 to keep it from rusting overnight. I don't want to go for a mirror finish, just something smooth. Whats the next best step to get rid of swirl marks from wire brushing?
Attachments


1969Honda
Been Around the Block
Try an abrasive sponge pad like this http://www1.mscdirect.com/cgi/NNSRIT2?PMAKA=03356532&PMPXNO=1714980&cm_re=ItemDetail-_-ResultListing-_-SearchResultsto get rid of the swirls. We used to use these at an engineering shop I worked for to create the"brushed" look, if you go in the same direction across the whole tank it should look pretty sweet.
compoundcycles
Been Around the Block
Thanks 1969Honda I'll see if I can find one of those locally.
Meanwhile on BikeExif this popped up...

This is totally what I was thinking about to tie down my gas tank...except one on each side.
Meanwhile on BikeExif this popped up...
This is totally what I was thinking about to tie down my gas tank...except one on each side.
compoundcycles
Been Around the Block
Can anyone who's painted their frame before recommend a brand of paint that is durable (rattlecans)? I've used Duplicolor's Wheel Paint on some items before and it seems really durable, problem is that style has a limited color selection. Any brand recommendations would be greatly appreciated. I'd love to see photos of your paint jobs too. Thanks.
nateridesbikes
Been Around the Block
If youre just going to rattle can it use appliance epoxy. Its super durable.
http://www.summitracing.com/parts/RLL-249309/
http://www.summitracing.com/parts/RLL-249309/
compoundcycles
Been Around the Block
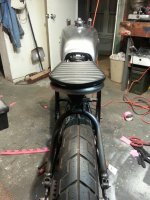
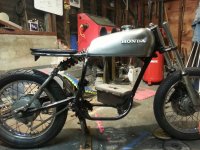
I polished the tank down to a shine similar to the aluminum side covers on the motor. It's covered with Rustoleum Rust Inhibitor in the video that's why it looks wet. It's not the greatest polish job, lots of swirls visible close up from where i tried to hit it with a sanding pad early on. Hopefully in passing it'll look smooth enough. I'll probably coat the underside with something durable and ugly. I think the dents show a little bit of history, that I hopefully won't add to, too much.
http://youtu.be/IErV6lYc-o0
http://youtu.be/IErV6lYc-o0
7aliveatlast7
the bearded hessian
looks nice from here! what's it sitting on though, your zombie apocalypse sheet, haha?
compoundcycles
Been Around the Block
7aliveatlast7 said:looks nice from here! what's it sitting on though, your zombie apocalypse sheet, haha?
Haha, Yep. Leftover shower curtain from Halloween. I thought it might come in handy for spraying things.
compoundcycles
Been Around the Block
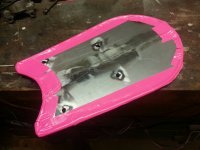
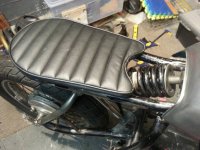
Covered the seat tonight. I'm pretty happy with it as its not far off from what I had in my head. If I was to do it over I would cut the seat pan smaller to sit inside the frame more. It hangs over just a bit too much. I hope it breaks in well.
Attachments
compoundcycles
Been Around the Block
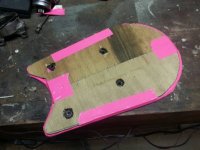
Here's what's inside the seat cover. It screws in from underneath the seat frame through some tapped threads. Metal seatpan on one side, wood on the other so I could stretch and staple the vinyl down.