
We noticed you are blocking ads. DO THE TON only works with community supporters. Most are active members of the site with small businesses. Please consider disabling your ad blocking tool and checking out the businesses that help keep our site up and free.
You are using an out of date browser. It may not display this or other websites correctly.
You should upgrade or use an alternative browser.
You should upgrade or use an alternative browser.
CB360 - Penelope
- Thread starter The Red Wonder
- Start date
The Red Wonder
Been Around the Block
Thanks John!
The carb kit I bought came with a pair of cone K&N...but I have been talking with Steel Dragon guy about making some custom brass velocity stacks...or I might try and tackle those myself")
The carb kit I bought came with a pair of cone K&N...but I have been talking with Steel Dragon guy about making some custom brass velocity stacks...or I might try and tackle those myself
66replica said:Hey man,
I'm running the A123 batteries in my 360. I fired it up for the first time and I don't think it's enough juice. I'm running 4 cells. Just FYI. It runs but not well. Ran much better when I hooked it up to my 7AH lead acid.
This is interesting. How many AH does your 4 cell figure up to? I'm planning on going with an 8 cell.
Juggernaut
Been Around the Block
What a great build! I'll still never understand why you guys put sooooo much work into a 360. Tons of great ideas from this build though.
Juggernaut
Been Around the Block
66replica said:You can only figure that out after you ride it.
CB360's: We're like roaches!
Sounds about right...I'm the exterminator.
Get back on topic! It's is going to be a hot looking bike.
The Red Wonder
Been Around the Block
Hahaha! You guys are funny, and thank you for the compliments.
In other news, I took a Motorcycle Safety course this weekend and got my Motorcycle's License, so that was a big step for this whole thing....now to finish her!
Thanks, I will keep that in mind. Since I bought a 28V pack, it was only half of the battery pack. I have another 4 cells that I could wire in series then wire the two packs in parallel and double the amps, need be. I have seen them run small bikes before so I am not sure what issues you are having. Maybe the cells aren't properly balanced? I don't know.
Sounds about right! I don't want this thing to grow out of control (cough cough...Blake...cough cough...Rocan)....bike focused!
In other news, I took a Motorcycle Safety course this weekend and got my Motorcycle's License, so that was a big step for this whole thing....now to finish her!
66replica said:Hey man,
I'm running the A123 batteries in my 360. I fired it up for the first time and I don't think it's enough juice. I'm running 4 cells. Just FYI. It runs but not well. Ran much better when I hooked it up to my 7AH lead acid.
Thanks, I will keep that in mind. Since I bought a 28V pack, it was only half of the battery pack. I have another 4 cells that I could wire in series then wire the two packs in parallel and double the amps, need be. I have seen them run small bikes before so I am not sure what issues you are having. Maybe the cells aren't properly balanced? I don't know.
Juggernaut said:Get back on topic! It's is going to be a hot looking bike.
Sounds about right! I don't want this thing to grow out of control (cough cough...Blake...cough cough...Rocan)....bike focused!
Juggernaut said:What a great build! I'll still never understand why you guys put sooooo much work into a 360. Tons of great ideas from this build though.
Because its way more fun to be wide open on a smaller bike than blipping the throttle on a big one.
The Red Wonder
Been Around the Block
It has again been a while, but I have just been slowly working away...
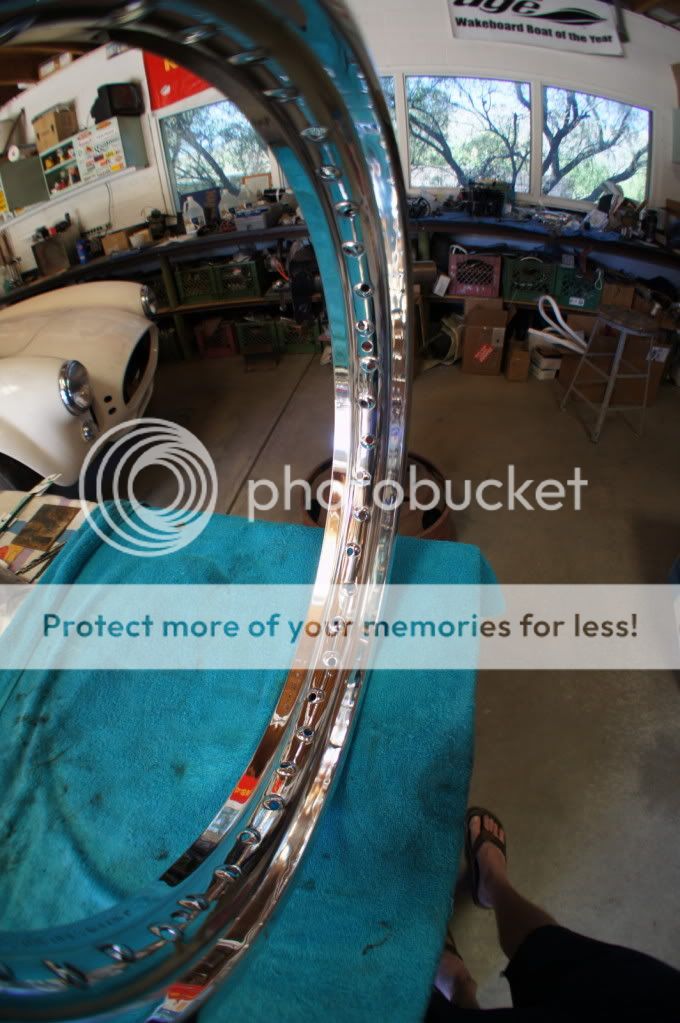
I polished the shiniest thing I've ever made. After about 10 hours of sanding, this is the result:
Aluminum rim on the left (satin like finish)

After


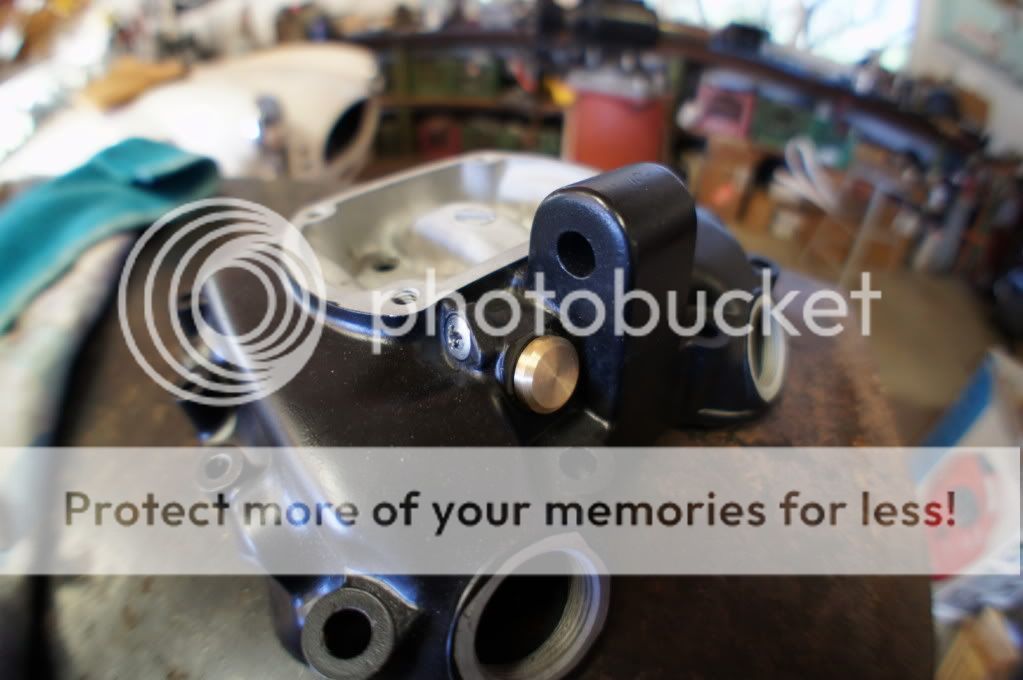
I made a small tachometer block of plug that fits with the internals still inside:

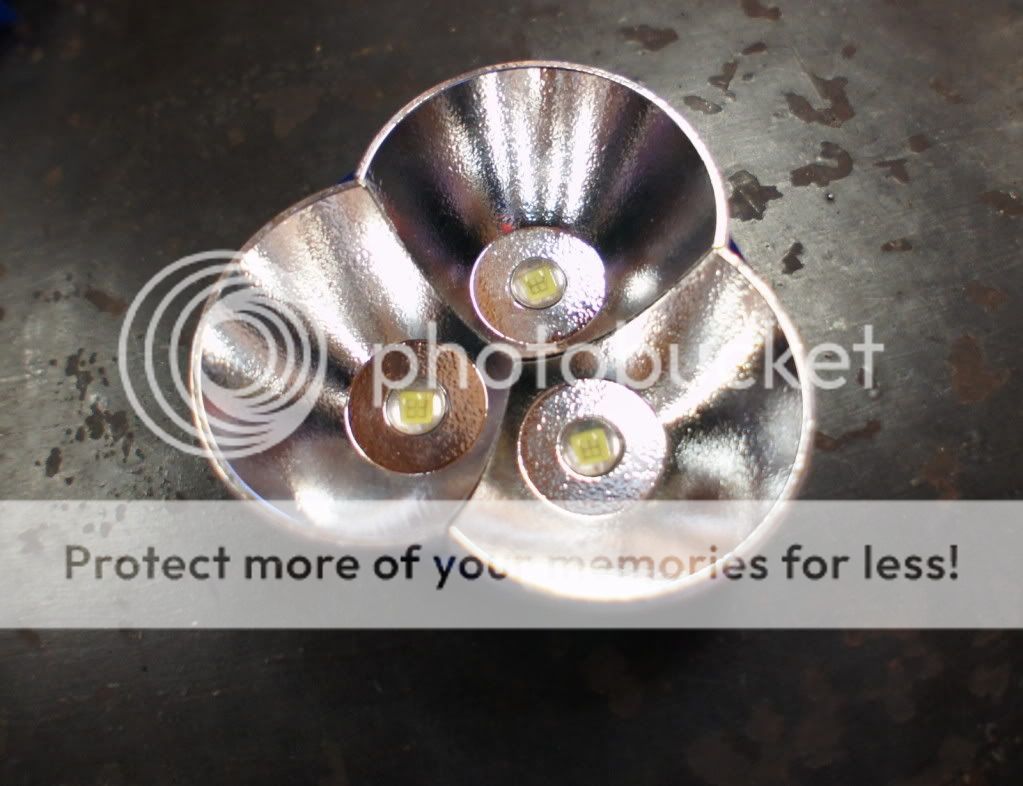
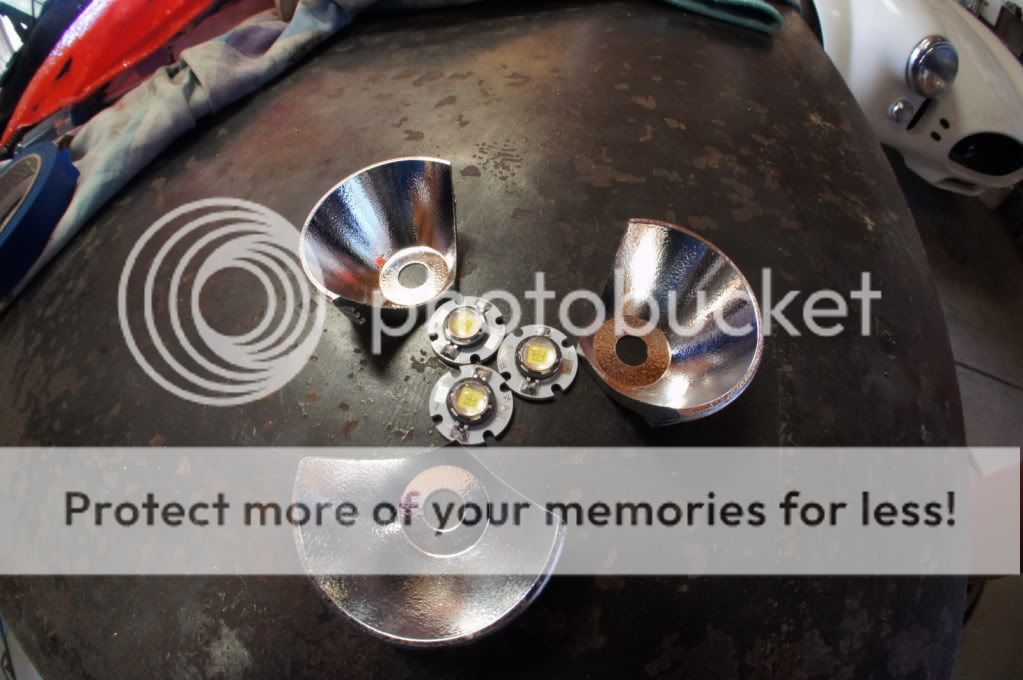
And I started working on the updated headlight. I am going to cut the sealed beam open and these will replace the old halogen bulb. Each of these are capable of putting out 900 lumens at only 2.8 Amps...but I won't be driving them that high as it will create a lot of heat! There will be a disc like piece that these will drop in to and those will fit in to the back of the sealed beam bulb. I milled down the sides of the reflectors so that they could "nest" together:
I went to go put on a tire yesterday and in the process pinched the tube with the tire iron putting a few small holes. I am all about safety, but should I get a new tube or just patch this one up, the holes are tiny and the tube is brand new...thoughts?
Also, I bought a three leg puller yesterday to try and get the stator magnet off so I can remove the starter clutch and gear. The piece that presses against the crankshaft broke off in the threads!!! That is what I get for buying harbor freight tools... I modified it so I could try and pull again, but still the thing hasn't budged! I applied heat to the piece while pulling but still nothing. I left the puller on overnight hoping that it might budge...we'll see. Do you guys have any ideas?
Thanks for looking!
I polished the shiniest thing I've ever made. After about 10 hours of sanding, this is the result:
Aluminum rim on the left (satin like finish)
After
I made a small tachometer block of plug that fits with the internals still inside:
And I started working on the updated headlight. I am going to cut the sealed beam open and these will replace the old halogen bulb. Each of these are capable of putting out 900 lumens at only 2.8 Amps...but I won't be driving them that high as it will create a lot of heat! There will be a disc like piece that these will drop in to and those will fit in to the back of the sealed beam bulb. I milled down the sides of the reflectors so that they could "nest" together:
I went to go put on a tire yesterday and in the process pinched the tube with the tire iron
putting a few small holes. I am all about safety, but should I get a new tube or just patch this one up, the holes are tiny and the tube is brand new...thoughts?Also, I bought a three leg puller yesterday to try and get the stator magnet off so I can remove the starter clutch and gear. The piece that presses against the crankshaft broke off in the threads!!! That is what I get for buying harbor freight tools... I modified it so I could try and pull again, but still the thing hasn't budged! I applied heat to the piece while pulling but still nothing. I left the puller on overnight hoping that it might budge...we'll see. Do you guys have any ideas?
Thanks for looking!
HelthInsXpert
Active Member
You want to sell those tach block off plugs? I'm trying to figure out what to do with mine and if they aren't hard to make I would buy one from you.
kMoto
Been Around the Block
I have ridden, at times, with patched tubes that never gave me a problem. Then again, it's just another something to fail. What I do now days, is patch the tube, throw it in my tool box, then put a fresh one in the wheel. It's always good to have an extra tube to throw in your pack for a long ride.
As far as the stator, I don't think a puller is the best way to get that thing off. The correct tool would be best, but if you wanted to order/buy the tool, you wouldn't have gone to harbor freight. This is what I did, and I know other people have done the same...
The thread on your rear axle is the same as the inside of the stator. Thread it in pretty tight, then give it a good whack with a hammer. The axle should tighten down a little more now. Give it another good whack. A couple of repetitions and it should fall right off. I held my stator w/ a strap wrench from HF to tighten the axle in, but I don't think that's necessary. I think as tight as you could get it holding w/ a glove on, would work.
After removing the starter gears and clutch, I also plugged the oil passage from the stator area into the crankcase with Yamabond (just the gasket sealer I use). That way when you time it, you wont be spraying oil everywhere when the cover's off. Just make sure you don't use something that could potentially break apart or fall into your crankcase and cause problems.
The Red Wonder
Been Around the Block
HelthInsXpert said:You want to sell those tach block off plugs? I'm trying to figure out what to do with mine and if they aren't hard to make I would buy one from you.
You are the second person to ask for one of these...I'll start a new thread and get an order sheet going. I would like to get atleast $30 (shipping included) for each of them, in your choice of brass or aluminum.
kMoto - Thanks for the info. I was thinking the same thing on the tube...$13 is cheap compared to the cost of getting a flat front! I am going to have to try the axle technique. When the piece broke off and got stuck, it took a few of the threads with it, but there should still be plenty left (crossing fingers). Just to be clear you are hitting it towards the bike and not away? I know the taper just needs to break loose, but I just want to be clear before I go whapping. The manual I have mentioned putting a penny between the crank gear and the clutch gear to hold them in place. I did that for tightening the puller and it worked great, no strap wrench needed. Did you unblock the passage after plugging it for timing? I wouldn't think the stator needs an oil bath, but I don't know for sure. Thanks for your help!
Ringo - Thanks man! That was only the rear rim, the front was newly chromed when I got it, so I had to make this one match, and it does!
kMoto
Been Around the Block
Yes, whack the axle towards the crankcase. All threads have a little "in/out" play in them, even if you can't feel it. Your just taking advantage of that play a little at a time. I think mine took about three good repetitions and POP, came right off.
I didn't unplug the passage. I haven't even ran my motor yet. I'm not an expert on this engine by any means, I just didn't see any reason for lubrication after the starter components were gone. Do you? I could be wrong. I don't think there is any actual contact between the stator (actual name for the outside piece w/ the copper windings) and the rotor ( the piece on the crank that we have been referring to as the stator).
I didn't unplug the passage. I haven't even ran my motor yet. I'm not an expert on this engine by any means, I just didn't see any reason for lubrication after the starter components were gone. Do you? I could be wrong. I don't think there is any actual contact between the stator (actual name for the outside piece w/ the copper windings) and the rotor ( the piece on the crank that we have been referring to as the stator).


