Welcome! I think I read about doing that over on the sohc4 forum—should have just gone with it from the start.Just catching this one, great trick to remove those head studs
We noticed you are blocking ads. DO THE TON only works with community supporters. Most are active members of the site with small businesses. Please consider disabling your ad blocking tool and checking out the businesses that help keep our site up and free.
You are using an out of date browser. It may not display this or other websites correctly.
You should upgrade or use an alternative browser.
You should upgrade or use an alternative browser.
CB550K1 - that Gulf bike
- Thread starter Ringo
- Start date
Thanks, February has been a scramble getting this thing road worthy. I’ve got another quiet month to tinker with it before work picks up and I think I might actually finish a little early.Happy to see updates. The looks show the amount of work invested.
Heres the rest of the progress pics-
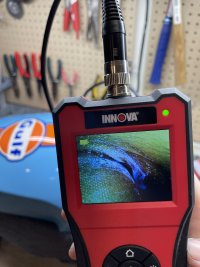
When I got the bike back there was some discoloration/yellowing in places in the clear coat, but one area was different. It’s darker, deeper looking, and has a bumpy texture. Since it’s at a joint on the tank, my first thought was a pinhole leak. I stuck a camera in there and of course couldn’t see anything, but it does look like there was some weirdness going on there when I joined the tank halves originally. I had to get creative sanding the area inside the tank around the leak because I didn’t want to do a full tank coat since I cheaped out and bought the smallest amount Caswell sells. But it worked.
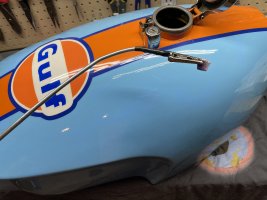
About the rest of the yellowing. It was tough to tell what it was at first, but I’m pretty sure it’s just yellowing in the clear coat. I’d post a photo, but have you noticed it in the blue paint in the rest of the pics? It just doesn’t show on camera. I’m not sure what even caused it, as it has a ”splotchy” appearance. I was told the bike was garage kept and the base and clear coat are urethane anyway, so I don’t know. Maybe it’ll come out with a polish.
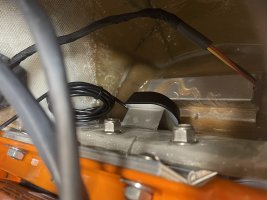
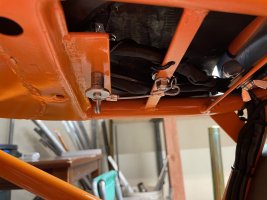
Next I needed a place with a clear view of the sky for the speedometer’s gps receiver. It’s magnetically mounted so I epoxied a thin steel sheet in place in the tail for it to sit on. It came with some adhesive pads so I could have just stuck it to the bottom in front of the tail light, but historically, permanent mounting solutions have been some of my worst ideas. See the tail light there, epoxied in place? Really excited for the day that thing fails. So, magnets.
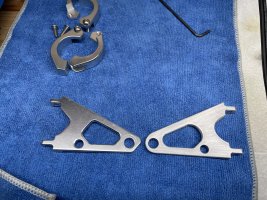
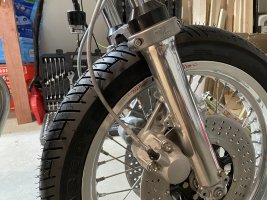
And lastly, I need to come up with some sort of bracket to keep the new brake lines off the tire, since we are now fenderless. I didn’t want to, but the 110/70 tire I imagined going on there was smaller than the 110/70 tire that really went on there. ”I bet something will fit” failed me this time.
When I got the bike back there was some discoloration/yellowing in places in the clear coat, but one area was different. It’s darker, deeper looking, and has a bumpy texture. Since it’s at a joint on the tank, my first thought was a pinhole leak. I stuck a camera in there and of course couldn’t see anything, but it does look like there was some weirdness going on there when I joined the tank halves originally. I had to get creative sanding the area inside the tank around the leak because I didn’t want to do a full tank coat since I cheaped out and bought the smallest amount Caswell sells. But it worked.
About the rest of the yellowing. It was tough to tell what it was at first, but I’m pretty sure it’s just yellowing in the clear coat. I’d post a photo, but have you noticed it in the blue paint in the rest of the pics? It just doesn’t show on camera. I’m not sure what even caused it, as it has a ”splotchy” appearance. I was told the bike was garage kept and the base and clear coat are urethane anyway, so I don’t know. Maybe it’ll come out with a polish.
Next I needed a place with a clear view of the sky for the speedometer’s gps receiver. It’s magnetically mounted so I epoxied a thin steel sheet in place in the tail for it to sit on. It came with some adhesive pads so I could have just stuck it to the bottom in front of the tail light, but historically, permanent mounting solutions have been some of my worst ideas. See the tail light there, epoxied in place? Really excited for the day that thing fails. So, magnets.
And lastly, I need to come up with some sort of bracket to keep the new brake lines off the tire, since we are now fenderless. I didn’t want to, but the 110/70 tire I imagined going on there was smaller than the 110/70 tire that really went on there. ”I bet something will fit” failed me this time.
Attachments
-
 09CBC459-26D5-4D47-B9DD-0B8F07A5CCB6.jpeg5.2 MB · Views: 206
 -
 0893F295-B264-44A2-A99C-4A2CFADD9FF5.jpeg3.3 MB · Views: 200
 -
 20F83E7D-3A42-44C9-BB2F-F604E26B59FD.jpeg1.4 MB · Views: 234
 -
 01B574E1-B2F4-46F2-9DB3-9A5031DC9EEC.jpeg1.7 MB · Views: 264
 -
 F51C1FD8-AC86-4768-AA4D-59CCCFD13A39.jpeg1.6 MB · Views: 194
 -
 896FC7C3-9F40-42E7-89FB-0F00625899AE.jpeg2 MB · Views: 198
 -
 0F4A65D3-7E4D-4CF6-B8EE-6B6FA3C313FE.jpeg2.1 MB · Views: 226
Last edited:
The bike is mostly assembled now, just missing the gauges and a muffler, so I took last night to get the suspension set up. Doc if you’re reading this, here are the initial numbers.
*Just going to note for anyone looking to apply this to your cb550- this setup is utilizing cb650 fork tubes (non Special) & a no-drop (flat) top triple, 13.75-14.2“ adjustable shocks, and 130/70-18 & 110/80-18 tires.
I got the sag dialed in much better than I was expecting, shooting for 30 mm rider sag. I’m a little lighter than usual right now, and did it in comfortable clothes so I’m expecting mid 30s actually riding:
Front static sag: 18 mm
Front rider sag: 31 mm
Rear static sag: 11 mm
Rear rider sag: 30 mm
Forks being flush with triples equates to roughly stock ride height (flat top triple plus longer fork tubes)
Front lowered 17mm: 23 degrees rake / 81.5 mm trail
Front lowered 8mm: 24 degrees rake / 84 mm
I didn’t measure stock height as I deemed it too lethargic to consider, but we can extrapolate 25 degrees rake / 86.5mm trail
I want 24 degrees and 90mm, but I’m not going to get that without reduced offset triples…
Rear shock length is unchanged from the +35mm it was (12.5” stock, to 13 7/8”)
There is too much rebound damping in the shocks still, even with adjusters backed all the way out. They really weren’t meant to be permanent, and the price reflects it I think, but I’m going to have to make finding some decent rear suspension a priority.
And I could actually use more rebound damping in the front, which is only controllable via oil with the race tech valves. Might look to swap in some heavier stuff, but I’d like to get a ride or two on it first.
Other than that I made a cable to keep from losing the seat pin. It doesn’t fall through the lower hole unless the button remains pressed, but other people do ride this bike pretty regularly and don’t know all the quirks.
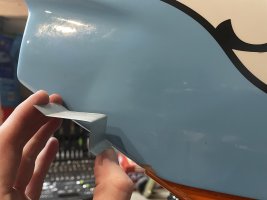
I also got a good pic of the paint discoloration, after a 2000grit wet sand. Still very much there, so I’ll likely just ignore it for the time being as it’s just cosmetic. I’d still like to know the “why” though. Where’s t71ford when you need him??
*Just going to note for anyone looking to apply this to your cb550- this setup is utilizing cb650 fork tubes (non Special) & a no-drop (flat) top triple, 13.75-14.2“ adjustable shocks, and 130/70-18 & 110/80-18 tires.
I got the sag dialed in much better than I was expecting, shooting for 30 mm rider sag. I’m a little lighter than usual right now, and did it in comfortable clothes so I’m expecting mid 30s actually riding:
Front static sag: 18 mm
Front rider sag: 31 mm
Rear static sag: 11 mm
Rear rider sag: 30 mm
Forks being flush with triples equates to roughly stock ride height (flat top triple plus longer fork tubes)
Front lowered 17mm: 23 degrees rake / 81.5 mm trail
Front lowered 8mm: 24 degrees rake / 84 mm
I didn’t measure stock height as I deemed it too lethargic to consider, but we can extrapolate 25 degrees rake / 86.5mm trail
I want 24 degrees and 90mm, but I’m not going to get that without reduced offset triples…
Rear shock length is unchanged from the +35mm it was (12.5” stock, to 13 7/8”)
There is too much rebound damping in the shocks still, even with adjusters backed all the way out. They really weren’t meant to be permanent, and the price reflects it I think, but I’m going to have to make finding some decent rear suspension a priority.
And I could actually use more rebound damping in the front, which is only controllable via oil with the race tech valves. Might look to swap in some heavier stuff, but I’d like to get a ride or two on it first.
Other than that I made a cable to keep from losing the seat pin. It doesn’t fall through the lower hole unless the button remains pressed, but other people do ride this bike pretty regularly and don’t know all the quirks.
I also got a good pic of the paint discoloration, after a 2000grit wet sand. Still very much there, so I’ll likely just ignore it for the time being as it’s just cosmetic. I’d still like to know the “why” though. Where’s t71ford when you need him??
Attachments


Last edited:
i looked up the stock rake/trail and found them on wikipedia to be Rake: 26°, trail: 105 mm. this sounds like it could be right and are actually good for stable but spirited riding for the era - with the caveat these numbers are often wrong on the web so not 100% sure if they are true.
I have never ridden a bike with less than 90mm trail but based on what i have experienced and read it may be a bit squirrely at 81mm trail. If this is close to the geometry you had before i would guess that this, combined with the stubby clip-ons, probably made for an interesting ride.
You're so close to being on the road i would say just ride it and see what it feels like. numbers are a good starting point but never a substitute for the real thing. if it feels a bit twitchy you can look into what it would take to tame it down.
Sometimes building a bike with more subdued geometry is what it takes to make you faster as a stable bike gives more confidence to hang it out there at speed. confidence inspiration can be the x-factor to going faster.
in regards to the paint - are you sure the clear isnt yellowing and what you are seeing is a thicker layer of the clear? it looks yellow over the whole tank where you sanded it. did you use a gel coat on the composite?
Those numbers line up with what I found on the sohc4 board. To me, they suggest inaccurate measurements on my part—losing 2 degrees shouldn’t drop the trail by more than 20mm I’d think.
Also I’m not sure I clarified above, but the geometry for my “stock front ride height” is still using the taller rear shocks.
And a bit of realization here: before this rebuild, this bike handled the exact opposite of “squirrely”; it was heavy, lethargic, slow. It was one of the main motivators to tear it apart. I attributed most of it to the steel rims, as steering effort increased with speed. The aluminum rims aren’t much lighter unfortunately. And after looking at the geometry, we are essentially back to square one. That was a lot of effort for so little improvement! So yes, I think I’ll ride it a little and revisit this.
As for the paint, yes the clear is all yellowed. The discoloration that caught my eye is actually small blob-like shapes that are not yellowed at all! The clear is uniform, no gel coat, but I used marine-grade epoxy resin.
It looks like it sat out in the sun for a decade- the clear coat is uniformly yellow, with the exception of the spots, and where the tank badges were (both areas look the same). It may just be a mystery.
theres only 3 variables that are used to calculate trail (unless you have raked triple trees), tire diameter, rake, and fork offset. Making some assumptions and working backwards with 105mm trail. I ended up with 51mm offset, 26.1" diameter for 100/90/19" tire, and 26 degrees rake - for the stock bike. in reality the tire diameter is slightly bigger i just couldnt find numbers for a 3.25/19 tire
If we swap to a smaller tire diameter of 24.9" for the (110/80/18) and reduce rake to 24 degrees with offset still at 51mm that lands you at 85mm trail so your numbers seem accurate.
what was your setup when it was handling slow? what is your current fork offset and actual tire diameter? you can measure this accurately by rolling the bike to measure the circumference of the tire.
I wouldn't underestimate the effect of your weight reduction on the front wheel. the aluminum rims make a big difference despite the overall wheel weight being close to stock. The weight lost is so far out from the axis of rotation it has an disproportinal effect on the rotational inertia. At the same time you also moved the weight closer to the axis by going from 19" to 18" further reducing rot interia. You took off 3mm on each disk - i bet you saved 2-3 pounds there as well and relatively far out from the axis. I bet this will feel significantly different than before.
Last edited:
Oof, forgot all about the disks. Yeah that was substantial.
Thanks for the patience / going into the weeds with me here. I’ve never needed to play with geometry to this degree on other bikes!
front tire circumference: 78” / diameter: 24.8”
rear tire circumference: 79.75” / diameter: 25.4”
I measured the offset at 50mm, so close enough there.
The setup I deemed too slow was with stock rims, a 90/90-19 front, stock front height, 13 7/8” (+ 1 3/8”) shocks.
I love the geometry stuff. Its the most important aspect of a bike and yet typically gets the least amount of attention. If you want to go real in the weeds i recommend the "motochassis" book by Tony Foale. Some crazy shit in there and he dispels a ton of incorrect info that is regularly passed around.
i reckon the bike is going to feel much quicker, and the higher/wider bars will give you way more control. If it ends up feeling twitchy/ unpredicable there are a few things you can tweak to make it more stable.
i reckon the bike is going to feel much quicker, and the higher/wider bars will give you way more control. If it ends up feeling twitchy/ unpredicable there are a few things you can tweak to make it more stable.
Oh awesome, I’ll hunt down a copy, thanks. Hey I’ll be happy if it steers a little quicker, never mind much quicker. It was pretty funny riding it back to back with a KTM duke 690. Apples to oranges I know, but very similar weight. One felt like a toy, one felt like a 50 year old motorcycle!
Hey folks, kinda shit progress lately. No excuses, I’m just low on motivation.
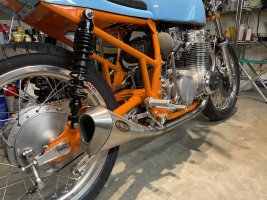
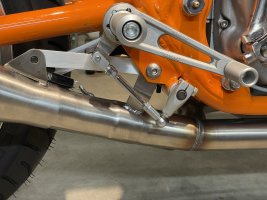
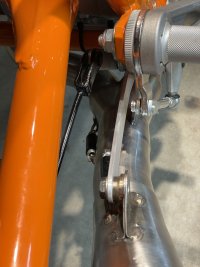
I did get the exhaust done. The Hindle system needed some modification. I moved most of the spring hangers, and adapted a portion from I believe a ninja 300 to get the final angle right. The muffler now clears the swing arm stand spools, and matches the tail angle. I’m happy with it, and looking forward to hearing the sound with unequal primary AND secondary pipes.
Still working out the gauge cluster. I don’t really like what I’ve come up with. I might just cut some holes for the gauges in the plate to mount them and worry about the mini fairing bit later. Or just shelve everything for next winter.
I also adapted a 530 countershaft sprocket to fit a 520 chain. Don’t ask and I won’t tell. I’ve been trying to get sprocket specialists to make one for two years now and they keep using “supply chain issues” as an excuse, when they bother to respond at all. Pretty well done with that outfit, but nobody else makes one, so, yeah.
Anywho the bike’s oiled up and rideable now, minus the gauges. Oh and license plate mount, no idea what to do there. Probably won’t run a plate this year, but I doubt it’ll get more than a half dozen rides, and I know the local cops so…*shrugs*.
Attachments
-
 80E87FC8-A582-44D9-83A3-EE0F8FD9B339.jpeg1.9 MB · Views: 214
 -
 D6E6C805-526E-4AB3-984F-8047E7A72678.jpeg2 MB · Views: 225
 -
 6EEAD9E1-76B4-43C3-82EB-D17E6436FD21.jpeg1.5 MB · Views: 178
 -
 AF7B4E5E-78A5-460D-8576-4AE353071FB8.jpeg1.1 MB · Views: 182
 -
 B54CDC2E-53A3-49A3-8CB1-48627A74A45A.jpeg1.8 MB · Views: 187
 -
 96554F73-6955-48E7-9039-7448B8486F83.jpeg3.7 MB · Views: 190
 -
 C06269B5-936A-4683-8057-DD8D44766387.jpeg3.6 MB · Views: 217
 -
 73AFEE60-C520-4150-969E-91A7D5C37079.jpeg3.4 MB · Views: 203
 -
 2CC39607-535A-455A-9149-430D4D9669F9.jpeg1.8 MB · Views: 219
The 520 sprocket from a 79-81 XL500S will work on the CB550. The difference, besides width, is that the outer diameter of the spline on the XL is 22mm and on the CB is 21MM. The XL sprocket will work on the CB but sometimes not the other way around. I have used the XL sprocket on many of my Honda racebikes to convert to 520. The JT Sprockets catalog gives all of their sprocket dimensions.
Much appreciated! The issue I found is in wanting an 18 tooth sprocket. I found many 520 sprockets that will fit, mostly from early 80s 500/600cc dirt bikes, but most top out at 16 teeth; possibly 17 on rare occasions, I can’t recall.The 520 sprocket from a 79-81 XL500S will work on the CB550. The difference, besides width, is that the outer diameter of the spline on the XL is 22mm and on the CB is 21MM. The XL sprocket will work on the CB but sometimes not the other way around. I have used the XL sprocket on many of my Honda racebikes to convert to 520. The JT Sprockets catalog gives all of their sprocket dimensions.
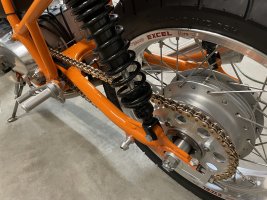
With the 40 tooth rear, 18 teeth in front is the sweet spot for road use, I feel. But my main reason is 18/40 keeps the swingarm safe from chain rub with shocks of this length.
That does sound like a problem in search of a custom solution. Is there an issue with the 530 sprocket thinned to 520 dimensions? 530 sprockets are easy and cheap to find. Fortunately, I have never needed larger than a 16T 520 for any of my race bikes.Much appreciated! The issue I found is in wanting an 18 tooth sprocket. I found many 520 sprockets that will fit, mostly from early 80s 500/600cc dirt bikes, but most top out at 16 teeth; possibly 17 on rare occasions, I can’t recall.
With the 40 tooth rear, 18 teeth in front is the sweet spot for road use, I feel. But my main reason is 18/40 keeps the swingarm safe from chain rub with shocks of this length.
I don’t think there will be an issue, but I can’t say for sure. Ideally I’d want to do it on a lathe, but I don’t have one. I used an arbor bit in a drill press and ground it down, cooling it with water occasionally to minimize losing the temper if there was one. If it was case hardened, it lost it on one face.That does sound like a problem in search of a custom solution. Is there an issue with the 530 sprocket thinned to 520 dimensions? 530 sprockets are easy and cheap to find. Fortunately, I have never needed larger than a 16T 520 for any of my race bikes.
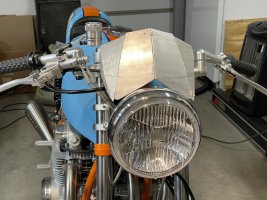
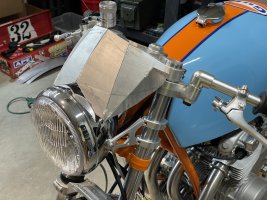
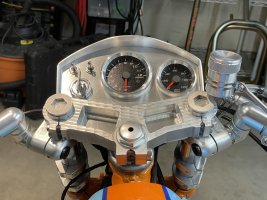
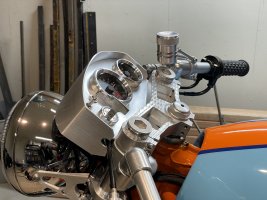
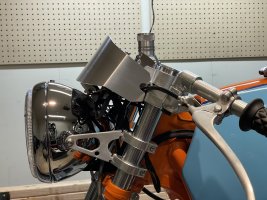
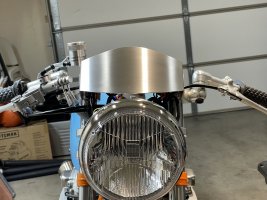
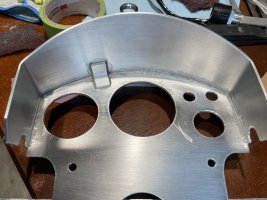
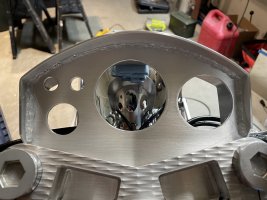
I came up with a dash design I like, for the most part. First photo is the final mock up. Initially I was going to weld both pieces together, but I spent a fair amount of time welding similar pieces in a tee joint to see if I could pull it off, and I couldn’t. The gauge plate is .125”, while the bug/aero cover is .090”. I couldn’t get enough heat into the thicker material without occasionally fully penetrating the thinner material. I never actually broke through, but I got some ugly bulges on the outside, and if you look at the finished pic of the front, that would be a lot of work to blend in and not have it stand out.
So I hung my head and chose epoxy. I used hot glue to temporarily secure it and seal the gaps so the epoxy wouldn’t drip through.
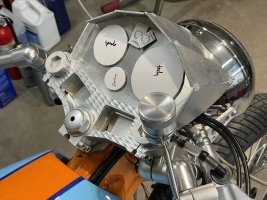
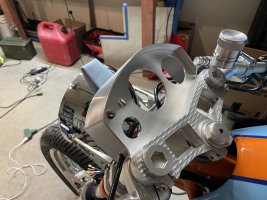
It’s mounted to the bottom of the triple clamp with two screws so far. I’m going to make two small plates that sit in the recesses of the triple against that lower lip, then basically sandwich the triple between those plates and the gauge plate to fully secure it.
I did away with the push button start too. I found a neat three-position switch to incorporate it though; the switch on the right acts as a kill switch and starter switch. Bottom: kill / middle: run / top (momentary): start. The left switch controls the headlight.
Don’t mind the wiring rats nest—I still can’t touch the cluster without leaving permanent fingerprints. It’s not oxidizing nearly as fast as the other aluminum bits that got a brushed finish, so I’m just leaving it be for now. I kind of think I might have to coat it with something, or just polish it.
So I hung my head and chose epoxy. I used hot glue to temporarily secure it and seal the gaps so the epoxy wouldn’t drip through.
It’s mounted to the bottom of the triple clamp with two screws so far. I’m going to make two small plates that sit in the recesses of the triple against that lower lip, then basically sandwich the triple between those plates and the gauge plate to fully secure it.
I did away with the push button start too. I found a neat three-position switch to incorporate it though; the switch on the right acts as a kill switch and starter switch. Bottom: kill / middle: run / top (momentary): start. The left switch controls the headlight.
Don’t mind the wiring rats nest—I still can’t touch the cluster without leaving permanent fingerprints. It’s not oxidizing nearly as fast as the other aluminum bits that got a brushed finish, so I’m just leaving it be for now. I kind of think I might have to coat it with something, or just polish it.
Attachments
-
 A373A720-716A-4E7C-9372-64CDE9D05C8E.jpeg3.6 MB · Views: 215
 -
 AE3A5012-E021-4779-8E83-2A2172817EAF.jpeg3.1 MB · Views: 207
 -
 601FBD6E-16C9-4CC3-99EA-743549947745.jpeg3 MB · Views: 193
 -
 C1D96DE1-0C3D-454C-855B-1E2604DB4410.jpeg2.3 MB · Views: 178
 -
 061272F6-2196-4979-99BD-03B1A987F26A.jpeg1.8 MB · Views: 178
 -
 984F267C-66CD-4818-A39D-974968421D4D.jpeg1.7 MB · Views: 171
 -
 DDA5601A-DB34-4F44-8924-AF559A36484D.jpeg1.8 MB · Views: 182


