
We noticed you are blocking ads. DO THE TON only works with community supporters. Most are active members of the site with small businesses. Please consider disabling your ad blocking tool and checking out the businesses that help keep our site up and free.
You are using an out of date browser. It may not display this or other websites correctly.
You should upgrade or use an alternative browser.
You should upgrade or use an alternative browser.
DEET MB5 - Fully Legal
- Thread starter HerrDeacon
- Start date
HerrDeacon
Over 1,000 Posts
Re: Project DEET- Mini Smoker - Departing Parting Lines
Yeah, we have a PA here. I always check the weekly flyers to see what is on sale, will be keeping an eye out for files.
Yeah, we have a PA here. I always check the weekly flyers to see what is on sale, will be keeping an eye out for files.
HerrDeacon
Over 1,000 Posts
Re: Project DEET- Mini Smoker - Shock Disassembly
Between last night and this morning I finished making the spring compressor tool and was able to take the shocks apart. Big thanks to a friend over on hondatwins.net for the idea, its such a nice feeling to make something useful with your own hands. Much cheaper too , I must have tossed the receipt but it was less than $10 to make.
Picked up a 2' of 5/16'' allthread bar, 3' of 1/8'' X 3/4'' flat bar and 6 nuts.

Trick with cutting allthread is to put a nut on either side of the cut line prior to cutting. Then you just remove the nuts to help clean up the theads.

All parts cut and drilled. I later drilled an additional hole in each bar to help with the fit.

All setup and ready to work.

All done until time to rebuild.

Nice thing about it is it packs up neatly

Will work on cleaning them up over the next few days.
Between last night and this morning I finished making the spring compressor tool and was able to take the shocks apart. Big thanks to a friend over on hondatwins.net for the idea, its such a nice feeling to make something useful with your own hands. Much cheaper too
, I must have tossed the receipt but it was less than $10 to make.Picked up a 2' of 5/16'' allthread bar, 3' of 1/8'' X 3/4'' flat bar and 6 nuts.
Trick with cutting allthread is to put a nut on either side of the cut line prior to cutting. Then you just remove the nuts to help clean up the theads.
All parts cut and drilled. I later drilled an additional hole in each bar to help with the fit.
All setup and ready to work.
All done until time to rebuild.
Nice thing about it is it packs up neatly
Will work on cleaning them up over the next few days.
Last edited:
HerrDeacon
Over 1,000 Posts
Re: Project DEET- Mini Smoker - Shock Disassembly
After disassembling the shocks this past weekend I started in on cleaning them up. The springs were not in too bad of shape, just a few nicks, scratches and a small bit of rust. I cleaned them up a bit and gave them a coat of paint. Also, the shock upper joints had these horribly huge casting marks, so I sanded them smooth and polished up a bit. Only have one done at the moment, start in on the other one tomorrow night.


Few parts painted and drying.

After disassembling the shocks this past weekend I started in on cleaning them up. The springs were not in too bad of shape, just a few nicks, scratches and a small bit of rust. I cleaned them up a bit and gave them a coat of paint. Also, the shock upper joints had these horribly huge casting marks, so I sanded them smooth and polished up a bit. Only have one done at the moment, start in on the other one tomorrow night.
Few parts painted and drying.
Last edited:
HerrDeacon
Over 1,000 Posts
Re: Project DEET- Mini Smoker - Shock Disassembly
Don't know what I'd do without the good old wire hangers Yeah, I believe I have the light figured out. Picked up a couple of 7" XS400 lights this past week from a guy selling them locally. I think they are too large for the MB5, so I'll put my CB350 light on the MB5 and use the 7" for the 350. Need to get/make some headlight ears now. Have something in mind but need to check on a few things before I'll know if its doable.
Don't know what I'd do without the good old wire hangers
Yeah, I believe I have the light figured out. Picked up a couple of 7" XS400 lights this past week from a guy selling them locally. I think they are too large for the MB5, so I'll put my CB350 light on the MB5 and use the 7" for the 350. Need to get/make some headlight ears now. Have something in mind but need to check on a few things before I'll know if its doable.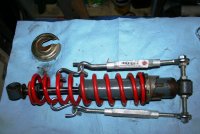
HerrDeacon
Over 1,000 Posts
Re: Project DEET- Mini Smoker - Shock Disassembly
Nice one! Looks like it should work good as long as the hooks could get in between the springs. The MB5 springs are pretty close together, should be doable though.
Nice one! Looks like it should work good as long as the hooks could get in between the springs. The MB5 springs are pretty close together, should be doable though.
HerrDeacon
Over 1,000 Posts
Re: Project DEET- Mini Smoker - Shock Disassembly
Really big shout out to Ari (a fellow MB5 owner and member over at 2strokeworld.com). Got a package today containing a Uni air filter he sent me...along with a load of other goodies I needed for my build. They included a footpeg bar (mine was bent), wiring harness (mine was a mess and missing all of the front end wiring), grips, carb (mine has a broken mount), license plate/turn signal bracket complete with the turn signals, LED plate light and reflective plate bolts.
This helps out my project greatly and I can't thank him enough.
Last edited:
intrudin
Coast to Coast
Re: Project DEET- Mini Smoker - Shock Disassembly
Nice catch there HerrDeacon. I picked up a speedo/tach of Ari, was a nice guy to deal with,, Do you have any extra footpegs??? i need one i also have two passenger foot pegs with brkts im not going to use..
MerryChristmas jimd
Nice catch there HerrDeacon. I picked up a speedo/tach of Ari, was a nice guy to deal with,, Do you have any extra footpegs??? i need one i also have two passenger foot pegs with brkts im not going to use..
MerryChristmas jimd
HerrDeacon
Over 1,000 Posts
Re: Project DEET- Mini Smoker - Shock Disassembly
Yes, very nice person, very knowledgeable about the MB's as well. Sorry intrudin I don't think I have any pegs. The two that came with my bike were trashed. Even the new ones have a split in the rubber. Seems to be a design flaw with them. I'll double check though and let you know if I have some. However, looking at pics of Ari's bike, he's using nice small aluminum modern pegs, may be an option if I can't get these fixed up.
Yes, very nice person, very knowledgeable about the MB's as well. Sorry intrudin I don't think I have any pegs. The two that came with my bike were trashed. Even the new ones have a split in the rubber. Seems to be a design flaw with them. I'll double check though and let you know if I have some. However, looking at pics of Ari's bike, he's using nice small aluminum modern pegs, may be an option if I can't get these fixed up.
HerrDeacon
Over 1,000 Posts
Re: Project DEET- Mini Smoker - Wheel Work
Spent a few hours yesterday and today working on the wheels. First off, the chrome on both front and rear rims is far from perfect (pitted and rust) but still good enough for me to leave them as is and not paint over it. As I mentioned earlier this bike was used as a dirt bike and the rims show it, mud and dirt in every crevice. The design of the comstar rims doesn't make it very easy to clean them either. Almost impossible to get down into the tip of the 'spokes'. There was also some surface rust on the spokes so I sanded them down to remove the damage.
Once cleaned and prior to painting I installed the new bearings. The old ones weren't too bad (only one really needed replacing) but since they are so inexpensive I replaced all for a bit of piece of mind. Used the freezer and heat trick to install them with minimal issues.


After they were in, I taped up the rim and sprayed some primer. Again, the comstar design makes it difficult to spray the inside of spokes and hub, especially the thinner front rim.


I'll leave for a couple of days then spray the colour. Will also start looking for tires after the holidays.
Spent a few hours yesterday and today working on the wheels. First off, the chrome on both front and rear rims is far from perfect (pitted and rust) but still good enough for me to leave them as is and not paint over it. As I mentioned earlier this bike was used as a dirt bike and the rims show it, mud and dirt in every crevice. The design of the comstar rims doesn't make it very easy to clean them either. Almost impossible to get down into the tip of the 'spokes'. There was also some surface rust on the spokes so I sanded them down to remove the damage.
Once cleaned and prior to painting I installed the new bearings. The old ones weren't too bad (only one really needed replacing) but since they are so inexpensive I replaced all for a bit of piece of mind. Used the freezer and heat trick to install them with minimal issues.
After they were in, I taped up the rim and sprayed some primer. Again, the comstar design makes it difficult to spray the inside of spokes and hub, especially the thinner front rim.
I'll leave for a couple of days then spray the colour. Will also start looking for tires after the holidays.
Last edited:
HerrDeacon
Over 1,000 Posts
Re: Project DEET- Mini Smoker - Wheel Work
When removing the bearing, I had to take out the speedo ring (not sure of correct name). Looks like I wasn't the first to remove it either, tabs are pretty bent up : This part is NLA but I should be able to bend the tabs back into a usable state.

When removing the bearing, I had to take out the speedo ring (not sure of correct name). Looks like I wasn't the first to remove it either, tabs are pretty bent up :
This part is NLA but I should be able to bend the tabs back into a usable state.
Last edited:
HerrDeacon
Over 1,000 Posts
Re: Project DEET- Mini Smoker - Swinging Arm
Did a bit of work on the swingarm as well. The ends of both arms looked like someone was hungry and tried to have a munch on them, pretty chewed up.


So, I wirewheeled it to remove most of the paint and then used a grinder to smooth out some of the damage. I'll have to use a bit of filler to smooth out the remainder of the damage. While I was at it I removed the chain guard tabs since I won't be using the guard.
One issue I'm having with the swingarm is the bushings, not having much luck removing them. Tried some heat but no go. Have some rust check on them now to see if it can free them up a bit. Would be nice to have a press. Here's a pic of the detabbed arm. Once I have the bushings out and new ones in I'll get it ready for paint.

Did a bit of work on the swingarm as well. The ends of both arms looked like someone was hungry and tried to have a munch on them, pretty chewed up.
So, I wirewheeled it to remove most of the paint and then used a grinder to smooth out some of the damage. I'll have to use a bit of filler to smooth out the remainder of the damage. While I was at it I removed the chain guard tabs since I won't be using the guard.
One issue I'm having with the swingarm is the bushings, not having much luck removing them. Tried some heat but no go. Have some rust check on them now to see if it can free them up a bit. Would be nice to have a press. Here's a pic of the detabbed arm. Once I have the bushings out and new ones in I'll get it ready for paint.
Last edited:
HerrDeacon
Over 1,000 Posts
Re: Project DEET- Mini Smoker - Wheel Work
I hear you, real pain to paint them. I have a feeling I'll be painting the black twice. Once to mainly get the insides, then sand down any runs that may have happened on the outside, then just finish with the outside.
Intrudin, did you replace your swingarm bearings? Mine are alright but was hoping to put in new ones while I was at it. Can't get them out though. Don't have a press to help with things. Just wondering if you replaced yours and, if so, how you got the old ones out?
HerrDeacon
Over 1,000 Posts
Re: Project DEET- Mini Smoker - Wheel Work
Thanks, will leave mine alone as well. Good to know on the steering bearings. I don't have mine apart yet, but its very notchy, so I assume I'm going to need a few. Do you know what size they are? Probably will take mine apart tonight to see how it looks.
Thanks, will leave mine alone as well. Good to know on the steering bearings. I don't have mine apart yet, but its very notchy, so I assume I'm going to need a few. Do you know what size they are? Probably will take mine apart tonight to see how it looks.


