Follow along with the video below to see how to install our site as a web app on your home screen.
Note: This feature may not be available in some browsers.
We noticed you are blocking ads. DO THE TON only works with community supporters. Most are active members of the site with small businesses. Please consider disabling your ad blocking tool and checking out the businesses that help keep our site up and free.
It depends how long a run you have?
I would probably use something a bit heavier from solenoid to ignition switch and back to fuse panel
Coils will draw about 4.5~5 amps, headlight (if you use 60/55w bulb) another 5 amps so something that can stand minimum of 10~12 amps continuous without heating up too much. (doesn't 400 use a 20A main fuse?)
Everything from fuse panel 'out' should be fine with 18~24 gauge cable (or even thinner for instrument panel, LED lights, or operating solenoids, etc)
I use anything from 16 to 28 gauge depending on what it's running, usually slightly heavier than needed to leave a safety margin (better to have fuse blow than wring melt down )
Do you have voltage drop per foot of wire? Internal resistance will need to be taken into account for coil and headlight wiring.
mydlyfecryziz would be better to ask as he's an electrical engineer and could give much more accurate explanation of what you need (or did you already contact him?)
Yep, it will all be OK
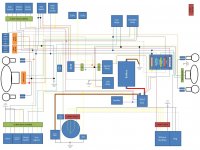
Starter solenoid is where main harness gets power.
Short cable from battery and a much thinner red plus red/white wire (some just have red/white going into harness)
It looks like you have permanent power to coils from starter solenoid, yellow is connected to live before RFID?
I think I see how you've done it, really I should print it out to get a better look ;D
Yeah, you're right. Not sure why I've done that (I suspect because I wanted a pure 12v feed to the coils but didn't really think it through. Although it's only live before and after the fuse as it runs into the relay which needs the run switch to be on.
Luckily I'm buying the Pamco ignition which I believe will safely protect the coils in the instance the ignition is left on (did I read that from you PJ?).
I was panicking the coils could be left on if I accidentally knocked the start switch, however it actually appears the coils relay switch doesn't get power unless the RFID is activated, so it appears the coils are on the RFID circuit indirectly.
With a new found energy and desire to knock this build off this year (maybe, possibly) I took some time tonight in the heat of the garage to install a few of my latest purchases:
I had my relays attached to the harness with spade connectors and it was a major pain in the arse knowing which wire went where after I had taken them off. Plus the relays were the one item on the battery box without a quick connector block, so I decided to remove the pain by installing relay plugs on the end of the wires.
Neatly crimped and a spot of solder and they are all done:
Just have to buy an 8 way connector block now to wire in the rec/reg. Plus I'm going to strip the black wire out of the stator pickup as I've used black for the earths (will actually reuse it as the missing earth for the rec/reg) so I will replace that wire with another colour to keep that earth colour consistent.
Then the only thing to do is to pull the trigger on my electronic ignition and that will be the electrics sorted (as soon as I grab a new battery too).
Will make sure it all works ok before I wrap the harness.
Next up I have plans to modify the fuel tap for my fuel lines.
Looks like a decision has been made on the exhaust direction too. My bud Darren has asked if I would sell him my Yoshimuras. Given they are too large for my build I've decided to let them go for what I paid for them.
Cash in the hand is worth more than Yoshimuras in the garage, especially considering it essentially buys all my motor internals.
Even more progress today as I looked to polish off the wiring to the battery box. A quick trip out to Jaycar to grab some wire strippers and an 8 way plug:
Step 1 was to cut the old plug off the rec/reg so I could terminate all the wires in to 1 plug. Seems odd to be butchering a brand new part but the end result looks pretty factory anyway:
Next I pulled out the black wire from the run of wires down to the stator as I needed to use it as a ground (all my grounds are black wire). So I shortened it and would terminate it with another main negative frame mount. I then ran a new green wire for the stator pickup:
Luckily I had a frame mount very close to the black wires path, so it was easy to de-solder it, pop some new shrink wrap on and terminate it again:
Crimped and soldered the new wires:
And the rec/reg was installed:
Not sure if the stator wires (3x yellow) or the pickup wires need to be wired in a certain way. Currently they are just plugged in randomly. I've heard the yellow wires are fine to be plugged in any order (will need to check this), plus I will do my best to ensure the white pickup wire is plugged in to the right place on the stator.
I've come into a little bit of cash as I've sold the Yoshimuras. They were too big for my build and I would prefer to have the cash in hand vs hanging on to them for another build a few years down the line.
So it's opens up the opportunity to get the motor parts ordered and I have some questions on which parts to buy for a total engine rebuild.
Here's what will be on the parts list. Going genuine Honda where available:
- cam chain tensioner
- cam chain blade
- crank bearings
- big end bearings
- crankshaft seal left
- crankshaft seal right
- oil control gasket
- cylinder head cover gasket
- cylinder head gasket
- primary chain (already have a new cam chain)
- tappet cover oring x8
- valve stem seals x8
Questions.
1. Does it look like I've missed anything?
2. Are there seal kits worth buying that are as reliable as OEM?
3. Are there gasket kits worth buying that are as reliable as OEM?
4. Do I need to replace my big end bolts/nuts? Can I get these for a bolt supplier? If so what would I need to get?
Littlest went down for a nap so I thought I would try and knock over my battery box rec/reg box. But the noise of the compressor/grinder going off was probably too risky in waking the aforementioned child, so my attention went to the oil pump instead.
I have purchased all the OEM oil pump o-rings from my local Honda dealer and I'm waiting for them to come in. However the 40mm x 2mm is not available from Honda and so I grabbed one of those from my local bearing place. Along with all new stainless hardware and a tub of Vaseline I was ready to actually "completely" finish a part in the bike:
Packed the pump full of Vaseline and dropped the oring on the housing:
Put plenty of anti seize on the stainless hex button head bolts:
And voila! The first finished part on the bike:
Gratuitous shot with the stainless hardware:
Heaven knows how much I've spent on stainless bolts on this bike. Doesn't bear thinking about!
Started on the rec/reg box. First up I measured out the rec/reg, added a touch of clearance around it (10mm) and then cut it out of my 1.5mm steel with the air shears. Scored it with the angle grinder then flap wheeled all the edges ready for welding:
All welded up, I grabbed the angle grinder and flap disc and took back the welds. Popped it on the bench sander to get the sharp edges back and it was done:
Here is the plan for the subframe tray (although this is on the original Alu one). The underside will be cut out and this will be welded in and the edges ground back:
The rec/reg will be in the recess facing down against the moving air. The box has been made about 2mm short for the rec/reg so the fins will ever so slightly protrude from the bottom of the tray. Unfortunately I don't have the bike here so I can't work out where it will go exactly, however I'm thinking up the front near the shock as this will offer some protection, plus I also have to get the RFID receiver in too which needs a more open space and the main aim is to have the rear end of the sub frame tray clean/clear.
1. I can buy the engine seals individually at a premium, or buy an aftermarket kit. Which direction should I go, and if a kit, which ones best?
2. Same deal for gaskets. I had my eye on a Vesrah kit originally. If it helps I plan on having the case upper barrel surface and valve surface decked by a machine shop.
i'd be buying the full set, not sure which brand is best but i found this ebay site earlier which may have the stuff you want (i was looking for 750 stuff)
i've just dropped my motor today (to investigate locked up kicker) and it looks like i'll be needing a full gasket/seal kit by the time i'm finished so i'd be interested to know what these guys quality is like. they're in japan so maybe OEM quality rather than cheaparse chinese stuff.
That's the same seller as the 466 piston kit I bought. Supposed to be quality gear but not heard about their seal kits. Will have a look to see if they have something for the 400F as all other kits seem to be no name Asuru brand:
This site uses cookies to help personalise content, tailor your experience and to keep you logged in if you register.
By continuing to use this site, you are consenting to our use of cookies.
") )
)