
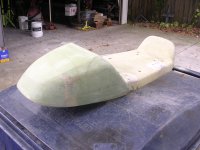
+1. Your work will be much easier and you will have a much better outcome if you smooth out your part to be just like the finished shape you wish to end up with. This will also make the next layup much easier, and you will also find the hard and rigid first glass layer easier to add to than the bare foam. It is very important to thoroughly sand anyplace you add more structure to - just like painting anything. All those inside corners are a bitch, but spend the time needed to refine the shapes - it will pay off in the end. You can use very coarse sandpaper to get your shape, but I use something like #80 for the prep for the next layer just to make sure the part has no "bare" un-sanded parts but is still pretty smooth. One way to do a layup on such intricate shapes is to paint on a coat of still liquid but ready to kick epoxy and just glue on all your pre-cut pieces of cloth. Once the epoxy starts to kick it will get pretty sticky and you can press on and smooth out your next layer of cloth without making a disastrous mess. You can fuss with it until it is completely and permanently stuck down tight. You don't need a lot of epoxy for this, just enough to totally glue on the layup. Once your done you can then paint on more fresh epoxy to saturate the layup. This is not the ideal by any stretch structurally, but will be more than acceptable for your pretty much only cosmetic part, and you will likely end up with much fewer voids or bubbles caused by the cloth pulling away from the base near sharp corners. You will still end up with a very light and strong for body work part if you are careful and methodical. Your new shape looks great!
We noticed you are blocking ads. DO THE TON only works with community supporters. Most are active members of the site with small businesses. Please consider disabling your ad blocking tool and checking out the businesses that help keep our site up and free.
You are using an out of date browser. It may not display this or other websites correctly.
You should upgrade or use an alternative browser.
You should upgrade or use an alternative browser.
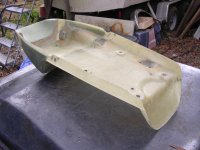
I'm making a tail section
- Thread starter billyp
- Start date
billyp
Been Around the Block
I will definitely sand down the whole part before the next layer, I will now also reshape where and if necessary. I had thought about painting on a thin layer of epoxy and letting it kick or flash a bit before laying down the next layer, I'll definitely do that now. Makes sense and sounds easier to "glue" pieces down a bit and smooth them out, then add more epoxy to get a good wet out. I believe that's what xb also recommended amongst his initial rants ")
You're right about it being mostly a cosmetic piece so I'm not terribly worried about the actual strength of the piece. That being said I'm still looking for a solid piece so I'm going to lay it up as good as I can with as few cuts and pieces as I can and it'll take as long as it takes. When I get more confident with the whole process maybe I'll lay up some layers wet and see how it goes. This is all very much a learning process and I'll take any advice anyone can give
You're right about it being mostly a cosmetic piece so I'm not terribly worried about the actual strength of the piece. That being said I'm still looking for a solid piece so I'm going to lay it up as good as I can with as few cuts and pieces as I can and it'll take as long as it takes. When I get more confident with the whole process maybe I'll lay up some layers wet and see how it goes. This is all very much a learning process and I'll take any advice anyone can give
billyp
Been Around the Block
doc_rot said:Any weave will lay drape over curves much easier if the warp and weft are oriented at 45 degrees to the curve. It makes a huge difference.
"Warp and weft???"
I'm new at this, English please

billyp
Been Around the Block
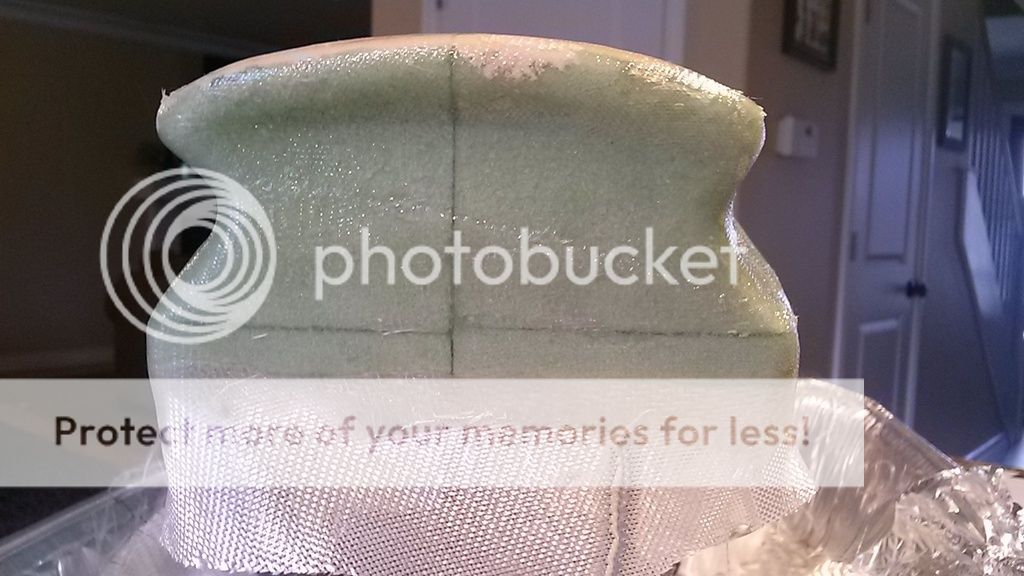
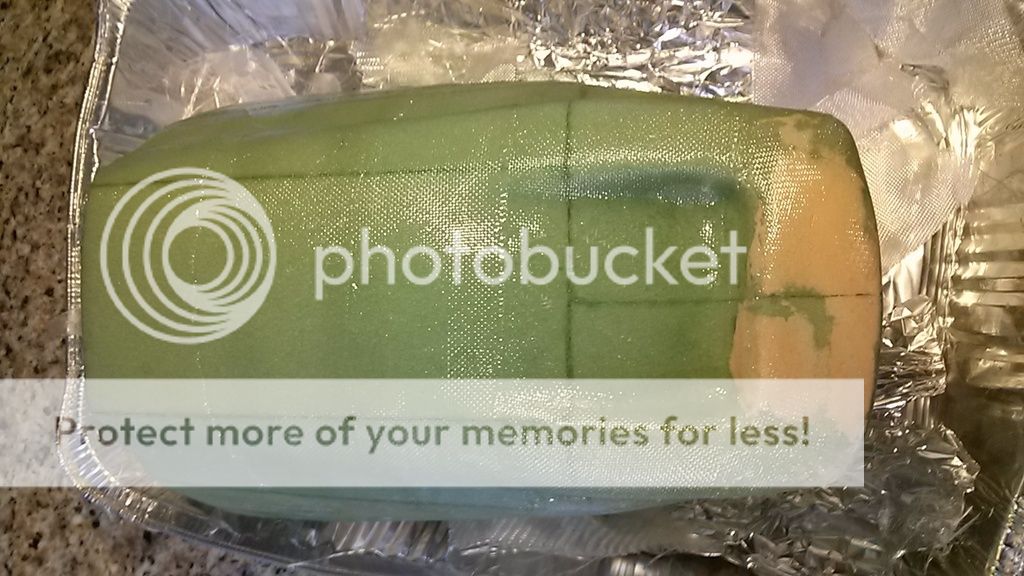
Over the weekend I was able to get a layer of 6 oz twill down over the 3.7 oz plain weave. It went much smoother this time, I was able the get the cloth to go around corners and conform to the shape much easier. Didn't get a whole lot of pics of the process, I was sticky and got caught up in the act of actually doing it.
Cut some cloth up first

Wet it down with a light coat and let it get a little tacky

And the final product. Picture looks a lot crappier than it turned out, not a pro job by any means but not too bad

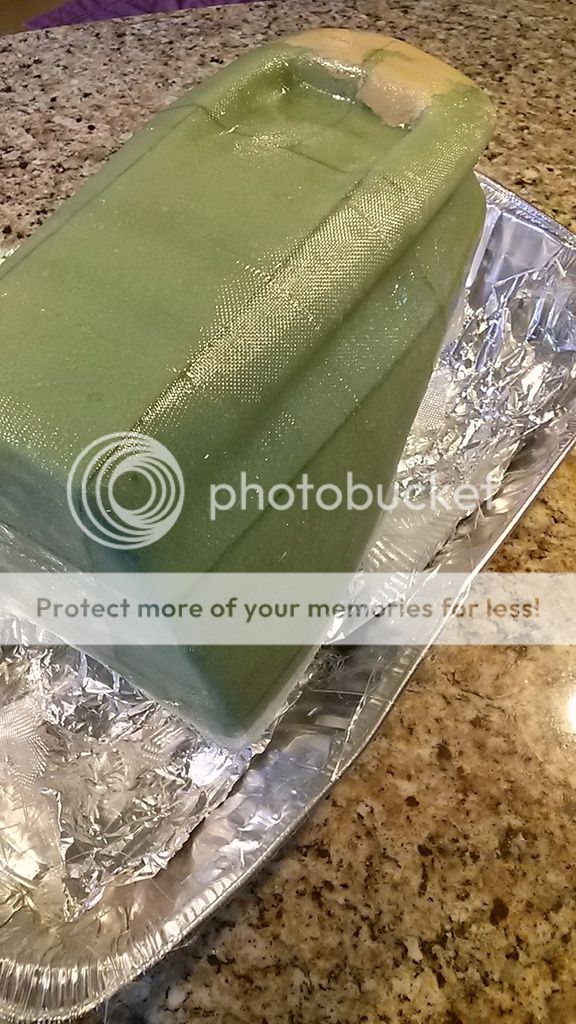
Got some 4 oz twill this morning that I'm getting ready to lay on. More to come
Cut some cloth up first
Wet it down with a light coat and let it get a little tacky
And the final product. Picture looks a lot crappier than it turned out, not a pro job by any means but not too bad
Got some 4 oz twill this morning that I'm getting ready to lay on. More to come

You may want to consider cutting what you have done so far down to as close as possible to its final form. As you may have already observed, bits you don't like tend to get amplified with the addition of layers. Plus, (as you may also have encountered) it is easy to get small voids or bubbles near corners which cause distortions. If you sand through into a void, it can easily be filled with resin on the next layup. This will also keep the final product as thin and as light as possible.
Don't underestimate the strength of the fiberglass cloth. The final construction can be very thin if you are going to leave the foam intact behind it. Epoxy tends to be misleadingly pliable for at least a day or two so give it some time. In a couple of days even very thin sections are quite rigid.
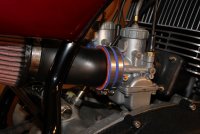
You can make all kinds of cool things besides bodywork - even things that have to "work". This 2 into 1 intake manifold was made using exactly the technique and materials you are using. It is easily less than 1/32" thick at its thickest point and very rigid, though the shape is mostly responsible for that. All I did was make top and side negative profile patterns out of cardboard, and carved up a piece of foam to fit the patterns and threw two layers of really super light cloth on it - don't remember the weight, it was a while back. When it was hard I just dug out the foam with a screwdriver and sanded it inside and out. Black spraybomb and there you are! I was very careful with the layups and foam core though.
Don't underestimate the strength of the fiberglass cloth. The final construction can be very thin if you are going to leave the foam intact behind it. Epoxy tends to be misleadingly pliable for at least a day or two so give it some time. In a couple of days even very thin sections are quite rigid.
You can make all kinds of cool things besides bodywork - even things that have to "work". This 2 into 1 intake manifold was made using exactly the technique and materials you are using. It is easily less than 1/32" thick at its thickest point and very rigid, though the shape is mostly responsible for that. All I did was make top and side negative profile patterns out of cardboard, and carved up a piece of foam to fit the patterns and threw two layers of really super light cloth on it - don't remember the weight, it was a while back. When it was hard I just dug out the foam with a screwdriver and sanded it inside and out. Black spraybomb and there you are! I was very careful with the layups and foam core though.
Attachments
billyp
Been Around the Block
That's a cool intake. So far I have one 3.7 layer, one 6 oz layer and one 4 oz. I think after the epoxy on this last layer fully cures, I'm going to dig out the foam and see how solid it is. I know I'll have to do at least 1 more layer, maybe more after I sand it down. Again, it's purly a cosmetic piece but I want it to be solid.
Tune-A-Fish
BOTM LOSER Proudly Deplorable
That's some F1 shit right therrrr... Been following along and I must say, I think I'm gonna stay with tin.
Don't know what you have in mind for the rest of your seat, but if you are going to continue with glass, here is one I recently did. It is sort of a hybrid of mold and moldless construction. I hate making molds but I made a throw-away one for this (actually a buddy made me a fancy silicon mold of the bottom of this after it was done because it bolts on to an unmodified bike). It has another actual seat pan that holds the upholstery that goes on top, but both are still very thin and light - it is a little thicker where the rubber feet go through. It sits on six rubber bumpers and uses the stock hinge and latch points which have threaded aluminum plates embedded to bolt to. I never weighed it, but the seat foam by itself (I like pretty cushy seats)weighs more than all the rest. It is a little flexible, but on the bike very solid with the hinges, catch and six rubber feet. The seat has over 4k miles on it now and still looks perfect, so it evidently is plenty strong. FWIW, the cowl section is not hollow - it has so little interior volume I left the foam. I think the best thing about this sort of construction is ease of making changes and ability to join elements with minimal structural problems. You could make a pan separately and join it to your tail section to it after the fact with little concern over how you will do it. I happened to make the pan part first and built the tail section on top of it while it was on the bike, any way that works has to be ok! I also make plenty of parts out of metal, but for me it takes a lot more planning to avoid making a change that throws out a lot of work.
Attachments
If you're interested, I've been using Aqua-resin for years to make molds and to cast prototypes and even final pieces. It's non-toxic, really easy to use and sets up quickly. You can coat it in Parfilm, or whatever epoxy mold release you're using. I also do short run molds in #1 pottery plaster. It's no more than $25 for a 50lb bag, so it's super cheap when compared to many other materials. Plus, when you're done with the molds, you can break them up and sprinkle the plaster on your lawn. It's a good nutrient for the soil. It doesn't work for undercuts, though. So any mold that needs to be more complex requires casting in multiple parts. I also use the Aqua-resin as a coating for the foam to make masters. When casting with the Aqua-resin, all that's needed is a wax-based mold release (WD-40 also works well).
Here's a fairing I cast in Aqua-resin. The left is a foam master coated in Aqua-resin, and the right is an Aqua-resin with nylon fibers instead of glass:

Here's a fairing I cast in Aqua-resin. The left is a foam master coated in Aqua-resin, and the right is an Aqua-resin with nylon fibers instead of glass:
billyp
Been Around the Block
deviant said:If you're interested, I've been using Aqua-resin for years to make molds and to cast prototypes and even final pieces. It's non-toxic, really easy to use and sets up quickly. You can coat it in Parfilm, or whatever epoxy mold release you're using. I also do short run molds in #1 pottery plaster. It's no more than $25 for a 50lb bag, so it's super cheap when compared to many other materials. Plus, when you're done with the molds, you can break them up and sprinkle the plaster on your lawn. It's a good nutrient for the soil. It doesn't work for undercuts, though. So any mold that needs to be more complex requires casting in multiple parts. I also use the Aqua-resin as a coating for the foam to make masters. When casting with the Aqua-resin, all that's needed is a wax-based mold release (WD-40 also works well).
Here's a fairing I cast in Aqua-resin. The left is a foam master coated in Aqua-resin, and the right is an Aqua-resin with nylon fibers instead of glass:
That sounds interesting. So you use the Aqua-resin as the final step on the plug before taking a mold off of it? Is it in place of the paint and polish as the final coat on the plug? Do you still need to sand the Aqua-resin with fine grit and polish it before the gel coat?
Yes, the Aqua-resin is the final coating on the plug. How smooth you want the final casting to be is how smooth you want the plug. I typically go with no more than 1000 grit and most of the time just go with 600 grit. When I make molds with #1 pottery plaster, I coat the plug with Murphy's oil soap and polish with my fingers. When casting in Epoxy resins, I coat it in Parfilm.
billyp
Been Around the Block
deviant said:Yes, the Aqua-resin is the final coating on the plug. How smooth you want the final casting to be is how smooth you want the plug. I typically go with no more than 1000 grit and most of the time just go with 600 grit. When I make molds with #1 pottery plaster, I coat the plug with Murphy's oil soap and polish with my fingers. When casting in Epoxy resins, I coat it in Parfilm.
Just looking at their site, do you use just the laminating resin/gel coat? They call it the "L" liquid component and "S3" powder component
That's the stuff. I started using it more because it's non-toxic. When we lived in a small apartment in Philly, I could still work in the spare bedroom.billyp said:Just looking at their site, do you use just the laminating resin/gel coat? They call it the "L" liquid component and "S3" powder component


