
We noticed you are blocking ads. DO THE TON only works with community supporters. Most are active members of the site with small businesses. Please consider disabling your ad blocking tool and checking out the businesses that help keep our site up and free.
You are using an out of date browser. It may not display this or other websites correctly.
You should upgrade or use an alternative browser.
You should upgrade or use an alternative browser.
New to DTT! 71CL350 Cafe Project
- Thread starter chewy
- Start date

Definitely will pick up a shot bag. I hate body work, so less filler = less stress ")
Decided to work on the battery tray today. I'm reaaaaally trying to hide all the wiring, and stuff the electrics under the cowl. My cowl is tiny, so I need to get creative.
Threw the bike in the element, and headed over to my uncles fab shop for some Ideas.
We decided to make the battery box part of the seat pan (removable) and implement a master harness connector so it could be removed.
Here we go!
Ok, so all the electrics will fit in the cowl? Check!

make a pattern. It'll locate against the mounting studs, and serve as a floor for the electronics enclosures

test fit the pan...

Decided to work on the battery tray today. I'm reaaaaally trying to hide all the wiring, and stuff the electrics under the cowl. My cowl is tiny, so I need to get creative.
Threw the bike in the element, and headed over to my uncles fab shop for some Ideas.
We decided to make the battery box part of the seat pan (removable) and implement a master harness connector so it could be removed.
Here we go!
Ok, so all the electrics will fit in the cowl? Check!
make a pattern. It'll locate against the mounting studs, and serve as a floor for the electronics enclosures
test fit the pan...
So then we thought, how can we protect the seat/cowl area from rock hits that would chip the paint, and make the batter enclosure more rigid?
Add a second dimension! Make it sit flush against the underside, and weld it to the floor of the battery box.
couple passes through the bender...

clamp it to the pan and cowl. getting ready to weld the floor in.

tack it in place...

We then tig welded the battery box up, fitted it to the cowl and ground it until all edges were flush with the seat pan/cowl. I apparently stopped taking pictures at this point.
So we then took the cowl, and made a 'catch' to hold the rear edge of the battery box in place, while the front is held in place by the 2 mounting posts. I'll blast the battery tray and take some better pictures of how it installs.
It's pretty slick, and you cant even tell its up there. Way strong too!

Add a second dimension! Make it sit flush against the underside, and weld it to the floor of the battery box.
couple passes through the bender...
clamp it to the pan and cowl. getting ready to weld the floor in.
tack it in place...
We then tig welded the battery box up, fitted it to the cowl and ground it until all edges were flush with the seat pan/cowl. I apparently stopped taking pictures at this point.
So we then took the cowl, and made a 'catch' to hold the rear edge of the battery box in place, while the front is held in place by the 2 mounting posts. I'll blast the battery tray and take some better pictures of how it installs.
It's pretty slick, and you cant even tell its up there. Way strong too!


more progress on wiring! the loom is completely hidden and runs along the frame c channel.

I decided to mount a double pole double throw for the headlight switch in the bucket. I did it on the bottom toward the back to hide it some.

hidden with a weather tight boot

brake side rear sets all set up!

shift side set up!

I decided to mount a double pole double throw for the headlight switch in the bucket. I did it on the bottom toward the back to hide it some.
hidden with a weather tight boot
brake side rear sets all set up!
shift side set up!
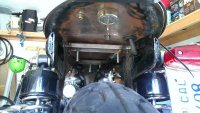
another look at the battery tray under the cowl.
It is retained by a 'lip' welded on to the back of the cowl, and is aligned by the mounting pins at the front..

hides completely under the hump, and is really rigid with the structure it has.

pretty slick.

Tomorrow I hope to wire the battery area and maybe make it run!!!
It is retained by a 'lip' welded on to the back of the cowl, and is aligned by the mounting pins at the front..
hides completely under the hump, and is really rigid with the structure it has.
pretty slick.
Tomorrow I hope to wire the battery area and maybe make it run!!!
Re: New to DTT! 71CL350 Cafe Project - It FIRED!
so its 104*F outside, and I say to myself, what a great day to work in the garage?
I wired up all the electronics, and got it all to fit neatly (and compactly) under the hump in the seat

another view..

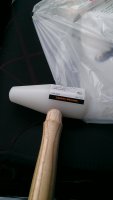
Ballistic lithium battery
Stock Voltage Regulator
Stock Key assembley
Aftermarket (tiny) 4 wire rectifier
Fuse holder w/ 15amp fuse.
Everything is bullet terminals, for easy, stock like connections
so its 104*F outside, and I say to myself, what a great day to work in the garage?
I wired up all the electronics, and got it all to fit neatly (and compactly) under the hump in the seat
another view..
Ballistic lithium battery
Stock Voltage Regulator
Stock Key assembley
Aftermarket (tiny) 4 wire rectifier
Fuse holder w/ 15amp fuse.
Everything is bullet terminals, for easy, stock like connections


I did get the bike to kick over today. Started, and got it to idle.
Got both carbs open throat same amount at idle, and mixture screws are about 7/8 turn out.
Will need to rejet for filters and exhaust, so I ordered a jet kit from siriusconsolidated, those will be here next week.
So the ignition side of my wiring appears to work. I wired the headlight, but no dice... and its too damn hot to go chase wiring right now.
On the list of to-do's:
relocate rear brake switch
chase down wiring faults for headlight
Currently, it'll run, but eventually die because the battery will drop down to ~9volts or so, and then no more spark. I read that these bikes really dont charge below 2000 rpm? is that true?
Garr... getting so close and hitting a little wall right now.
oh man, mucho progress last night and today!
I got it up and running after rejetting carbs last night!
http://www.youtube.com/watch?v=QFtYOMkohE0&feature=youtu.be
It appears to be charging fine, idles at ~1200 RPM, starts pretty easily 1st or second kick.
I rode it around the neighborhood, you know cuz you have to, but encountered a small walk home... twice.
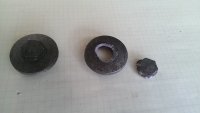
For some stupid reason, my petcock stops flowing fuel. Its brand new! I have large fuel filters on the lines to catch any crap that may still be in the tank.. but I'm guesing a vaporlock issue?
With a half full tank of fuel, the ON will stop flowing fuel to the carbs after a short while. I pull the line off, and magically it starts flowing again!
The same thing with the reserve!!!
I pulled the petcock, blew air through it, and took a few gas baths today... Any ideas? I havent even replaced the tank cap seal yet! Where is the tank vent?
I'm also guessing something in the tank may be clogging the petcock.... even though I rinsed the tank a few times!
So fun!!! So frustrating!! lol
I got it up and running after rejetting carbs last night!
http://www.youtube.com/watch?v=QFtYOMkohE0&feature=youtu.be
It appears to be charging fine, idles at ~1200 RPM, starts pretty easily 1st or second kick.
I rode it around the neighborhood, you know cuz you have to, but encountered a small walk home... twice.
For some stupid reason, my petcock stops flowing fuel. Its brand new! I have large fuel filters on the lines to catch any crap that may still be in the tank.. but I'm guesing a vaporlock issue?
With a half full tank of fuel, the ON will stop flowing fuel to the carbs after a short while. I pull the line off, and magically it starts flowing again!
The same thing with the reserve!!!
I pulled the petcock, blew air through it, and took a few gas baths today... Any ideas? I havent even replaced the tank cap seal yet! Where is the tank vent?
I'm also guessing something in the tank may be clogging the petcock.... even though I rinsed the tank a few times!
So fun!!! So frustrating!! lol
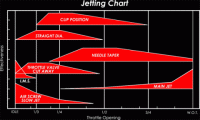
So i have a small 'flat spot' in my carbs at about 1/4 / 1/3 throttle. And I found this handy jet interaction chart for Keihin CV carbs...
I have the stock 3D CV's on it.
Had 70's and 115's in it. I bumped up to 72/120 jets for the exhaust and air filter pods. I run from sea level to 2000 ft typically in my area, do these jets sound about right? Any idea how to get rid of the stumble/flat spot I have?
My CV carbs do not have adjustable needle clip positions, so I am not sure how I can adjust them?
The help is really appreciated!!!
Attachments
Took her for another couple spins around the hood. Seems that I have a petcock that clogs :/ and the bike will run on one cylinder. I have temporary large clear fuel filters on it, and one cylinder's fuel filter will be dry.... UGH. Time to pull the petcock and clean it again (i guess its better than going through the carbs again and again....
Made some other progress today. Re-indexed the shift side motobits rearset to give me mo betta shifting/ parallel arms. Great success
Bolted the stock CL fender on...

But noticed a snag...
Either my wheel is dished wrong, or my fender brace is bent.
doesnt look centered...

rubs the tire

I am thinking I can just muscle it back to square? or maybe narrow the fender some...
I started thinking about how to trim the front fender. Maybe transfer stock curve a few inches back?

short enough?

(i guess its better than going through the carbs again and again....Made some other progress today. Re-indexed the shift side motobits rearset to give me mo betta shifting/ parallel arms. Great success
Bolted the stock CL fender on...
But noticed a snag...
Either my wheel is dished wrong, or my fender brace is bent.
doesnt look centered...
rubs the tire
I am thinking I can just muscle it back to square? or maybe narrow the fender some...
I started thinking about how to trim the front fender. Maybe transfer stock curve a few inches back?
short enough?


