Suzuki GS650GL cafe project

I like those lighted bolts....very much what I'd like to use for the license lamp. I need to check the local auto parts stores for general use lighting, assuming you don't come up with anything from your stash
 
I have a set of those license plate bolts (bought them from ebay though) and find them really good, really bright.
 
The same ones SeaKing showed Deacon, or a different style? The problem with mounting the taillamp centrally, in the tail section, is that I then need to come up with a different mounting location for the plate and it's lighting
 
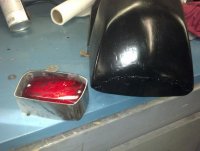
Ok, I think I may have an idea for a taillamp, after checking out the cool site link SeaKing sent me. As usual, I had to dream up something that will require more work than I care to invest, but what the hell, I've got nothing but time, right?!

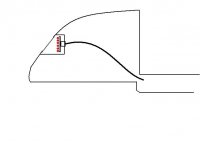
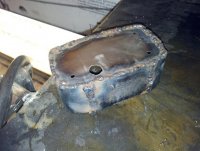
My thought is to take a piece of, say, 2" OD tubing, perhaps 3-4 inches long, do a mitered cut along one end to fit the contour of the inside of the tailpiece. Then I'll cut a 1.5" hole in the back side of the tailpiece and weld the tube in behind it. I'll need to weld a backing plate over the open end of the tube inside the tailpiece, with a hole for mounting the light socket. I can also cut a 2" disc out of the existing taillamp from the GS650 as a lens. Around the circumference of the hole I'll drill several small holes for either rivets or small screws. These will secure the lens tight against the inside edge of the hole. My paintbrush illustration below kinda shows what I'm thinking:
 

Attachments

  • taillampconcept.jpg
    taillampconcept.jpg
    13.4 KB · Views: 789
The ones you pictured remind me of the one I picked up from the local farmstore it's a Blazer combination tail and brake lamp # B465R... not LED but they make them too if it suites you. Kind of a slick little unit for a combo light that has it's own mounting plate behind.

41CIjGdj1IL._SY300_.jpg

B465R_schematic.jpg
 
Thanks Hoosier! Thats pretty much exactly what I'm looking for. I'll have to check the measurements, but just eyeballing I'm sure it'll work. It even fits the shape of the tailsection, the way it has a peak in it.
 
Found that light on Amazon for $9.35 at "Toby's Tool Shed", 1 left in stock. Ordered. Total was $15 and change! Thanks Daddy!
 
So I was workin on my razzu aluminum footpeg mounts, trying to get a better fit for the left-side peg, when it suddenly snapped right through the footpeg mounting hole. It's cast, it's weak to begin with, so I said fuck it and made some out of 3/16 steel with 3/8 pipe as "spacers" to move the mount out enough to clear the frame. I only have the right side done for now, I'll get to the left side tomorrow.
 

Attachments

  • newpegmount1.jpg
    newpegmount1.jpg
    41.9 KB · Views: 935
  • newpegmount2.jpg
    newpegmount2.jpg
    37.7 KB · Views: 957
  • newpegmount3.jpg
    newpegmount3.jpg
    71.9 KB · Views: 252
Thanks Floegstad.

Made a bit more progress the last couple days. My harness from Sparck Moto showed up (thanks Matt!!) and it's awesome. Also got my Tommaselli clip-ons, I think from a member here. The same day I hit the metal store and got some aluminum stock for brackets, etc for this project. I've got the muffler brackets basically made...I just need to drill some speed holes in them, make a little tweak in them and bolt them up. To mount them to the frame I cut some pieces of 1"X1/8" angle iron and drilled them for mounting holes, then welded them to the frame.
I also finished making a new steel peg mount for the left side.


I had to do some trimming on my front master cylinder to get it to fit the clip ons well, and decided to clean up the other 3 sides of the casting to get it looking the part. Fits good now.
I also recieved my taillamp from Amazon the other day and set to work today building a housing for it out of sheetmetal. I started with a baseplate then heated and bent a 2" wide strip around it, tacking it with my welder as I went. I then welded up the seams and ground it all smooth. I then transferred a pattern of the shape of the gasket to the rear of the tail section and cut it out using a cut-off wheel on my grinder. I tacked the "ham-can" housing inside and it's ready to finish weld and smooth out. I think this is gonna work slick. You can also sneak a peak of the right side exhaust bracket I also completed today. This bitch is coming together.
 

Attachments

  • taillamphousing4.jpg
    taillamphousing4.jpg
    54.9 KB · Views: 956
  • taillamphousing3.jpg
    taillamphousing3.jpg
    40.8 KB · Views: 839
  • taillamphousing.jpg
    taillamphousing.jpg
    54.1 KB · Views: 880
  • mastercylinder.jpg
    mastercylinder.jpg
    53.3 KB · Views: 915
did a little more work on my taillamp housing today, but I'm gonna need a small grinding stone or wheel to really finish the edge good before it's ready for smoothing out with putty. I think it's gonna look sweet though.
I also started in on cleaning up my hand controls. The clutch side cleaned up nicely, and I drilled the lever. This whole bike is gonna get swiss-cheesed. The front MC is gonna need a rebuild after I cleaned it up, but it's looking good too. Still need to drill and clean up the brake lever.
 

Attachments

  • clutch.jpg
    clutch.jpg
    54.5 KB · Views: 713
  • clutch2.jpg
    clutch2.jpg
    45.7 KB · Views: 769
  • frontmc.jpg
    frontmc.jpg
    37.4 KB · Views: 784
more work on the front MC and hand controls. I also detabbed the top triple and wire-wheeled the paint off it.
 

Attachments

  • controls.jpg
    controls.jpg
    51 KB · Views: 770
  • controls1.jpg
    controls1.jpg
    36 KB · Views: 799
  • controls2.jpg
    controls2.jpg
    46.6 KB · Views: 777
Back
Top Bottom