Follow along with the video below to see how to install our site as a web app on your home screen.
Note: This feature may not be available in some browsers.
We noticed you are blocking ads. DO THE TON only works with community supporters. Most are active members of the site with small businesses. Please consider disabling your ad blocking tool and checking out the businesses that help keep our site up and free.
When I first saw the picture before reading the post, I thought you had been holding your beer with the vice grips. But, that would only be necessary after a lot of beer.
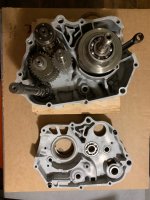
New bearings, transmission and kickstart assembly cleaned up and reassembled, and everything installed into the left crankcase half. Shifted through the gears and everything seems to be smooth and working as intended. Seal em up tonight hopefully.
Been slowly chipping away at the motor rebuild. I’ve been trying to grab one ziploc bag at a time and clean everything up and get it reinstalled before I move to the next thing.
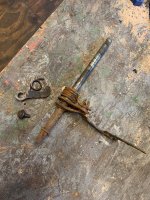
The gearshift lever spindle was one of the things that was exposed due to the broken cases, and the spring stay welded to the spindle was bent out of shape. Bent back the welded bracket, cleaned everything up on the wire wheel and it’s ready to reinstall.
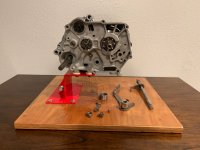
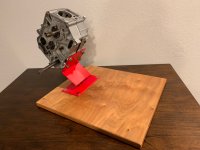
I also spent about 3 hours making this nifty little engine stand. I had drawn a nicer version up in CAD that my uncle was going to water jet for me, but I decided to save the money and use scrap and materials I had lying around the shop to build a simpler version. Ended up having $0 into the stand, so that’s money in the parts fund.
Thanks dudes! I’ll check that site out. I love how available parts are for these bikes. After the RV125/90 and their difficult to find parts, it’s made it a lot more enjoyable finding parts.
pidjones said:
One baggie at a time. That's the way to either eventually finish a build. Or forget what you were doing and eat four pizzas.
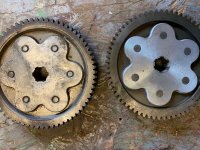
Over the weekend I got the new primary drive gear in. As you can see in the first pic, the aluminum mounting boss that’s riveted to the gear was all cracked on the gear on the left side. I found a replacement for $15 shipped and slapped it in.
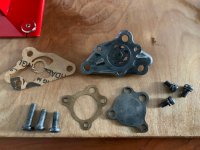
Also cleaned and rebuilt the oil pump. I had to make the inner gasket for the pump cover as it wasn’t included in the gasket set I bought. There was a bit of crud in there but once cleaned and oiled everything spins smoothly.
Need to grab a couple clutch plates and a few more engine parts before I can button this sucker up.
I also spent an hour on the frame straightening up some of the damage from the crash but haven’t gotten any pics yet. I also got the swing arm straightened out as well. Still have more work to do there. Also need to get the damn swing arm bushings out. They are always a pain in the arse. I think its time to get a grade 8 bolt and the 1/2" impact on there to push them out.
Also need to get the damn swing arm bushings out. They are always a pain in the arse. I think its time to get a grade 8 bolt and the 1/2" impact on there to push them out.
What techniques have you tried in the past for removing the bushings? I want to replace mine, too. Somebody on the CT90/110 forum wrote they had success heating up the bushings with a torch until they were soft enough to pull the inner sleeves out, after which they removed the outer sleeves by first scoring them in a couple places with a hacksaw blade. I thought I might try the same.
What techniques have you tried in the past for removing the bushings? I want to replace mine, too. Somebody on the CT90/110 forum wrote they had success heating up the bushings with a torch until they were soft enough to pull the inner sleeves out, after which they removed the outer sleeves by first scoring them in a couple places with a hacksaw blade. I thought I might try the same.
What I’ve done in the past is use a large socket on one side with the ID larger than the bushing, and a socket with the same OD as the bushing. Take a long boot and run it through the whole deal with a thick washer on each end, and then tighten the crap out of it with an impact.
It’s worked every time for me so far, but I was using a crappy carriage bolt I had lying around that was flexing under the pressure. If I can’t get them out using this method, I’ll go ahead and score them and punch them out with a drift.
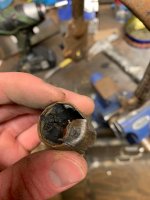
Well my bolt broke and I didn’t feel like going out to buy a stronger one so I ended up cutting them with the hacksaw and punching ‘em out. Easy enough!
Nice! I was also thinking the upside-down air duster freeze trick could be a good addition to the bolt method. It probably wouldn't help unless you were able to get most of the rubber off to expose the outer sleeve, though, and that looks tough judging by your photo.
Nice! I was also thinking the upside-down air duster freeze trick could be a good addition to the bolt method. It probably wouldn't help unless you were able to get most of the rubber off to expose the outer sleeve, though, and that looks tough judging by your photo.
Yeah, the rubber is pretty resilient. Hack saw cuts right through and the bushing pushes right out with a blunt punch once it’s cut twice. The second one came out real easy. 10/10 would recommend.
This site uses cookies to help personalise content, tailor your experience and to keep you logged in if you register.
By continuing to use this site, you are consenting to our use of cookies.