Follow along with the video below to see how to install our site as a web app on your home screen.
Note: This feature may not be available in some browsers.
We noticed you are blocking ads. DO THE TON only works with community supporters. Most are active members of the site with small businesses. Please consider disabling your ad blocking tool and checking out the businesses that help keep our site up and free.
That doesn't look like the right piston, but that could just be an illusion.
There are a few different pistons for those singles with different crown shapes. The one you show as original looks like the crown shape is different than the one fitted. The reason for the different shapes is the combustion chamber shapes. Some are deeper and some are wider depending on exactly which motor it fits.
The z50R had a different head design and they moved to a "flat top" piston that was a bit shorter on the 79 and up models. This is supposed to be correct for a z50A but my guess is just crappy QC.
Check your head. Let me re-phrase that. The head on that motor and see how it matches.
Have you checked for rub marks to see where it' has "negative clearance"? Almost all our Honda builds ( with non OEM pistons) needs the valve pockets machining. If the rub is on the face, try to cut the seats back a little. If it's on the outer edge, are the valves the right size or oversize? Is the cam close to stock lift and duration? That will cause rubs every time.....
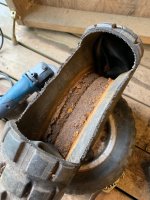
The rub marks can be seen on the "lips" at the upper and lower edge of the piston in the valve pockets - those "lips" that are supposed to be machined off in production. I well get a pic of the piston showing the rub marks later.
So I contacted the vendor about the piston, turns out its a known bad batch and they "didn't think they had any more of those in stock." Looks like I'll just end up grinding down those protruding edges on the valve pockets. Good thing I ordered a second set of piston pin circlips. :
Got my money back for the piston, ended up filing down the lips on the valve pockets. Got it reinstalled but I think there’s some crap in the ring groove so I need to remedy that so I can reinstall the top end.
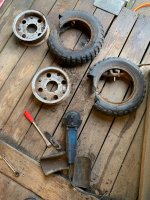
Switching gears, I fought with breaking the beads on the wheels for about an hour the other day before giving up. I was going to take them to a tire shop but decided to give it one more shot. What I ended up doing was cutting a section of the tire out with a sawzall, and then taking the angle grinder almost tangent to the rim and slicing the metal in the bead. Once I got through the steel wire in the bead, the tire fell right off.
If you’re careful, you can do it without touching the rim with the cutoff wheel. What I did was cut 3/4 of the way through the bead, then stick a tire spoon behind the bead and pry it out a bit to make some space. Then finish cutting through the wires using the spoon as a backer.
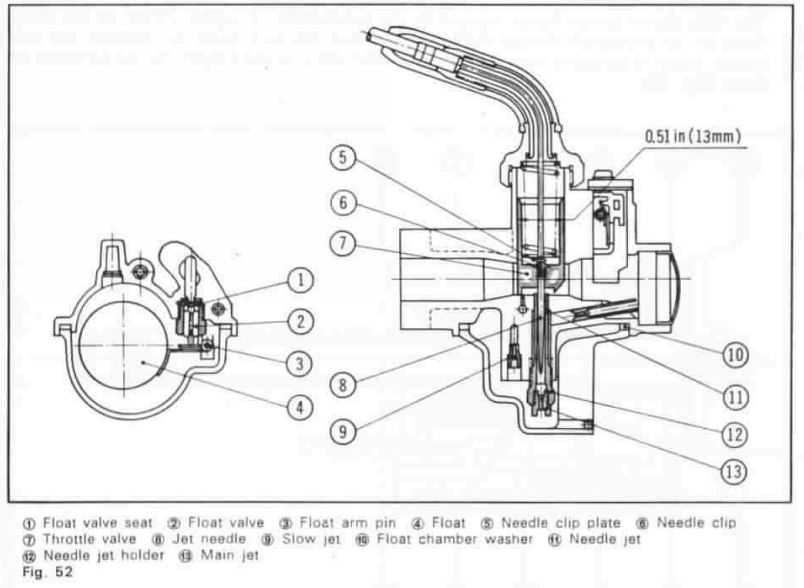
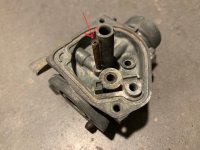
I put the carb in the ultrasonic a few weeks back and started cleaning out some of the passages. If anyone is familiar with these carbs...this brass tube seems to be some sort of pilot jet but it’s completely clogged. It almost feels like I’m hitting metal when I poke at it from the bowl side. But there’s a small hole inside the carb throat that leads down to it. There’s nothing called out as a pilot jet in the carb diagram though. The carb diagram in the FSM shows a slow jet but it looks like a traditional jet and not what I have here.
That's a Z50a carb drawing, but you have a Z50r/XR50 carb. Try heating the jet and see if you can soften whatever is in there. Also, make sure you wire is not too thick. Like a couple strands of electrical wire thin.
Clem found this post on planetminis talking about the same issue I’ve got. I think I’ll crank the heat way up in the ultrasonic and see if I can’t get it to soften up.
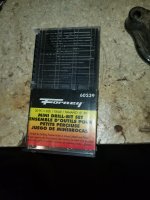
Mine must not have been clogged the first time I cleaned it...dont remember running wire through it. I normally cook it forever in ultrasonic cleaner and have no problem. I also have tiny "forney" size 61-80 drill bits I use for bad stuff.
This site uses cookies to help personalise content, tailor your experience and to keep you logged in if you register.
By continuing to use this site, you are consenting to our use of cookies.
")