small CL 360 project

Thanks for the kind words guys!
JRK, thank you for the sharing the knowledge.
Even though I spent the time to tape the nipples/rims I may end up painting the rims as well. The way they are now it may be a little too much chrome with the silver frame and all. We'll see.

SausageMahoney said:
... My wheels look almost exactly the same, except I got like two or three spots where the paint lifted right off the surface and crinkled up because my garage was so cold when I sprayed. I'm still working on finishing up the trouble spots, two weeks after I started!!!
Man I was thinking of you the whole time I was doing this. The whole time I was just hoping that the paint would go on smooth and would stick. I warmed the can up first and had the wheels warm as well ( I live in a passive solar house and I just put them in the sun for about an hour). I took them outside and shot them and brought them right back in to dry. I think this might have helped but who knows.
 
SausageMahoney said:
I'm glad you could learn from my mistakes! ;)
There is this saying, "were all standing on the shoulders of giants".
Also, I was wondering when you sand and repaint how well does the paint feather out and the new paint blend in? I've not had to do it yet but it sounds like it could be a posibility.
 
A Little more progress.
After spending a good evening sanding the frame I got it ready to paint (Damn that was a lot of work!). I washed the frame with dish liquid in the bath tub
DSC_0574.jpg


I then wiped it down and put it in the sun to dry. After abut twenty minutes I wiped it down with denatured alochol.
DSC_0578.jpg


All I can say is its very silver. I just hope it grows on me.
Paint did turn out real smooth except for a couple of places where the can shot out a ton of glitter. It was a pain in teh ass because I almost had to continously shake the can while painting. In a few days I'll hit it with 400 and touch it up. This is after 2 cans of rustolium appliance epoxy.
DSC_0580.jpg
 
Looking great, man.
Just wondering, do you shoot primer first before the appliance epoxy? Or just paint it right after the alcohol?
 
My personal experiences...

I have used the Rustoleum Appliance Epoxy quite a bit in the past. The cans I have had said to spray over bare metal. I tried it once over primer and it was a disaster. The epoxy flaked off fairly easily. When I cleaned it up and re-applied it according to the directions, it has been about bulletproof so far...I have always used the gloss black...The stuff has been fairly UV resistant too...I make sure the metal is as warm as possible and make sure the can is warm by setting in the sun, or putting in a pan of warm water...

Eric
 
arsey said:
Looking great, man.
Just wondering, do you shoot primer first before the appliance epoxy? Or just paint it right after the alcohol?
Thanks man, I shot it on bare metal. I was a bit uneasy about it at first. But that's what the directions say. We'll see how it holds up. What ever I did to the silver made it set up very, very fast. I think I might have thinned it down by letting the can sit in direct sun light for almost an hour. The can was pretty warm but not hot. Three hours after shooting, I tried to sand it in a small spot and it had already set up. I went ahead and feathered out the places that went on dry and they look ready to shoot again. No problems at all. I couldn't believe it. However, I'll wait a few more days to put a few more coats on so the cleaner I use to prep won't hurt whats already down. So far I really like the epoxy paint. I don't have the money to pc so I wanted something that would stand up to my abuses. Time will tell. I will say that I agree with all the others in that it is all in the prep. I have spent an unbelievable amount of time preping and so I hope it holds up.

eric123 said:
My personal experiences...

I have used the Rustoleum Appliance Epoxy quite a bit in the past. The cans I have had said to spray over bare metal. I tried it once over primer and it was a disaster. The epoxy flaked off fairly easily. When I cleaned it up and re-applied it according to the directions, it has been about bulletproof so far...I have always used the gloss black...The stuff has been fairly UV resistant too...I make sure the metal is as warm as possible and make sure the can is warm by setting in the sun, or putting in a pan of warm water...

Eric
Eric, That is such good news! I have spent so much time prepping it sounds like it should pay off. "Bulletproof so far" makes me very happy! Do you have any photos of the stuff you've shot?

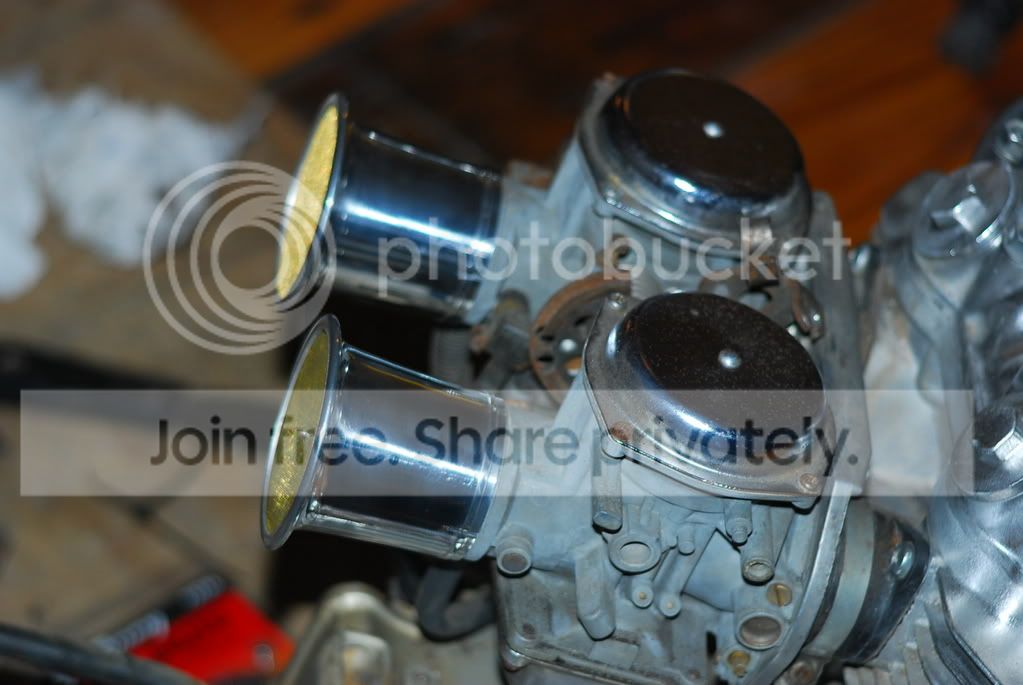
Also, I got my velocity stacks today. They look real nice. They came in a pack of 4 so I have 2 extra if somone wants them. The boxes are stamped CB 450 but they fit my 360 carbs perfect. I'll take 20 bucks shipped anywhere.
 
I'm interested to see how the whole project will turn out!

I plan on painting some metal pieces as well. I guess it's according to the paint if you're supposed to shoot primer on metal before shooting it with some coats of paint.
 
Hey hanly, These are the ones I'm keeping. The ones I'm selling will come in the box unopened. I have photos of both. I just stuck mine on the carbs. The clamp bolts seems a little small although I've not tried them yet to see if they fit or not. At worst you may have to buy a longer bolt for the clamp. You can see the clamps in the second photos.
DSC_0593.jpg


The box and clamp

DSC_0597.jpg

DSC_0599.jpg
 
goodfornothing said:
I'm interested to see how the whole project will turn out!

I plan on painting some metal pieces as well. I guess it's according to the paint if you're supposed to shoot primer on metal before shooting it with some coats of paint.
Yeah this is the only paint I'm aware of that it says not to apply primer first. For bare metal I have used self etching primer with good results, but that was with other paints.
I'm feeling pretty good about the paint on the frame. We'll see how the rest goes. Troy
 
same v stacks ill be rocking on my CB350 build... man your bike is ROCKIN now man! i have to race to catch up now!!!
 
JRK5892 said:
same v stacks ill be rocking on my CB350 build... man your bike is ROCKIN now man! i have to race to catch up now!!!
They are pretty cheap and I really like the way they look on the bike. I was trying to check on canuckplumbers stacks but I thinks he's busy.
I got a long way to go. I keep looking at all those baggies of parts.....Funny thing is my parts are starting to turn up in different places around the house. I catch myself dragging something to where the family is hanging out so I can be around them. You know quality family time. Gotta keep the wife happy ;)
 
ha ha ha ha i bring parts in with polish and will polish them on a tray table covered wiht a towel as the girl and i watch TV... that way she gets her time and i get to work on the bike... win win!
 
troybilt said:
Thanks man, I shot it on bare metal. I was a bit uneasy about it at first. But that's what the directions say. We'll see how it holds up. What ever I did to the silver made it set up very, very fast. I think I might have thinned it down by letting the can sit in direct sun light for almost an hour. The can was pretty warm but not hot. Three hours after shooting, I tried to sand it in a small spot and it had already set up. I went ahead and feathered out the places that went on dry and they look ready to shoot again. No problems at all. I couldn't believe it. However, I'll wait a few more days to put a few more coats on so the cleaner I use to prep won't hurt whats already down. So far I really like the epoxy paint. I don't have the money to pc so I wanted something that would stand up to my abuses. Time will tell. I will say that I agree with all the others in that it is all in the prep. I have spent an unbelievable amount of time preping and so I hope it holds up.
Eric, That is such good news! I have spent so much time prepping it sounds like it should pay off. "Bulletproof so far" makes me very happy! Do you have any photos of the stuff you've shot?

Also, I got my velocity stacks today. They look real nice. They came in a pack of 4 so I have 2 extra if somone wants them. The boxes are stamped CB 450 but they fit my 360 carbs perfect. I'll take 20 bucks shipped anywhere.

Hey Troybilt...Sorry, I don't have any pics...I caught a terminal case of cheating wife syndrome(Divorce) so all my shit went into storage...I will be digging some stuff out again in the next few weeks and will see if I can get a few pics. I use the epoxy on frames, fenders, and gas tanks...Been the best stuff I have used in a can so far...
 
troybilt said:
Hey hanly, These are the ones I'm keeping. The ones I'm selling will come in the box unopened. I have photos of both. I just stuck mine on the carbs. The clamp bolts seems a little small although I've not tried them yet to see if they fit or not. At worst you may have to buy a longer bolt for the clamp. You can see the clamps in the second photos.

Those look pretty tight man,I love the look with the gold(brass?) screens. I may run one on my project track bike,but I don't know how they flow compared to say a large K&N style filter. I don't think I'd run them on a street bike,but on the track I think I could get away with running a stack.
 
Don't know. I figure you will have to rejet the carbs. I think it would be the same for running pods. Your exhaust also affects this. Maybe some one with more experience can help us out. Troy
 
eric123 said:
Hey Troybilt...Sorry, I don't have any pics...I caught a terminal case of cheating wife syndrome(Divorce) so all my shit went into storage...I will be digging some stuff out again in the next few weeks and will see if I can get a few pics. I use the epoxy on frames, fenders, and gas tanks...Been the best stuff I have used in a can so far...
Oh man I hate to hear that! Hopefully things are working out for you!
 
Back
Top Bottom