Follow along with the video below to see how to install our site as a web app on your home screen.
Note: This feature currently requires accessing the site using the built-in Safari browser.
We noticed you are blocking ads. DO THE TON only works with community supporters. Most are active members of the site with small businesses. Please consider disabling your ad blocking tool and checking out the businesses that help keep our site up and free.
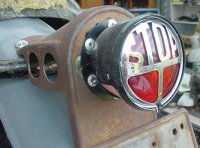
Heres the before & after of how the tail light, a replica Vincent item grafted to a modified Benelli 250 2C mount ,turned out after I hit it with a 35mm chassis punch (to make the big holes in the thin sheet metal) & then had it powdercoated
The Rickman race fairing slopes back above the headlight so Ill need to create a 'glass return flange to fill the gap below
Also heres the wire mesh guard fitted to the 7" replica chrome brit headlite but now with a 55/60w Q/H bulb to give WAY better light than they ever had back in the '60s
I also get to make another clear screen to replace the earthquake damaged one in the pic
Actually,its quite straightforward,I get a 1/2 bubble blown at the local plastics shop & then proceed to trim it to shape with a thin metal cutting disc on an angle grinder
The only problem is that acrylic is really brittle so when drilling the boltholes you need to use a BLUNT drill!!
Spent this last week making the 2 x front brake,2 x throttle & the clutch cables, fitting the stands & new springs ,making & sorting out the floating back brake linkage & rod , plumbing in the fuel lines & rebushing/fitting the back shocks with new s/s bolts & domenuts. Next is to mount the chainguard & battery box.
Heres a pic of the carb cables & fuel lines progress & the front end assembly progress including mounted front fender & finished cables & levers.
Theres still a lot of alloy polishing to do & Im actually looking forward to spray painting the tank, sidecovers, fairing & rear fender. Ive even already got a colour scheme in mind......
Still undecided on frame powder coat colour though, anyone got any ideas/suggestions?
Well, things are coming right along. Got the suitably holed Commando chainguard finally mounted up.Then on went the battery holder complete with one of my replica figlass Lucas battery boxes.That will hide the cheapo taiwanese 12v battery quite nicely
Lastly, decided to mount the oil cooler/filter unit under the motor so it would look like a sump. Usually it mounts directly to the crankcase rear face but theres a Triumph tranny in the way....Ill have to plumb it in with some nice braided stainless lines
Thanx man ,but wait theres more!......
Heres todays result of waving a hacksaw, then a file, wearing out some sandpaper [& my fingertips] & standing in front of the polishing buff for a couple more hours:
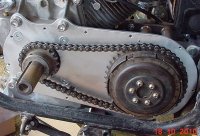
Making excellant progress on Lois' inner & outer primary covers
Started by doing a couple of quick sketches for the inner primary then making a cardboard template & then chewing it out of yet another bit of 1/4" ally plate with my now very tired jigsaw
Filed,drilled,countersunk & tapped the holes & viola! primary inner done
FYI the clutch is BSA thats been adapted to the Trumpy box
Have had to change the previously made wood/bog outer cover buck to suit
Next up Ill have to make a female fibreglass mold of it then do a male copy from that to form a suitable pattern for ally casting
Yesterday had a crack at figlass molding the aforementioned wood/bondo primary cover plug
Came out usable & contained in it is the mold for the 'Griffon' seat,tank & motor badges
I found this badge on my grandsons cheapo plastic knights helmet & sheild
You all now know why this bikes called Lois, {off 'Family Guy'}
Im not a fan of too much chrome so decided to match them to the frame powder coat colour ,antique gold & antique pewter should look good on the alloy crankcase cover
This build is one of the most inspiring builds I've seen here on this board. There are ones that I'm completely awed at, well executed and beautiful and there there are ones like this where it wants me to develop my skills to this level. Amazing work.
This build is one of the most inspiring builds I've seen here on this board. There are ones that I'm completely awed at, well executed and beautiful and there there are ones like this where it wants me to develop my skills to this level. Amazing work.
I agree. This is one of the finest builds of anything that I've ever seen on any web site. Period. The raw ingenuity demonstrated puts you into a category of your own.
I don't think I will ever attain this level of skill in my lifetime, but it's something to shoot for.
This site uses cookies to help personalise content, tailor your experience and to keep you logged in if you register.
By continuing to use this site, you are consenting to our use of cookies.