Follow along with the video below to see how to install our site as a web app on your home screen.
Note: This feature may not be available in some browsers.
We noticed you are blocking ads. DO THE TON only works with community supporters. Most are active members of the site with small businesses. Please consider disabling your ad blocking tool and checking out the businesses that help keep our site up and free.
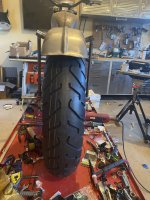
Prototyping a sprocket spacer on the 3D printer. I got the spacers made up for the brake side of the the rear wheel. Left side is gonna be tricky. There’s very little clearance between this 130 rear tire and the frame. Getting this sprocket and a 130 chain to work and clear the tire is gonna be a close call if it works out. There’s a chance I’m going to have to switch to a narrower tire.
This is all the clearance I have to work with. I’m very close to lining up the sprockets with a 1/4” spacer on the sprocket but I’m not clearing the tire. I’ve got another 12mm thick spacer printing now. Which is about another 5mm. Will see how that goes. Definitely not gonna get an off the shelf spacer. Will have to have one made.
Got the rear sprocket and spacer shit worked out. Chain clearance is tight but it is clear and the wheel is centered. The brake caliper doesn’t bind. Now, between last night and today, I went ahead and tacked up the rear fender mounting bungs and made up the struts. I’ll finish welding them up tomorrow morning. That should wrap up all the welding I need to do on the frame. I still need to weld up front fender struts. I need to put in an order at McMaster Carr this weekend for some fasteners and spacers to
Make that work.
I finished up my welds broke the bike back down and dropped my frame off for powder coating today... I should have it back by the weekend. I’ll powder up my fender struts and get the shop cleaned up so that I can move onto painting in the very near future.
I get my frame back from PC tomorrow. Today while I worked, I gave the tank a soak for several hours in a couple of gallons of vinegar... tossed in some ceramic tumbling media I’ve had great luck with in the past. Then gave it a good shaking and then rinsed out all the flakey rust and then gave it another good soak in a CLR solution and did the ceramic media shake again. Cleaned out the tank very well... no liner needed and and no inline filter needed. Now I can fully move onto the paint prep on the outside . I did spot weld the badge screw holes too as I’m not attaching a tank badge. To this one. Logos will be painted on.
Picked up the powder coated frame today. I also got started on the paint prep a little. Hope to get a first primer coat this weekend as well as get the frame back into a roller.
Yeah crazy fast turnaround. I think it’s the same guy that Eric used on his 400-Four.
I managed to get the frame assembled and mates back to the front end. I made a few spacers and powder coated them to make up for the thickness differences between a stock rear frame and the hard tail at the bottom mounting points. Gotta use stock fasteners as these are CEI threaded. I also mounted the headlight and ears on the forks while reassembling. Headlight bucket might end up getting painted to match the rims or just gloss black.
I managed to get the tins primed in epoxy primer, block sanded and primed again yesterday. Will work toward getting prepared to do a sealer coat and lay down some actual paint later this week. I need to order a set of carbs and my exhaust so that they will be here about the time to really start assembling this thing.
This site uses cookies to help personalise content, tailor your experience and to keep you logged in if you register.
By continuing to use this site, you are consenting to our use of cookies.