Where'd ya get those velocity stack filters?
We noticed you are blocking ads. DO THE TON only works with community supporters. Most are active members of the site with small businesses. Please consider disabling your ad blocking tool and checking out the businesses that help keep our site up and free.
You are using an out of date browser. It may not display this or other websites correctly.
You should upgrade or use an alternative browser.
You should upgrade or use an alternative browser.
'73 CB250 - Doing it right this time round.
- Thread starter Green199
- Start date
Quick question in preparation for reassembly.
I have a set of SAE 660 bronze bushings, so not oil impregnated. I've heard with the oil impregnated bushing that they should not be greased with bearing grease, as obviously it would block up the pores preventing the self-lubricating nature of the bearings.
Should I use standard bearing grease for the 660 bushings?
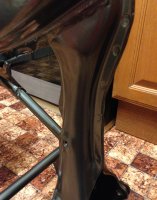
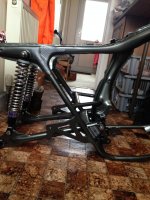
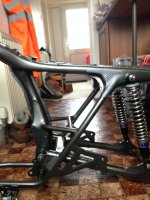
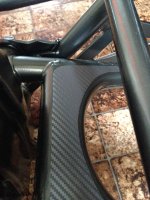
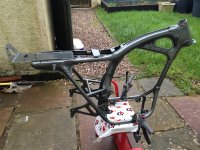
Got my powder work back yesterday. Unfortunately, there were a few bubbles in it and the colour which I picked definitely amplified the flaws in my welding. I will be covering the worst of the bubbles with a carbon fibre frame protector sheet. Should cover them up nicely. Again, it made the welds on my seat pan look like proper chicken shit, but they will be hidden when assembled so its all good! I don't pretend to be a professional at this, so for my first ever time welding i'm moderately happy with the way its all panned out.
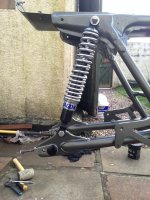
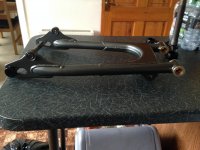
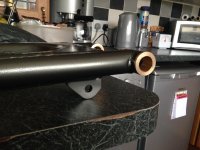
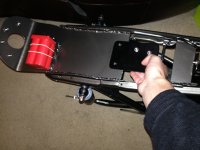
That meant I could finally crack on with the rebuild today! Put the bronze bushings in the swingarm, and replaced the bushing for the lower shock mount.
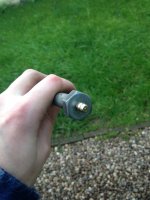
I also replaced the stock grease fittings on the swingarm pivot bolt with zerk fittings so I can use a standard grease gun. Got it mounted with some new stainless fasterners too.
You can see the bubbles in the top right in the last pic.
Next is to wait for it stop raining down here, then I can mount the motor back in the frame and get her back to a roller.
That meant I could finally crack on with the rebuild today! Put the bronze bushings in the swingarm, and replaced the bushing for the lower shock mount.
I also replaced the stock grease fittings on the swingarm pivot bolt with zerk fittings so I can use a standard grease gun. Got it mounted with some new stainless fasterners too.
You can see the bubbles in the top right in the last pic.
Next is to wait for it stop raining down here, then I can mount the motor back in the frame and get her back to a roller.
Attachments
yorkie350 said:Nice nice nice 8) that's a cool colour mate starting to look like a bike againfelt same about my welding skills or lack of them haha
Thanks yorkie!
Hopefully when its all assembled the defects will just blend in a tad! Already stopped noticing poor welds on the swingarm supports now that its mounted. I will still covered the majority of the bad parts with frame protectors to help them blend in.
That all looks pretty damn good! One of the most important things to realize building anything is that the completed project, in general, will be viewed as a whole, so little defects only a builder would notice are lost in the bigger picture. This is massively true with big objects like cars, but bikes which, in the main, are laid bare for everyone to be able to inspect everything are another matter. On my own projects I tend to obsess over things I know no one will EVER be able to see, but the truth is that the overall picture is far more important. Save up all your highest demands for the paint on the bodywork. Only absolute perfection will do if you wish it to present well - even if that is only to yourself. Many flaws will be hidden, but unlike a car for example, no flaw in the paint on a bike is lost in the scale of the project - it's almost the only thing most people notice. EVERYONE will look at the "paint" on the tins. After all, there is very little to else (for most) to look at, so defects there will be spied out by even the casual critic. It's nice to have everything perfected, but in the main, a practical impossibility. In the real world, even for the most insane, compromise is a fact of life. Set your bar high, but keep moving forward!
I know what you mean jpmobius, I really am hoping that they are lost when the bike is reassembled. Its just hard to imagine that when the frame is bare and the flaws are staring right at your face! haha
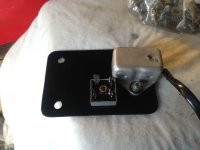
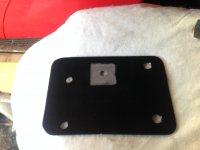
Had to grind the powder of the electronics plate today, so that it can act as a heatsink for the bridge rectifier.
And no, I am not using an elastic band to hold the battery in....just a mock up. ;D
Had to grind the powder of the electronics plate today, so that it can act as a heatsink for the bridge rectifier.
And no, I am not using an elastic band to hold the battery in....just a mock up. ;D
Attachments
DohcBikes
Fuck You.
Do it.Sonreir said:http://www.sparckmoto.com/products
Sonreir said:A modern rectifier won't get too hot. You'll be OK.
Not too late to go with one of our combined units, though. ;D
http://www.sparckmoto.com/products
For the sake of 10 minutes and a die grinder, I thought I may as well just in case.
Believe me, If I had the funds now I would be running a complete Sparkmoto harness! ;D
I'll have an order in with you in future!
Bit of a problem regarding my lower steering head bearings.
I ordered a set of pyramid parts steering head bearings. I've seen peoples kits come with 2 spacers; a thin one and a slightly thicker one. Mine only came with the thick washer.
I know I need to compare the stack height with the stock bearings and race to determine which spacer to use, but my lower race had to be cut from my bottom yoke, so I cant use it to measure the height. (It was properly chewed up and mangled, so couldn't use it after it was removed).
Is there another way to determine if I need the spacer without assembling it all together, and if wrong, trying to take it apart without damaging the bearing?
DohcBikes
Fuck You.
Just need to make sure the race isnt recessed so much that the lower clamp will contact the steering tube when installed. So, measure your race, then measure the bearing total height, then measure your headstock to see how far the race will seat. If the headstock measurement is more than the assembled bearing, you will need to make up that much or more with spacers.Green199 said:Bit of a problem regarding my lower steering head bearings.
I ordered a set of pyramid parts steering head bearings. I've seen peoples kits come with 2 spacers; a thin one and a slightly thicker one. Mine only came with the thick washer.
I know I need to compare the stack height with the stock bearings and race to determine which spacer to use, but my lower race had to be cut from my bottom yoke, so I cant use it to measure the height. (It was properly chewed up and mangled, so couldn't use it after it was removed).
Is there another way to determine if I need the spacer without assembling it all together, and if wrong, trying to take it apart without damaging the bearing?
I do believe deviant just went through a similar process on one of his prejects, the gl maybe. Check with him for a possibly easier to understand explanation. What can I say hes a teacher, Im just a dumb bike mechanic.
LOL. I hope this covers it:
I did have a similar problem on my GL. I had to make up 4mm, where the Suzuki matched race was shorter than the Honda. I made a 5mm spacer to sit on the bearing seat inside the steering tube, so the race extends 1mm beyond the lowest edge of the tube. I figure I want all the force on the bearings, so that 1mm extra would be good insurance that my triple would stay off the steering tube when the bolts are cinched.
I had two issues to deal with: One, I had a race that inset 4mm into the steering tube so my bearing did not make contact. Two, I had a few mil to make up in the length of the Suzuki stem vs the stock GL.
Before:

After:

I did have a similar problem on my GL. I had to make up 4mm, where the Suzuki matched race was shorter than the Honda. I made a 5mm spacer to sit on the bearing seat inside the steering tube, so the race extends 1mm beyond the lowest edge of the tube. I figure I want all the force on the bearings, so that 1mm extra would be good insurance that my triple would stay off the steering tube when the bolts are cinched.
I had two issues to deal with: One, I had a race that inset 4mm into the steering tube so my bearing did not make contact. Two, I had a few mil to make up in the length of the Suzuki stem vs the stock GL.
Before:
After:
Assuming you are going to tapered rollers here. Good point made gentlemen, that the only real concern is to keep the lower triple from contacting the frame at the head stock tube. You can go ahead and install the race into the head stock tube, and then place the roller assembly into the outer race. If the bottom of the inner race is higher (with the frame upside down, i.e. sits proud of the head stock tube) then you shouldn't need a spacer. You should be able to make a confident judgement comparing the lower triple and where the bearing will end up when pressed onto the steering stem with where it sits when placed into the outer race. If it is too close to eyeball, with the inner race and rollers sitting in the steering neck you can put a straight edge on the inner race if it is proud, or the steering neck tube if it is low and measure the distance. Then compare that to how high the inner race needs to sit off the lower triple to make some clearance. You don't want any more than just enough to clear. Excessive clearance will reduce the length the steering stem scopes through the neck. Tapered rollers replacing loose ball bearings usually are thicker, so you don't want to cause your steering stem to be any shorter than needed or else you may have trouble making it reach to all the parts that go on top.
I'll figure out the bearings races later on.
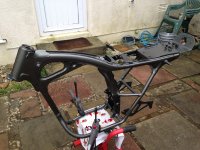
In the meantime, my frame protector sheet came in, so I tried to just cover up some of the flaws. Doesn't look too bad, but if it does later on when its in the light I'll just remove them.
Also got my acrylic sheet in to act as my rear splash guard. Just need to get some acrylic cutting blades for my jigsaw and I will cut it out.