'73 CB250 - Doing it right this time round.

xb33bsa said:
very nice indeed love the color
if you are to put a panel splash across the rear tubes in front of tire make sure it clears, as the tire intrudes that area on susp travel
just a flat panel lashed across will hit for sure

I plan to run it tangentially to frame tubes, at the point closest to the front of the bike. I will install it and compress the rear again and check the clearance to the guard.
 
Got the bearing races mounted. I kept them in the freezer overnight, and then used the old races to knock them in gently, did't take very long really. Worked really well.

I also finally get the engine mounted. I still need to torque the bolts to spec, and put the other bolt into the top bracket (misplaced it somewhere).
 

Attachments

  • IMG_2365.JPG
    IMG_2365.JPG
    795.3 KB · Views: 226
  • IMG_2371.JPG
    IMG_2371.JPG
    1.8 MB · Views: 247
  • IMG_2369.JPG
    IMG_2369.JPG
    2.4 MB · Views: 228
  • IMG_2368.JPG
    IMG_2368.JPG
    2.6 MB · Views: 235
  • IMG_2367.JPG
    IMG_2367.JPG
    2.3 MB · Views: 219
  • IMG_2366.JPG
    IMG_2366.JPG
    868.4 KB · Views: 215
I also got hands on with a Ducati Scrambler yesterday.....
 

Attachments

  • IMG_2363.JPG
    IMG_2363.JPG
    2 MB · Views: 209
Also, I like what i'm seeing.

There are things I wouldn't do but you already know that. I have a feeling you have a cv carb tuning lesson coming up.
 
DohcBikes said:
Bottom race looks too deep top race looks too proud you sure you didnt swap them

98-99% sure I got them right. The spacer in the bearing kit seems to put the lower yoke in the right place from my measurements.

I agree the top looks quite proud (its around 2mm at a push), but from what I've seen the tapered race always seems proud on a 350. I'll have to double check when i've installed it that its all lined up.

DohcBikes said:
Also, I like what i'm seeing.

There are things I wouldn't do but you already know that. I have a feeling you have a cv carb tuning lesson coming up.

Yep, definitely have. Although the stacks are going to covered by some long foam cylinders similar to UNI foam, which I'm hoping will make the tuning a little easier than if I was just running stacks.
 
Green199 said:
98-99% sure I got them right. The spacer in the bearing kit seems to put the lower yoke in the right place from my measurements.

I agree the top looks quite proud (its around 2mm at a push), but from what I've seen the tapered race always seems proud on a 350. I'll have to double check when i've installed it that its all lined up.
I'll take your word for it, have never done the swap on a 350, just comparing it to the other swaps I've done. Thank you for the opportunity to learn.
 
Will know for certain when I get the lower bearing installed on the steering stem. That's going to be my next hurdle.
 
It might be late, but I would consider running your stem through with the bearings in to see if you'll be able to catch the threads at the top. I know the lower race is supposed to be inset a bit, so you're probably right where you should be. But with that 2 mil at the top, I'd be concerned you're overlapping the threads the spanner nut is supposed to catch.
 
deviant said:
It might be late, but I would consider running your stem through with the bearings in to see if you'll be able to catch the threads at the top. I know the lower race is supposed to be inset a bit, so you're probably right where you should be. But with that 2 mil at the top, I'd be concerned you're overlapping the threads the spanner nut is supposed to catch.

Thanks for the input deviant. I'll try this tomorrow morning and see if i'm good with everything in place.
 
deviant said:
It might be late, but I would consider running your stem through with the bearings in to see if you'll be able to catch the threads at the top. I know the lower race is supposed to be inset a bit, so you're probably right where you should be. But with that 2 mil at the top, I'd be concerned you're overlapping the threads the spanner nut is supposed to catch.

Right. Intended to make this point in my previous post. That is why it is important to measure what you have so as not to shim unnecessarily. As previously mentioned, tapered rollers almost always are taller than the loose balls and races they replace, so the effect is to make the steering stem no longer long enough to make up the difference properly. Usually the extra length needed from the tapered roller bearing swap can be accommodated, but often just barely which is why you don't want any more shimming than is absolutely needed. It is worth the trouble to make a careful measure, but in general you can still push the bearing off the steering stem if you are careful and change the amount of shimming. This is often quite difficult to do without damaging the bearing cage which is why it is a good idea to measure carefully.
 
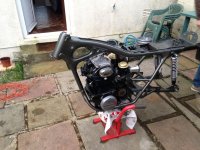
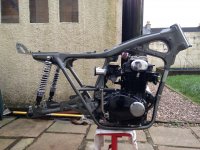
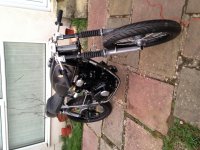
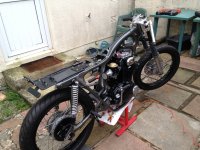
I got the rear wheel on this morning, and got everything torqued to spec.
The powder-coated side stand went on too, with a repainted spring.

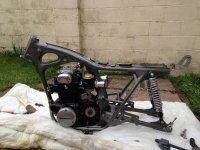
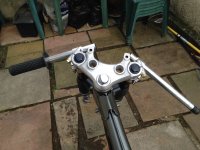
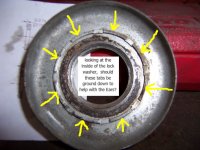
I then double checked my measurements for the steering head bearings. I got everything right, and then installed the bearing on to the steering stem. Took a bit of a pounding, but went on in the end, and still span nice and freely.

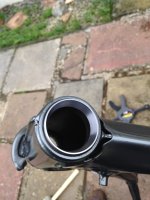
The top of the fork tubes and the top nuts were a bit rusty, so I cleaned them up with some emery cloth and sprayed them gloss black. Unfortunately, no matter how thinly I tried to apply it, and how much I lubricated the legs before putting them into the lower yoke, they still got all scratched up. So I will touch up the paint at a later time.

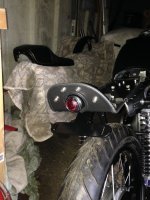
This allowed me to get the front wheel on again, so we have a roller! ;D

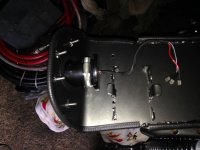
Just placed the bodywork on to save storage space...definitely needs to be tidied up once it gets a bit hotter here.

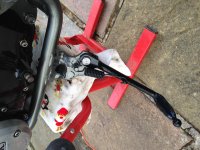
I think the next port of call will be to sort the caliper and master cylinder, and then get the wiring loom back on the bike to finish up.
 

Attachments

  • IMG_2415.JPG
    IMG_2415.JPG
    949.1 KB · Views: 199
  • IMG_2408.JPG
    IMG_2408.JPG
    2.6 MB · Views: 205
  • IMG_2406.JPG
    IMG_2406.JPG
    2.6 MB · Views: 196
  • IMG_2403.JPG
    IMG_2403.JPG
    2.1 MB · Views: 197
  • IMG_2404.JPG
    IMG_2404.JPG
    2.6 MB · Views: 190
  • IMG_2386.JPG
    IMG_2386.JPG
    1.1 MB · Views: 189
  • IMG_2385.JPG
    IMG_2385.JPG
    2.8 MB · Views: 208
I'm not entirely happy with the top bearing assembly. The locknut for the top has locating 'ears' for the stock races. Now they have been removed, they effectively raise the nut off of the surface of the bearing more than it needs to be. This means I have less threads engaging than I would like. So i'm gonna take the die grinder to them tomorrow which will hopefully give me more thread to play with.
 
Why is the new top race not sitting further down, is that all the deeper it was machined?

You really should fix it by getting the top race to go lower.
 
That's just the dimensions of the top race. Its seated on the internal lip where it is meant to be.

The raised sections in the locknut, shown below, are irrelevant now I have moved from the stock bearings. Removing them would give me a flat surface to contact the top of the bearing, with the benefit of giving me more threads to play with.

*not my photograph. Pulled from Hondatwins.
 

Attachments

  • CB350project015.jpg
    CB350project015.jpg
    60.4 KB · Views: 773
those are not ears fo locating anything it is just the area where they did not crimp/smash it down to hold the cupped washer in place ,its a skip-crimp takes much less force in the machine that they crush it in hence less chance of distorting the cupped washer.
you need to knock out the oem bearing cups before the taperd cup can be seated home
still looking for your brake collar
 
xb33bsa said:
you need to knock out the oem bearing cups before the taperd cup can be seated home
still looking for your brake collar

Yep, well aware the old races need to be removed, and they are.

Thanks for looking for that xb! :)
 
Compressor packed in so I couldn't modify the upper locknut, or strip the powdercoat off my earthing points on the frame.

So this morning I drilled and tapped my caliper arm for a grease fitting. Also got my new brake pads through. Brembo sintered. Haven't seen a review of them online, either good or bad, so I will give them a try. The old Vesrah pads aren't int he worst condition and are still lying around, so I can swap them out if I don't get on with the brembos.

I'm waiting for an M10x1.25 tap before I can get the caliper mounted. (Powder on the bloody threads!).

Also drilled a hole to rivet a jubilee clip on to act as the mount for my taillight. Nice and stable on there.
 

Attachments

  • IMG_2416.JPG
    IMG_2416.JPG
    2.2 MB · Views: 204
  • IMG_2419.JPG
    IMG_2419.JPG
    964 KB · Views: 185
  • IMG_2420.JPG
    IMG_2420.JPG
    1.2 MB · Views: 201
  • IMG_2423.JPG
    IMG_2423.JPG
    975.4 KB · Views: 197
  • IMG_2422.JPG
    IMG_2422.JPG
    1.3 MB · Views: 202
Back
Top Bottom