
We noticed you are blocking ads. DO THE TON only works with community supporters. Most are active members of the site with small businesses. Please consider disabling your ad blocking tool and checking out the businesses that help keep our site up and free.
You are using an out of date browser. It may not display this or other websites correctly.
You should upgrade or use an alternative browser.
You should upgrade or use an alternative browser.
'73 CB250 - Doing it right this time round.
- Thread starter Green199
- Start date
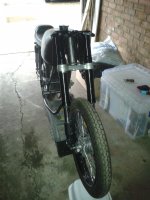
Ive taken a few pictures of my the set up to see what is wrong.
I had the points gap and the timing set while I had this setup, and didnt have the spark. So ive tinkered with the gap and timing a bit before I took these photos so they may be a tad off.
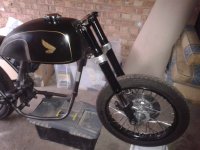
I have both black/white wires from the coils merged into one, which I ten connected to the battery.
 Uploaded with ImageShack.com
I then have a duel bullet connector coming from the other side of the coil. Into these connections go one from the condenser, and one from the points.
 Uploaded with ImageShack.com
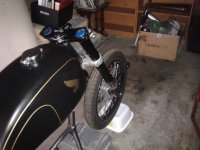
This shows what I have to do to get a spark at the plugs. I have to touch the heel of the point to the centre cam.
 Uploaded with ImageShack.com
This shows 'almost' the full gap how it sits.
 Uploaded with ImageShack.com
I know the gap looks a little bit big, this is because it isn't properly set as I said before.
I had the points gap and the timing set while I had this setup, and didnt have the spark. So ive tinkered with the gap and timing a bit before I took these photos so they may be a tad off.
I have both black/white wires from the coils merged into one, which I ten connected to the battery.
Uploaded with ImageShack.comI then have a duel bullet connector coming from the other side of the coil. Into these connections go one from the condenser, and one from the points.
Uploaded with ImageShack.comThis shows what I have to do to get a spark at the plugs. I have to touch the heel of the point to the centre cam.
Uploaded with ImageShack.comThis shows 'almost' the full gap how it sits.
Uploaded with ImageShack.comI know the gap looks a little bit big, this is because it isn't properly set as I said before.
kopcicle
antidisestablishmentarian
Well the manual doesn't do a very good job of explaining this so ...
New points have a film on them . Use contact cleaner on a piece of cloth or paper and drag it through the contacts several times to get the surfaces clean .
Set one set of points to the proper gap and place a dwell meter on that set of points and take down the reading .
(doesn't really matter what the number is or how many cylinders because you are going to make the other set the same . Just pick a setting that gives you a reading around mid scale)
Now get the bike running and set the other set of points to the same reading .
Ok now the almost kinda tricky part . Connect a timing light to the bike and moving the entire breaker plate assembly place the timing mark (usually for the left ) within the 1/8" or so that is the full advance mark .
You will notice that one set of points is "usually" solidly connected to the breaker plate assembly (again usually left but not always ) and the other set (right ) will move not only in advance and retard but in gap also .
Switch the timing light to the right and again place the mark in the 1/8" that is full advance .
go back and check dwell for both right and left . if the dwell and the timing is reasonably the same for each set within a couple of degrees you are done .
Special cases . On older bikes the advance mechanism may have been abused and even though the timing is correct at full advance the static or full retarded timing may be way late . limiting the advance by adding a bit of metal to the advance stoppers is preferred to attempting to bend them as they often break . Worn or loose advance springs will cause indistinct timing at just off idle to around 2,200 hundred rpm .
Adjust the valves . I can't repeat this often enough . Adjust the valves or all the work that goes into adjusting the timing has little or no effect on performance . Find either a reputable mechanic with a proven record with older bikes or attempt or your self . Just get it right .
. Now ever if the valve adjust is correct and the timing is spot on the carb sync should be a breeze . Have a talk with the folks around WiredGeorge before you mangle anything in and or around your carbs . if your manifolds are rotten and cracked you will have to replace them . Almost forgot . Get a trickle charger for the thing . The early charging systems arn't near as efficient as the newer models . They work and they are durable they just don't have great output .
~kop
Spark is consistent and big, fat and blue! ;D
Worked on the rest of the wiring job today.
Pretty much finished it up. Got a few things the wrong way round so my headlight turns off when the brake light goes on, but nothing I shouldn't be able to sort.
Just need to find a decent and cheapish battery I can hide somewhere now, and to get the throttle cable shortened, then I can fire her up!!!
sonicwarhawk
New Member
That is boss man.
Thanks very much man.
I have wired something wrong at the minute, so i'm trying to figure out why.
I have the 'on' prong of my on/off switch connected to the front running light and the rear running light. However, when only the front turns on. The rear turns on when it is switched to the off position, which is weird, seeing as it isn't connected to it. Plus, the headlight turns off when the brake light is on.
So ive gotta properly go through the wiring to fix it.
hooligan998
Been Around the Block
Enjoyed reading this so far. I'm in for the rest! Great job so far!
Nightmare. I hooked up some fuel lines now that had spark to try and see if I could just get it to fire.
Turns out, by my analysis anyway, (I rotated the rotor to LF on what I think was the compression stroke, and noted where the point on the cam behind the spark advancer was), that I have installed the crank 180 degrees out. Is it possible to run like this. Surely just by setting the left point to open when it just open RF instead of LF would make it work?
Turns out, by my analysis anyway, (I rotated the rotor to LF on what I think was the compression stroke, and noted where the point on the cam behind the spark advancer was), that I have installed the crank 180 degrees out. Is it possible to run like this. Surely just by setting the left point to open when it just open RF instead of LF would make it work?
Fella's....I need some help.
I have taken the rocker cover off to set the cam timing.
I disconnected the cam chain, so that it was no longer connected to the cam. Thus meaning that when I set the rotor to LT, it was at top dead centre. By disconnecting it from the cam, the rotor is now in the right place and cannot be wrong because its on the exhaust stroke as opposed to compression because thats all related t the cam....yes?
I then rotated the cam so that the little know on the end of it was pointing directly up, and attached the sprocket to the cam, with the horizontal timing mark bang on horizontal.
So I had the rotor on LT, the cam with the timing mark up, and the timing mark on the cam sprocket horizontal.
I rotated it a few times, to make sure it still lined up and nothing hit, and it was fine.
Then had a look at what was happening, and when all these things are right (rotor, cam mark and the sprocket) and when it should be on the compression stroke, it is actually on the exhaust stroke, as the exhaust valve is open.
What the hell is going on?! Have somehow done it completely wrong...is the cam marking wrong,?
Problem solved....kind of. Don't know what was causing it to skip a tooth, but I fully disassembled the motor (had a few oil leaks!), cleaned everything, repainted, used an oil stone on the gasket surfaces, and put some new gaskets in. Reassembled very slowly and precisely and it seems to be firmly on the camshaft now.


There was however a compression leak from one of the valves, so the head is coming off and spare valves are going on, or my spare head is going on once I get a broken carb manifold welded up and retapped.
There was however a compression leak from one of the valves, so the head is coming off and spare valves are going on, or my spare head is going on once I get a broken carb manifold welded up and retapped.
The head has been welded and reshaped. Just waiting to get some free time at university so I can whack it on the flowbench 
In other news, this just came in. :
In other news, this just came in. :
Attachments
scotch_egg
New Member
Any update with the fork install?
would love to see it complete. I have pulled the front end off my cb350 and am now looking for an alternative :'(
would love to see it complete. I have pulled the front end off my cb350 and am now looking for an alternative :'(


