Follow along with the video below to see how to install our site as a web app on your home screen.
Note: This feature currently requires accessing the site using the built-in Safari browser.
We noticed you are blocking ads. DO THE TON only works with community supporters. Most are active members of the site with small businesses. Please consider disabling your ad blocking tool and checking out the businesses that help keep our site up and free.
I wasn't able to get a quick video before the snow finally hit, but I was able to put a few miles on the new setup. Everything seems to be working out great with the newest pipes. Its now stored indoors, and has allowed me to do some fine tuning of the looks. I've already tried at the fairing concept, and decided on purchasing a premade one. I ended up with the universal dunstall quarter fairing: http://www.airtech-streamlining.com/vintage/Dunstall.htm
I'll paint match it up with the rest of the bike. However, its been pointed out by others that the front end seems higher, ie the headlight and the overall stance. I agree, and have a fix for this. I used clipons in the past, and loved them. However, they were over engineered and didn't fit well with the rest of the bike. So, I purchased a set of clipons and headlight brackets. I went ahead and removed the turn signals from the bike, something I should've done a long time ago. so, by the end of the year, I'll have the fairing and within a week I'll have the front end stuff to fool around with and get it all setup. With the clipons mounted, I'll be able to fine tune the height, and also allow me to drop the bars lower, something that I've been wanting to do. And of course when I put on the clipons, I'll need to make up a custom aluminum triple tree top so I don't have the ugly bar mounts hanging around. Pics will follow when parts are recieved. thanks, Joe
I took a look at the differences between the 74 and 75, much more of a change than I thought. I was able to modify my existing one, considering the amount of time it would take to make a complete new one, I'll settle on this. The clipons and headlight bracket should be in by the end of next week. One other thing I dabbled into is aluminum welding. I can tig weld steel pretty well, as can be seen by the pipes, but I've never touched aluminum before. The pic is what I did after seting up the tig and making a few passes. I can see a bright future in aluminum fabricating...Thanks, Joe
I recieved the clipons and headlight brackets. The headlight bracket was actually meant for a 1978 yamaha dt175. I saw some shiny chrome universal ones, but I opted for a more original look. After swaping out the necessary parts, I ended up with this. I really like how much lower the bars and headlight are, and will look much better paired up with the fairing. However, it has made me realize how much larger the gauge cluster really is. I think I may go the extra yard and get a vapor system. I'll make a spacer to take the speedo assembly off and I'll also be able to take out both the tach and speedo cables, cleaning up the mess quite a bit. both the speedo and tach get funny at speed anyways, I might as well have something that actually works. I'll look into it. In the mean time, I just have it dangling down where It may be located in the future. Thanks for reading, Joe
Looks much better! Love those headlight tabs you got. I was looking for something similar, but just ended up getting some "polished" aluminum ones off ebay. I just hope they arent too long.
As for the gauge cluster, they are pretty huge once you start stripping everything off the bike. Plus the lens' on both sets i have are so cloudy it would be dangerous trying to use them while ridding. I was gonna try and get some mini 2" gauges, but just not sure what ratio our bikes are... Keep up the good work!
That top triple looks pretty good. I've got the same problem with the GT750 triple I bought for my T500 project. I also have a GT550 upper triple that I hoped to use but the fork tube spacing is different so it looks like I'll have to modify the 750.
I purchased the trailtech vapor computer and should be here by the end of the week. What I did work on was the front wheel. I originally wanted to make a spacer to replace the speedo drive that's now useless. I later found out that the spacer on the opposite side is the correct size for the replacement of the speedo drive, so I'll be buying a second spacer rather than machining my own. I always wanted to put some holes in the rotor, but being stainless, I never touched it. After some templates, I settled on a design, and picked up a titanium 5/16th drillbit (dewalt if it matters). The design was simple, and was a total of 60 holes. Before I drilled the holes, I chucked it up to the lathe and smoothed out the surface. After many years of riding, small ridges have built up and made it look nasty. It cleaned up very nice. I should be getting an update later this week on the fairing. Thanks, Joe
Looks awesome! Great work as always. Where did you get the template? Online program? I was wanting to do the same thing. How did the holes turn out? Where they rough on the back side after drilling thorough?
I used a cad program called mastercam that I use with the cnc machines. The holes were very clean, but I did run a slight countersink on both sides. What I suggest when putting the template onto the rotor, is to check and double check that the template is centered. After mounting the rotor and spinning it, I found out theres a slight wobble, about 1/8" off. I'm sure its not gonna ruin the balance but I'd rather have it be perfect. Oh well, onto other things. I called airtech and my fairing should be shipped out the end of this week or beggining of next week. The trailtech computer should be in a little before then. When I removed the turn signals, horn, etc I was left with a mess of open ended wiring in the headlight bucket. I spent some time with the original wiring diagram and cut out all the unnecessary stuff, taking out quite a bit of wires. thanks, Joe
I recieved the trailtech vapor a couple days ago, and started figuring out how I wanted to mount it. I ended up with this
I made it out of stainless, so it won't bend or rust when compared to aluminum or steel. The amber led is my neutral light and the switch turns on the headlight, highbeams only. The computer sits flush with the dash and hopefully it will all fit nicely inside the fairing. I've already got the magnetic bolt and speed sensor on the bike, but unfortunetly the crush washer temp sensor is the wrong size. I'll talk to trail tech directly and see what they can do. thanks, Joe
Alright, a big update. I recieved the quarter fairing, and my first impression is this thing is huge! After working with it, it looks like its gonna fit the bike more and more. One thing I realized is the position of the headlight in relation to the clipons. When I test fit the fairing, the clipons were sitting too low. After some work, I ended up fitting them like so:
Heres the pic with the fairing in position, noting how the bars aren't in the right spot:
As you can see in the first pic I also lengthened the headlight brackets about 3/4" to leave me with some room between the fairing and the mastercylinder. In the final position, the headlight sits as low as it can, and the bars are now right where they should be. It also puts the fairing low on the bike, giving it a very sleek look that covers up the front end well. One problem I found with the vapor bracket was that the angle was off. Sitting on the bike in a normal riding position, the angle wasn't right, so I rewelded it in a better position and spent more time on smoothing out the welds. I also recieved the new temp sensor and will be installing it in the near future.
I'll be spending the next few days getting the fairing attached and finally painted. Thanks, Joe
I have those same bars for my GT250 build, and i actually initially did the same thing. Those bars are indeed swapped and upside down. Its hard to tell because there isnt much of a drop angle on them. But once another member commented about it on my build thread i trying turing them over and it really made a difference. But its actually not that bad upside down either. Gives them more of a straight drag bar feel. To each their own. Keep up the good work Joe!
yeah, I was slightly disapointed when I got the clipons. After some time I decided against the fairing. I'm not sure if I'm going to use it on a future project or not. If someone on here wants it, email me and I'll give you a good price. What I ended up doing was a new design on the headlight bracket and I flipped the clipons to the "correct" way. I love the angled feel, just like my clubmans, but the angle could be a little more. I also went ahead in the performance section and picked up some kawasaki h1 heads. After some reseach, it seemed that they are far superior to the stock heads with slight modification. Indeed, the squish design is much different. All that is needed to be done is have the surface milled down untill the squishband matches the new bore diameter. I did add a slight step in mine just in case the clearance wasn't there. After all said and done, the squish test showed about .065" gap, slightly larger than what I want but I can put it back on the lathe and mill them down some more. I also picked up a new triple tree top from an earlier year gt250. I unbolted the handlebar clamps, and pressed in aluminum rod and milled everything down and sanded it smooth.
Here is the newest setup with the new headlight brackets and the clipons repositioned:
Here is the modified triple tree top and the gauges:
Heres the stock h1 head compared to the stock gt250 head:
The h1 head on the left is modified, the one on the right is stock
In the end, I like the way it looks compared to the ram air. Going along with my them of less is more, the heads really fit the part.
I think I'm about finished with the heads. I took .030" off, and now my squish is right around .030"-.035". Before I started machining off the material, I took out a syringe and measured the cc's of the heads. The stock head measured out at 14cc's(keep in mind I did mill off about .020" from stock). The modified h1 heads also measured out at exactly 14cc's too. That explains why the compression was the same. However, once I corrected the squish clearance, it dropped it down to 11.5 cc's. Using an online calculator, this bumped my uncorrected cr from 9.84 to 11.76, and my corrected cr from 4.76 to 5.58. After I install the heads I'll be able to get a good compression reading. the compression with the stock heads were 120-125psi. I also chopped off one of the outside fins so it matches the stock cylinders a little better, they stuck out a little too far for my liking. Thanks, Joe
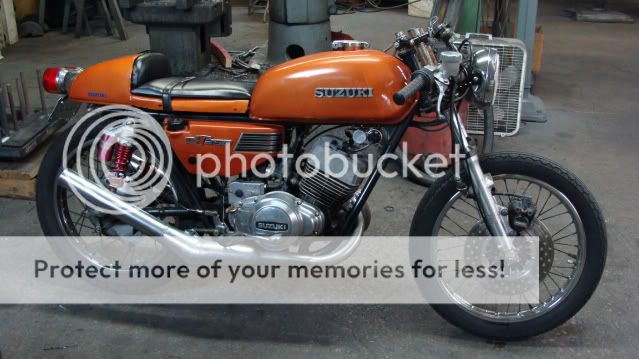
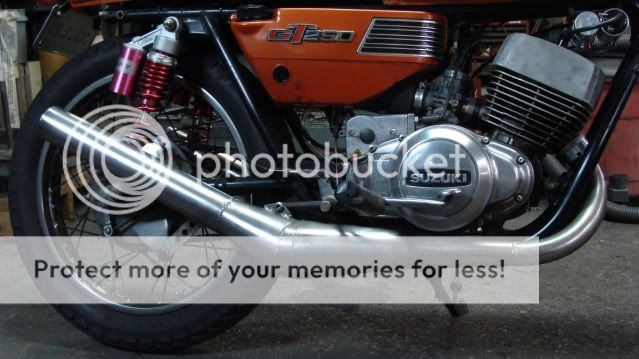
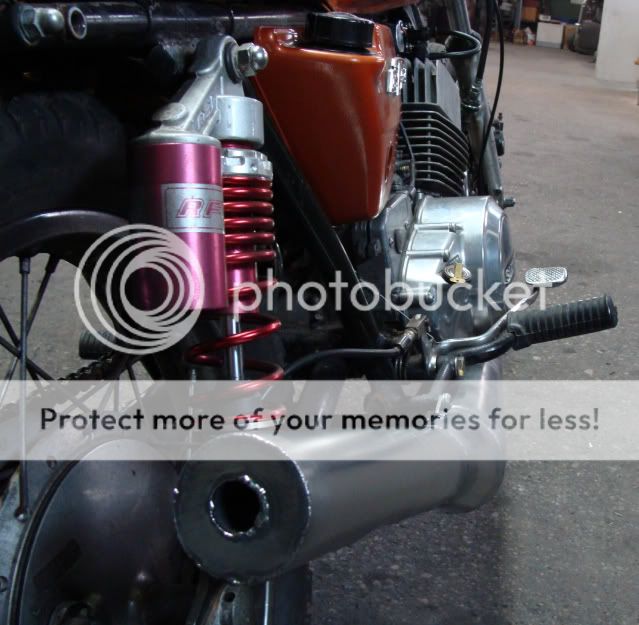
I'm glad I've had so many viewers to my thread. I've actually been back in the shop doing some tweaking here and there, along with actually putting some miles on the bike. I've developed another set of pipes for the bike. In actuality, they are the same pipes as before, but with a 50/50 split in the two divergent cones instead of the earlier 70/30. This will supposedly give me a better, more noticable powerband and narrow it a little. I also changed the baffles to go all the way down to the covergent cone, just like dg pipes, and it has a great, low popping sound like a bigger dirtbike. I've had just a quick ride with them, and they seem to be performing quite well. Instead of painting the pipes, I've polished them and will be applying a hightemp clear soon. My tig welding has been getting exponentially better. I was able to weld up all the cones and get the basic shape done using less than a half of a welding rod. One other big update will possibly be in a week. I have leads to a complete topend and carbs off a suzuki t350. The topend will "directly" bolt onto my cases and bump my cc's from 247cc's to 315cc's. Thank you for your interest, I'll try to keep this more updated. Joe
This site uses cookies to help personalise content, tailor your experience and to keep you logged in if you register.
By continuing to use this site, you are consenting to our use of cookies.


") Great job!
Great job!