'75 suzuki gt250...Buzzing around the block

Re: '75 suzuki gt250

ha, yeah...the rear wheel. I haven't thought about that yet, and I'm not sure what direction I want to go. A quick look on ebay gives me a few options as far as using rz350/fz600 rear wheels and swingarms. I have no intentions of converting over to a monoshock any time soon. However, I'm stopping to a local motorcycle salvage and I know he has hundreds of both bikes and wheels to choose from. What I'd like is a mag wheel that is close in design, but have a drum brake. I think the amount of work to get a rear hydraulic brake system is offset by the small advantage it gives me. That, and I can easily adapt my existing brake linkage to the wheel. I can easily purchase and modify axles and wheel spacers to make them work. Expect a new update on saturday when I check it out.
 
Re: '75 suzuki gt250

I was able to pick up a suzuki rear master cylinder and caliper, and a yamah 400 twin rear wheel. Overall I wasted a day trying to get the ball rolling. The sprocket is made for 530 size chain, not 520 and a few other small problems made me quit. I'd rather spend the money on a used rz350 wheel that already has the correct sprocket and then I'll have matching rims. In the pic you can see how much lower the rear sits than the front. The rfy shocks are about 1.75 inches lower than stock. I was able to take apart the shock and will be able to make up a new piece on the lathe to regain the length back and still keep the shock. On top of that I'll gain some much needed ground clearance. I know I've touched my side stand on more than one occasion. Hopefully tomorrow and wednesday I can get to that. Thanks, Joe

DSC000222.jpg
 
Re: '75 suzuki gt250

It's looking pretty good 8)
You can see how much rear needs to come up now though
I made new bottoms for the RFY shocks out of 6061
I had heard horror stories about the stock RFY mounts for Honda shattering
Pretty sure it was bad fitting?
The supplied mounts for 'eye' fitting look pretty good with a 2000lbs pull (I guess the factory heard about it and did some tests?)
Anyway, I just made heavy duty ones about 10mm longer and completely re-built the shock
The damper rod tubes are Loctited in position (or Chinese version of loctite)
Propane torch to heat them up and they come apart pretty easy.
Not sure if the quality control has improved, mine had no gas and not enough oil (2 sets I tested then stripped down to fix)
 
Re: '75 suzuki gt250

yep, I actually looked at your pics to get a good idea on how to take them apart. I was easily able to get the nut backed off of the damper rod after raising the "washer" piece that holds the bottom of the spring. I'm not sure if I want to incorporate the existing eylet or not. If so, I would need to pick up a new tap to thread the new bottom. I did set both of the shocks to 60 psi. Is there a short cut to checking/adding oil without taking apart the whole shock? ie removing the schrader valve?
 
Re: '75 suzuki gt250

I've got one extended shock complete, and should be able to get the other done a little more quickly. I started off with a big chunk of 1.5" aluminum stock and turned it down to size. I could've bought round stock but I already had this stuff just sitting around.

1-4.jpg


Cut to size, about 1.5" longer than stock:

2.jpg


Eyelet is cut and reused the rubber grommets and bushing:

3-1.jpg


I also made up a new "spacer" that holds the bottom of the spring. I made it .25" thicker than stock to aid in strength.

4.jpg


Here it is in the first mockup. One thing I didn't mention yet was the hole that was drilled and tapped for the piston rod. the thread is 12mmx1.25mm pitch. The local napa store only carried 12mmx1.75 but I was able to order one through the shop's tool supply for $10.

5.jpg

6.jpg


Here it is in the final stage. I took out some extra weight and gave it a scotchbrite finish. I still need to pick up a bench buffer.

7.jpg

8.jpg

9.jpg

10.jpg


Here's a side by side. You can tell how much of a difference there is. It is still sitting slightly lower in the back, but there is only one shock on there so once both are back on it'll be perfect.

11.jpg

12-3.jpg
 
Re: '75 suzuki gt250

Nice, looks a lot better sitting level 8)
You could just let the gas out and remove the bladder to change oil, although I would drill for a bleeder screw as it's MUCH easier to get completely filled and have no air in them
 
Re: '75 suzuki gt250

I have a lead on a complete rz rear end that should keep me busy this winter. Still keeping the stock swingarm and shocks, maybe extending it a couple inches. I did get to work on the top triple clamp. It'll be done cutting tomorow morning and will take a few more hours to get it to bolt on.

DSC00044.jpg


DSC00046.jpg
 
Re: '75 suzuki gt250

yes level is good...nice work-good luck with her.
 
Re: '75 suzuki gt250

I was able to do more work on the triple clamp. Turns out some of my dimesioning was a little off. I bought extra material incase this happened. The fork tube holes are correctly offset, but the stem hole is about .15" too high. This makes me have to slot the hole, turning it into a paper weight. I've already got version 2 almost done on cad.

DSC00049.jpg

DSC00050.jpg

DSC00052.jpg

DSC00054.jpg


Here you can see the slot:
DSC00055.jpg

DSC00059.jpg


I was also able to work up something for the new headlight bracket. I built my own set of clipons a few years back and modified them a little bit.


You can see the old one in black:
DSC00060.jpg

DSC00061.jpg

DSC00062.jpg
 
Re: '75 suzuki gt250

Looks very nice, you do a good job. I don't see any pinch bolts to lock the clamp to the fork tubes, am I missing something?
 
Re: '75 suzuki gt250

Since I need to make a new clamp anyways, I wasn't going to do the extra work to that one I'm not going to use. I finished up the headlight brackets. I ended up welding the two pieces together. I've welded aluminum one other time, and was able to get some good welds on these. I've also got some buffing wheels and compound coming in on monday or tuesday so I'll be able to polish these up.

DSC00063.jpg

DSC00064.jpg
 
Re: '75 suzuki gt250

I wouldn't say the 0.150" out is a problem, that's how adjustable yokes are made.
You just bore it slightly larger then make various insets to change rake/trail ;)
Just need to do something with the bottom and you have 'full race' version
 
Re: '75 suzuki gt250

crazypj said:
I wouldn't say the 0.150" out is a problem, that's how adjustable yokes are made.
You just bore it slightly larger then make various insets to change rake/trail ;)
Just need to do something with the bottom and you have 'full race' version
I was thinking the same thing. Darned site easier than making a new clamp.
 
Re: '75 suzuki gt250

Alright, big update. First, I finished the final version of the top triple clamp. It came out very nice, with everything matching up. I did move the bolt holes for the gauge cluster in further. I could've modified the first one, but I had extra material and some second thought ideas that I could impliment into this one. I got all the buffing stuff I needed so I was able to clean up many of my existing parts too.

DSC00091.jpg


DSC00093.jpg


DSC00095.jpg


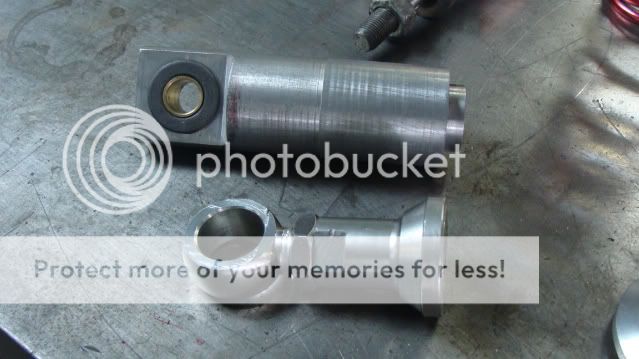
I got most of the things needed to put the rear rz350 rim on the bike. It was a simple conversion. My swingarm is 7.5" in width, and the rz rim assembly is 8.25". I ended up taking off 0.365" off the sprocket side. This was done by removing the bearing seal and original bushing and replacing it with a new, thinner bushing. I machined the lip surrounding the bearing and bushing down so it won't rub on the swingarm. In order to keep the sprockets lined up, I also machined down the sprocket surface.


DSC00081.jpg

DSC00085.jpg


You can see a small, 0.05" lip that goes agains the inner bearing race so it doesn't drag on the outside of the bearing.
DSC00086.jpg


Here's a pic of the rear master cylinder. The body is powdercoated dull silver/grey.
DSC00089.jpg


I then removed about 0.425" off the caliper bracket. I couldn't use the orignal method of bracing for the bracket, so I have to use a long plate to restrain it. I added more aluminum on the outside and inside of the bracket then drill/tapped it for the new brace plate. Don't worry about the condition of the caliper bracket so far. Once everything is bolted on and tested, it'll be cleaned up, deburred, and painted/polished. You can see in the pics that the original brake plate one is still in place and is a bit short. I havent' gotten new material for it yet. I also figure that with the brakes applied, it wants to fold the brake bracket, instead of stretch it like the drum brake had. I'll make sure the new one is out of thicker material to avoid an embarassing mistake down the road.

1-5.jpg

2-1.jpg

3-2.jpg


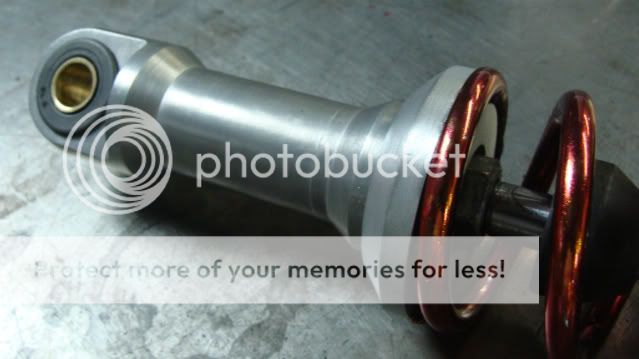
You can see the rear caliper in the same matching powdercoat.
DSC00076.jpg


I got the same powdercoated matching pair of front calipers, so I swapped out the guts from the old ones and put them in the new, shiny ones.

DSC00065.jpg

DSC00067.jpg

DSC00090.jpg


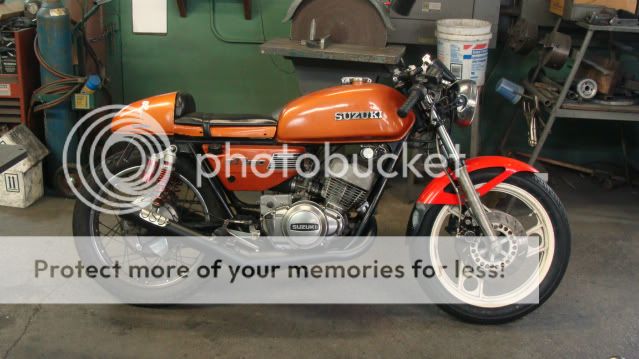
Here it is, in its entirety:

DSC00075.jpg

DSC00073.jpg

DSC00072.jpg

DSC00071.jpg


I've got a new tire coming in on monday, a Michelin pilot activ: http://www.motorcycle-superstore.com/1/28/396/6158/ITEM/Michelin-Pilot-Activ-Rear-Tire.aspx?WT.ac=SLIsearch

I also have a good sprocket that'll be in next week. I talked to a local powdercoater and I'll have both of the rims coated in satin black for $30 each if I sandblast and prep. I'm debating on keeping a polished lip, or having it all one color. I plan on removing the fork legs again and polishing them to give a good contrast with the rim. The calipers are going to look great against the rims once they're coated. Thanks, Joe
 
Re: '75 suzuki gt250

Dude, that looks baaaad ass. Can't believe how modern the old girl looks.
 
Re: '75 suzuki gt250

Got a little bit further. Rims are sandblasted and are going to the powdercoaters tomorrow. I decided to change the look of the rear shocks, so I sandblasted off the anodizing and polished them up. I kept the spring the same color for now. Lastely, I plan on stretching the swingarm by 2 inches. I've got a few ideas on how to do this, and with proper bracing. Hopefully by the end of the week I can start to piece it back together. I'm still not sure on the front fender. I have no idea on the color or possible trimming to make it work. Once I get the wheels back on the bike it should spark something. Thanks, Joe

DSC00097.jpg


DSC00098.jpg


DSC00100.jpg
 
Back
Top Bottom