
We noticed you are blocking ads. DO THE TON only works with community supporters. Most are active members of the site with small businesses. Please consider disabling your ad blocking tool and checking out the businesses that help keep our site up and free.
You are using an out of date browser. It may not display this or other websites correctly.
You should upgrade or use an alternative browser.
You should upgrade or use an alternative browser.
CB450 K7 "Espresso Love"
- Thread starter CCRider
- Start date
DBLshotcafe
New Member
man i really dig the idiot lights idea!!! totally stolen  i hope you dont mind, great idea for filling up those holes on the top mount!
i hope you dont mind, great idea for filling up those holes on the top mount!goodfornothing
Spicey!
Ahh that is so clean!
CC, guys like you and Herm never cease to amaze me. I've said it before, and I'll say it again in the future. Great work!
CC, guys like you and Herm never cease to amaze me. I've said it before, and I'll say it again in the future. Great work!
GoBears0305
Been Around the Block
How did you open up the gauges and then seal them up again? Did you just cut the securing "ring" and then just weld it back again? I'd love to be able to do the same, but it seems that once you open up the gauges, you can't get them closed again.
CCRider
Coast to Coast
GoBears0305 said:How did you open up the gauges and then seal them up again? Did you just cut the securing "ring" and then just weld it back again? I'd love to be able to do the same, but it seems that once you open up the gauges, you can't get them closed again.
Here's a good how-to link: http://www.vjmc.org/techtips/speedo_repair.htm
CC
CCRider
Coast to Coast
The wiring is complete!
Since it's been a while since I've posted, I hope you'll forgive me an excessive number of pics this time.
I'll try to just hit on the highlights of the electrics.
The coils that came with the bike were toast, so I ordered a new set from Mike's XS. To mount the new coils, I fabbed a bracket from aluminum sheet metal. The bracket pieces were bent up and trial fitted to the frame:

Then the pieces were trimmed and drilled:
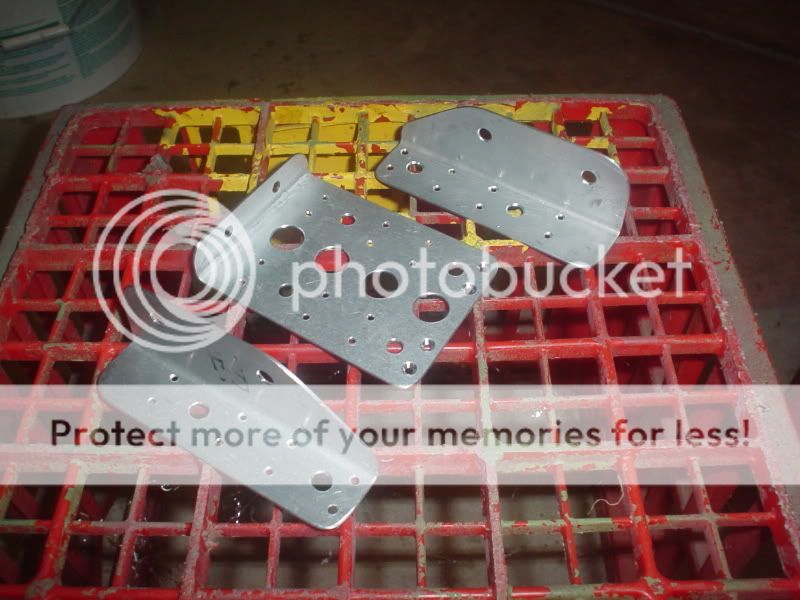
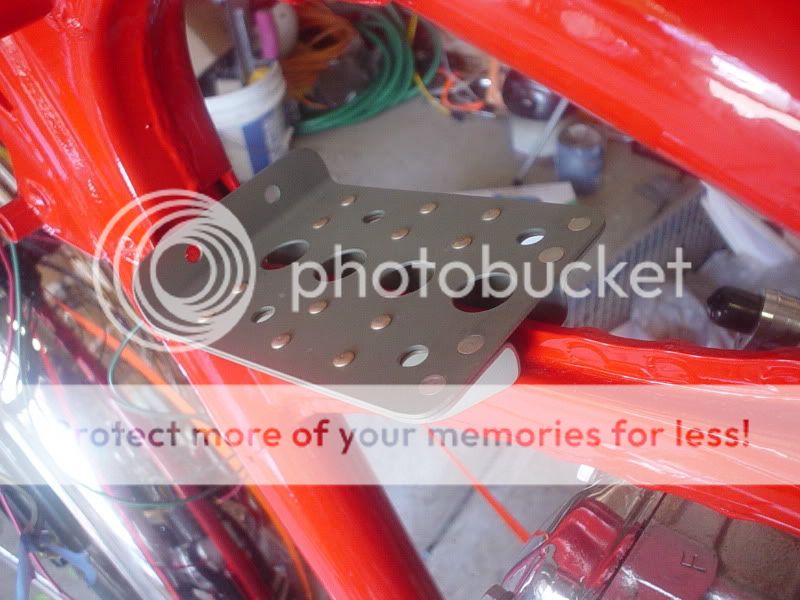
Riveted together, primed and mounted on the frame:
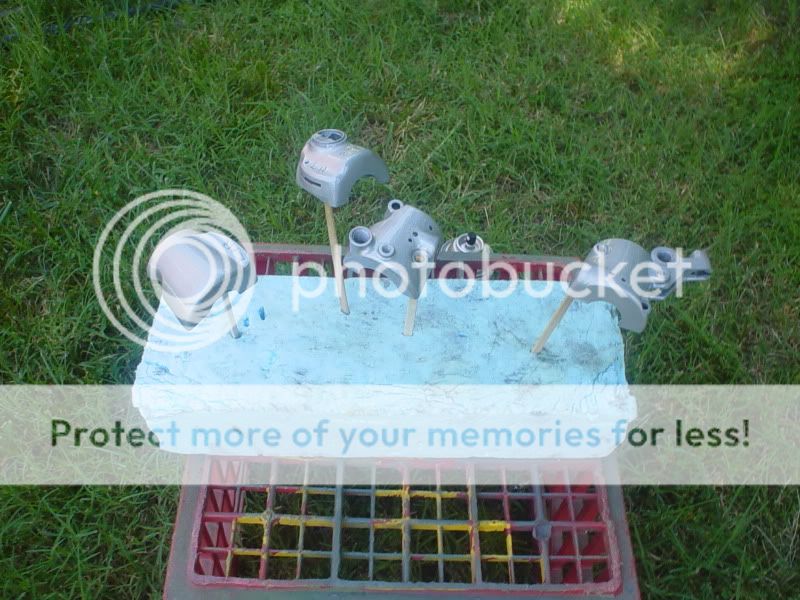
The stock controls were disassembled, cleaned and bead blasted. After blasting I clear coated the bare aluminum controls. I think the finish turned out really well:
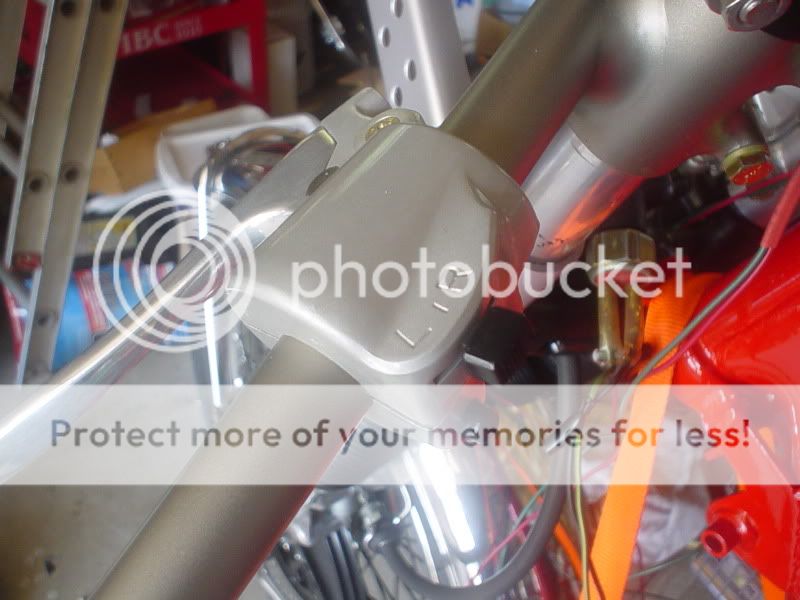
The only modification I made to the controls was to add a ground wire to the start and horn buttons, since the bars were painted and I didn't think I would get a good ground through them.
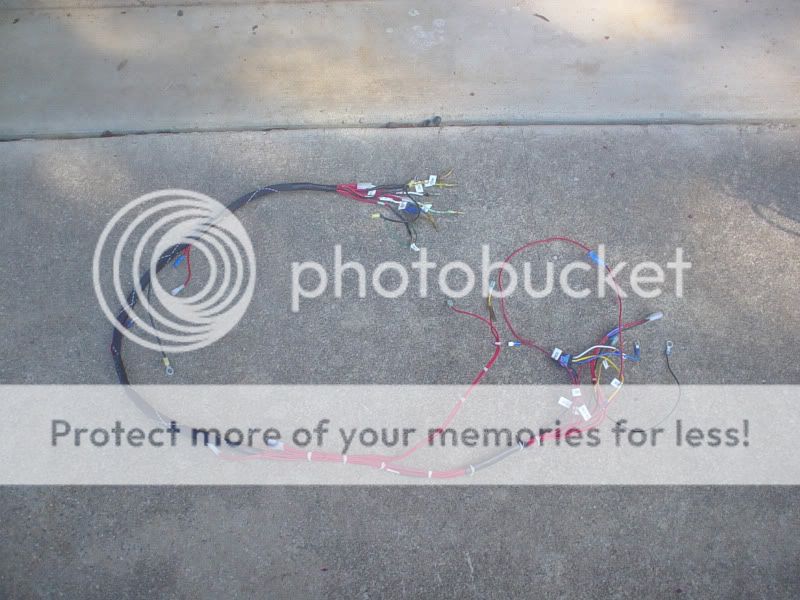
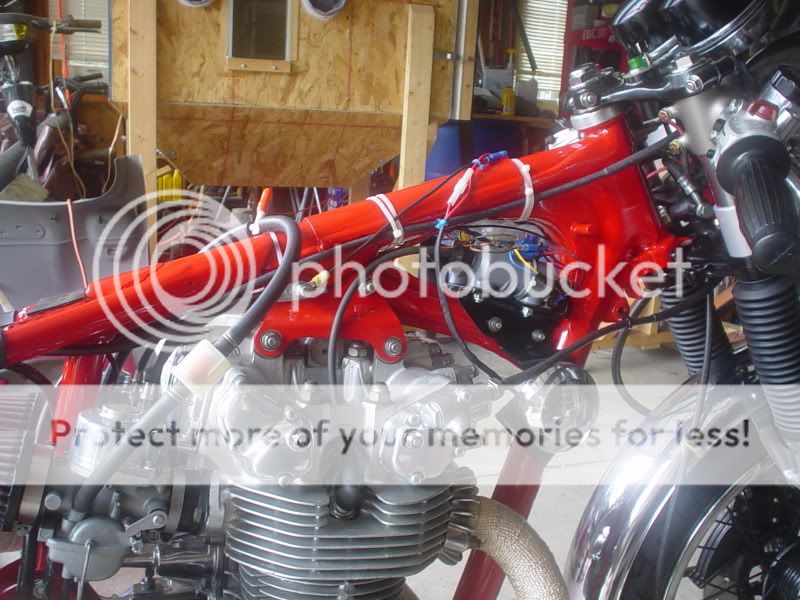
I pretty much started from scratch and made up a new wiring harness:
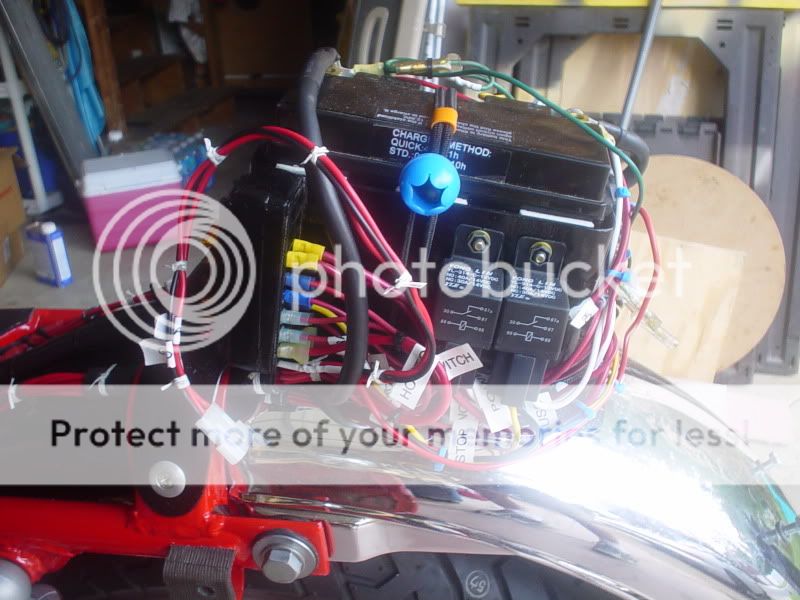
If you recall from my seat thread, I built a fiberglass battery box to hide everything under the seat cowl. Here's the left side of the battery box with the fuse block, master relay and ignition coil relay installed:
The back side of the battery box holds a terminal strip for making wiring connections:
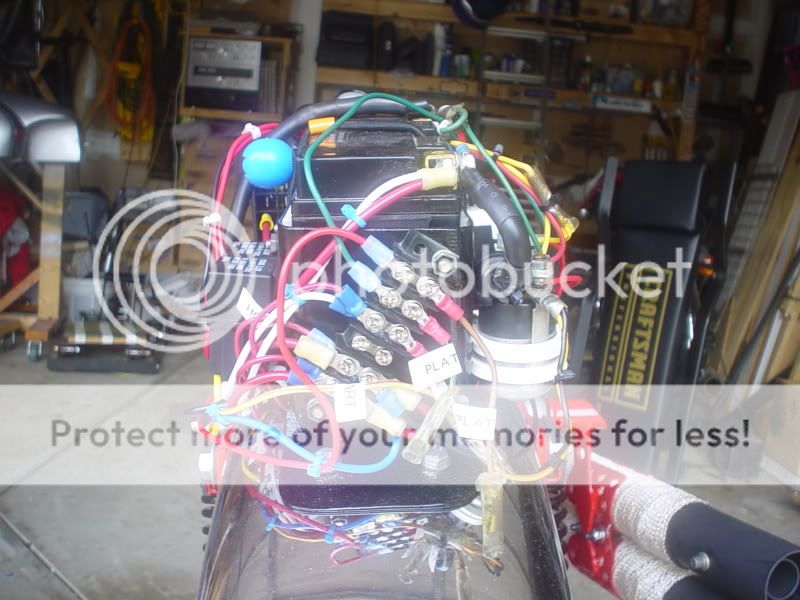
On the right side of the box the starter solenoid, radio shack rectifier mod and voltage regulator are installed:
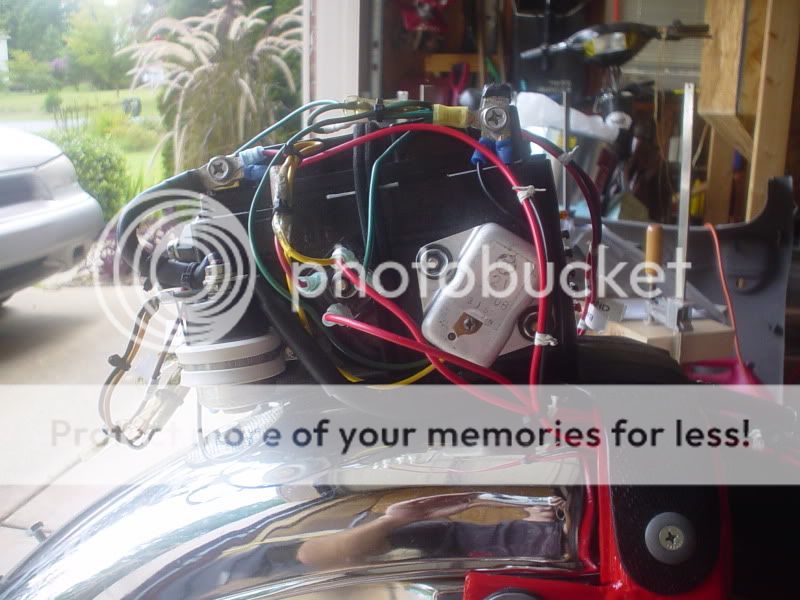
Here's the front of the box showing the fuse block and the pigtail connection for the rear/brake light:
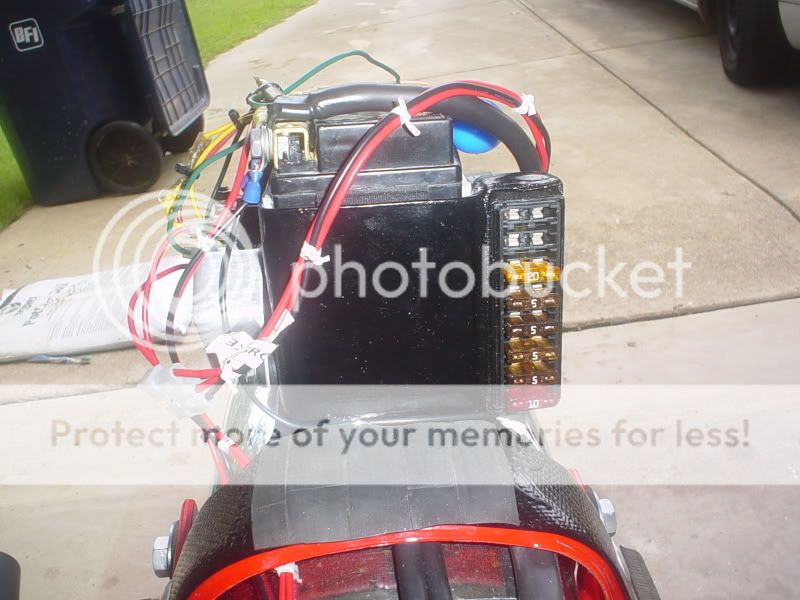
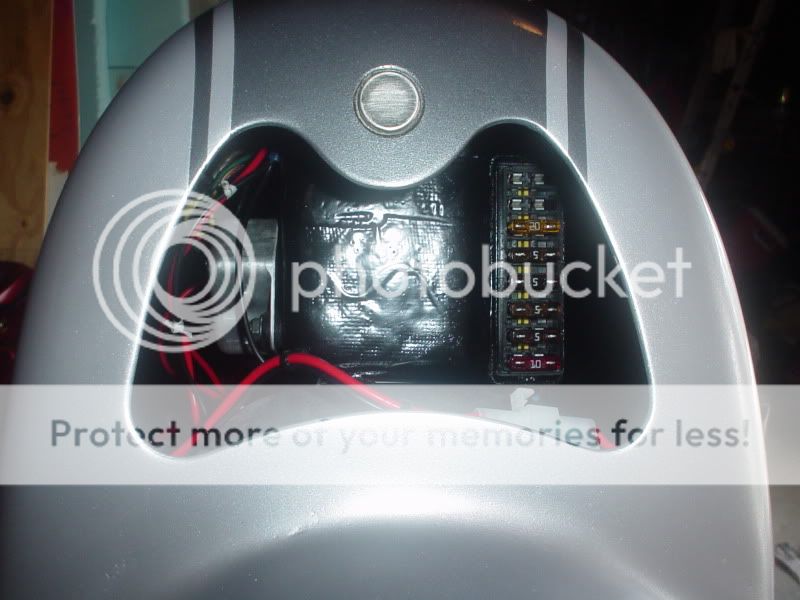
And a shot of the access to the fuse block with the seat pan installed:
From the battery box, the wiring follows along under the seat:
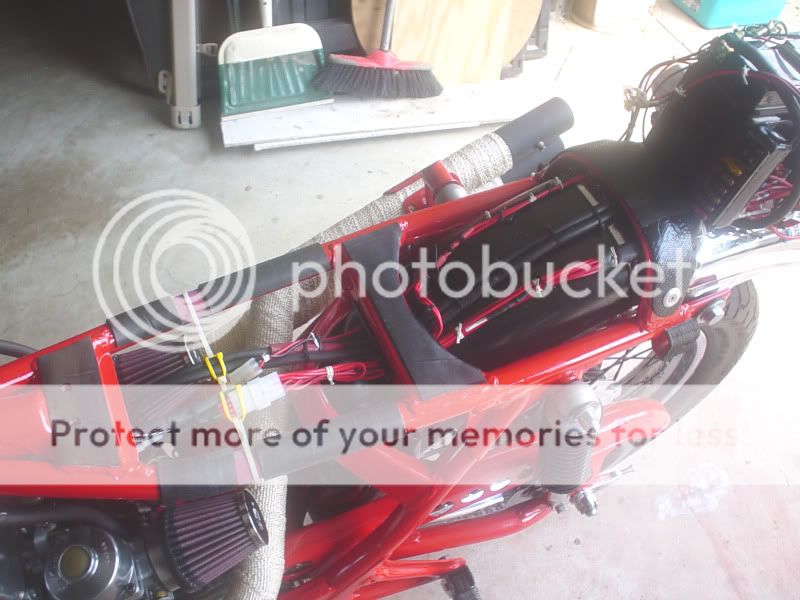
And along the left side of the frame to the headlight bucket:
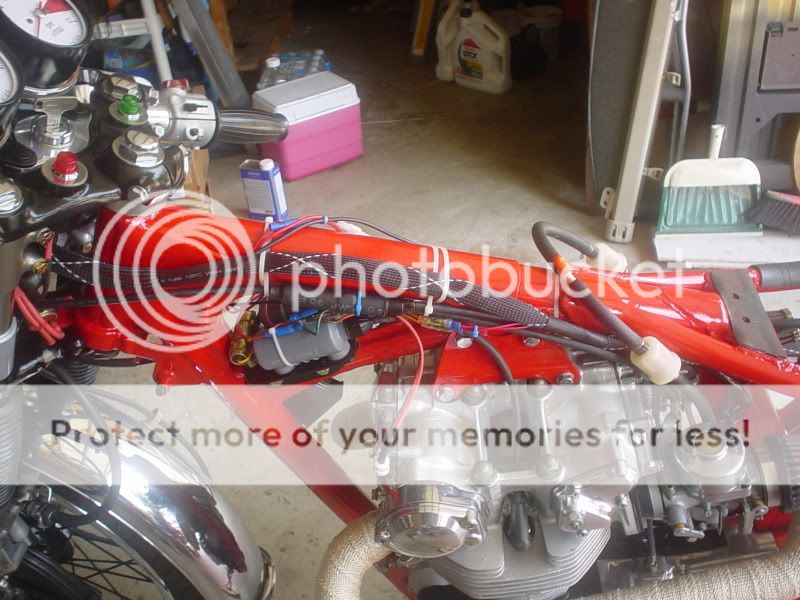
Here's a shot of the right side of the frame, showing the ground connection to the upper motor mount:
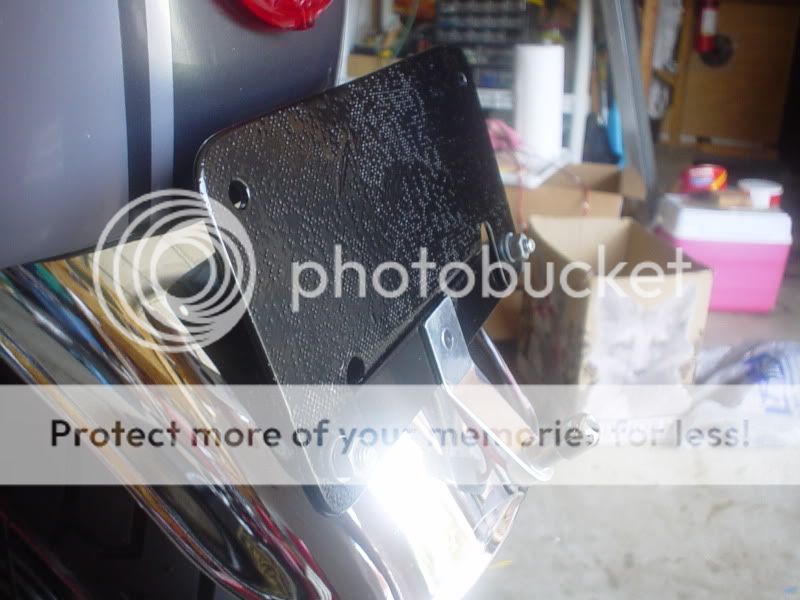
I don't have a picture of it yet, but for the license plate light I bought a pair of the LED bolt lights. I don't like the way that the bolt lights shine on the plate at such a sharp angle, so I built a little bracket that will mount a single bolt light about 2-1/2" back from and below the center of the plate and shine up on it.
Well that's the wiring in a nutshell.
In the meantime I've also started the engine and have it running very nicely (at least at low to mid RPM's) after some initial troubles. I expect to have to do some rejetting for high RPM's.
I'm also almost finished with "take two" of my rear brake set-up. I'll get some pics of that up soon I hope.
Thanks, CC
Since it's been a while since I've posted, I hope you'll forgive me an excessive number of pics this time.
I'll try to just hit on the highlights of the electrics.
The coils that came with the bike were toast, so I ordered a new set from Mike's XS. To mount the new coils, I fabbed a bracket from aluminum sheet metal. The bracket pieces were bent up and trial fitted to the frame:
Then the pieces were trimmed and drilled:
Riveted together, primed and mounted on the frame:
The stock controls were disassembled, cleaned and bead blasted. After blasting I clear coated the bare aluminum controls. I think the finish turned out really well:
The only modification I made to the controls was to add a ground wire to the start and horn buttons, since the bars were painted and I didn't think I would get a good ground through them.
I pretty much started from scratch and made up a new wiring harness:
If you recall from my seat thread, I built a fiberglass battery box to hide everything under the seat cowl. Here's the left side of the battery box with the fuse block, master relay and ignition coil relay installed:
The back side of the battery box holds a terminal strip for making wiring connections:
On the right side of the box the starter solenoid, radio shack rectifier mod and voltage regulator are installed:
Here's the front of the box showing the fuse block and the pigtail connection for the rear/brake light:
And a shot of the access to the fuse block with the seat pan installed:
From the battery box, the wiring follows along under the seat:
And along the left side of the frame to the headlight bucket:
Here's a shot of the right side of the frame, showing the ground connection to the upper motor mount:
I don't have a picture of it yet, but for the license plate light I bought a pair of the LED bolt lights. I don't like the way that the bolt lights shine on the plate at such a sharp angle, so I built a little bracket that will mount a single bolt light about 2-1/2" back from and below the center of the plate and shine up on it.
Well that's the wiring in a nutshell.
In the meantime I've also started the engine and have it running very nicely (at least at low to mid RPM's) after some initial troubles. I expect to have to do some rejetting for high RPM's.
I'm also almost finished with "take two" of my rear brake set-up. I'll get some pics of that up soon I hope.
Thanks, CC
Ninetyeight
Been Around the Block
WOW!
This build is brilliant.
Do you have any pics/possibly a tutorial on how to add the ground wire to the horn/start button?
Thanks,
Garrett
This build is brilliant.
Do you have any pics/possibly a tutorial on how to add the ground wire to the horn/start button?
Thanks,
Garrett
CCRider
Coast to Coast
Ninetyeight said:WOW!
This build is brilliant.
Do you have any pics/possibly a tutorial on how to add the ground wire to the horn/start button?
Thanks,
Garrett
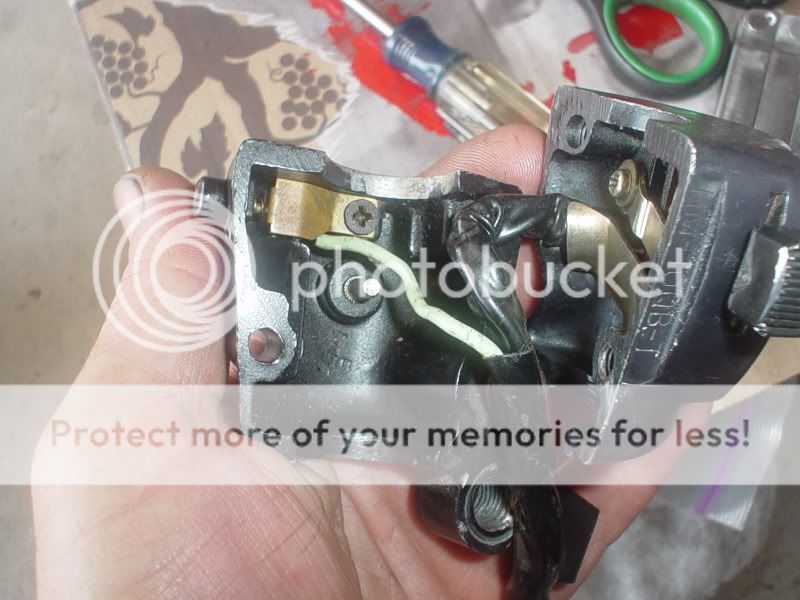
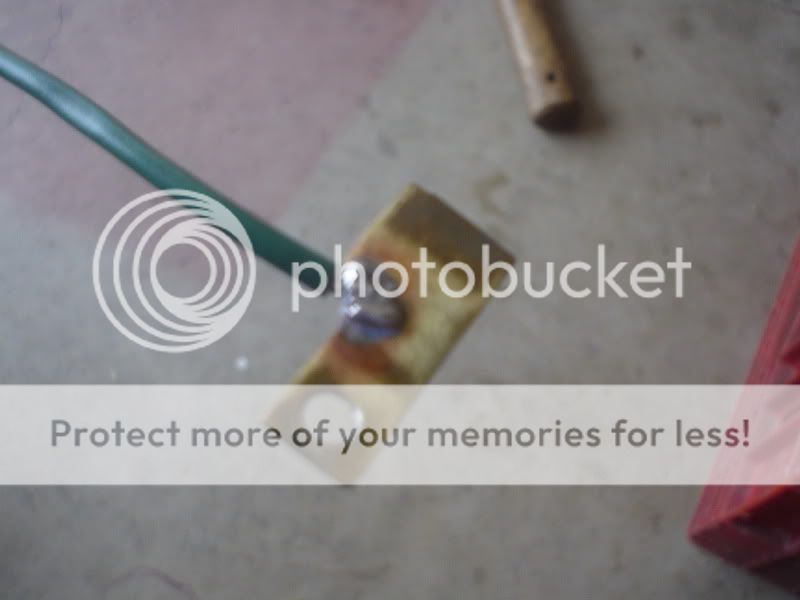
Thanks very much. Here are a couple of pics I dug up that may help. The first pic shows the inside of the left/horn side control. There is a contact on the end of the pale green wire that the end of the button shaft makes contact with when pressed. The shaft also makes contact with the brass tab via the return spring completing the circuit. The pale green is the hot and the brass tab is normally grounded through contact with the handlebar/switch housing/locating pin.
Basically all I did was drill a small hole in the brass tab and solder a ground wire in place, which was then connected to a known reliable ground (pic two).
The right side/starter button is slightly different but works the same.
Hope that helps, CC
valvesprung
Over 1,000 Posts
Truly inspiriational craftsmanship. I only hope I can pull something off that cleanly come winter during tear down #2. Keep it up man!
dcmspikes
Over 1,000 Posts
nice plate mount. FYI be careful with the LED wires. i had some of those bolts and the wires were very thin and eventually the vibration wiggled them too much and they broke. my idea to prevent this is to put some hot glue around the wires where they enter the bolt. cant wait to see this bike finished
CCRider
Coast to Coast
Today was a MAJOR milestone in the build - I'm legal !!!
I loaded the bike on a trailer this morning and hauled it down to the DMV for inspection by the License and Theft Bureau. Everything went well, although the inspector seemed to be concerned by the fact that the frame and engine VIN numbers didn't match and I was VERY concerned because I had just heard that non-metallic tanks were illegal in NC.
Nothing was mentioned about the tank and in fact he didn't do any inspection of lights, horn etc.
At first he wanted to title it as a 2009 custom motorcycle, but decided that since the frame/engine/drive were essentially stock it should stay a '74 CB450. (seemed like a no-brainer to me)
So with my temp title in hand, I dropped by the insurance agents office to ad the bike to my policy (~$35 per 6 months), then to the license plate office for my new tag.
I was a little unsure I'd ever get to this point, so you can imagine it's a huge load off my mind.
CC
I loaded the bike on a trailer this morning and hauled it down to the DMV for inspection by the License and Theft Bureau. Everything went well, although the inspector seemed to be concerned by the fact that the frame and engine VIN numbers didn't match and I was VERY concerned because I had just heard that non-metallic tanks were illegal in NC.
Nothing was mentioned about the tank and in fact he didn't do any inspection of lights, horn etc.
At first he wanted to title it as a 2009 custom motorcycle, but decided that since the frame/engine/drive were essentially stock it should stay a '74 CB450. (seemed like a no-brainer to me)
So with my temp title in hand, I dropped by the insurance agents office to ad the bike to my policy (~$35 per 6 months
), then to the license plate office for my new tag.I was a little unsure I'd ever get to this point, so you can imagine it's a huge load off my mind.
CC
valvesprung
Over 1,000 Posts
So wait, let me get this straight. You have it together enough to have it inspected and you haven't given us any pics!!! You're killing me smalls! ;D
CCRider
Coast to Coast
valvesprung said:So wait, let me get this straight. You have it together enough to have it inspected and you haven't given us any pics!!! You're killing me smalls! ;D
Yeah, I've been trying to post plenty of detail pix of the pieces as they come together, but hold off on the "big picture" till I've got a finished product. I figure I'll make one more post of the new rear brake set-up when I get it all painted up, then on to the "Show and Shine".CC
CCRider
Coast to Coast
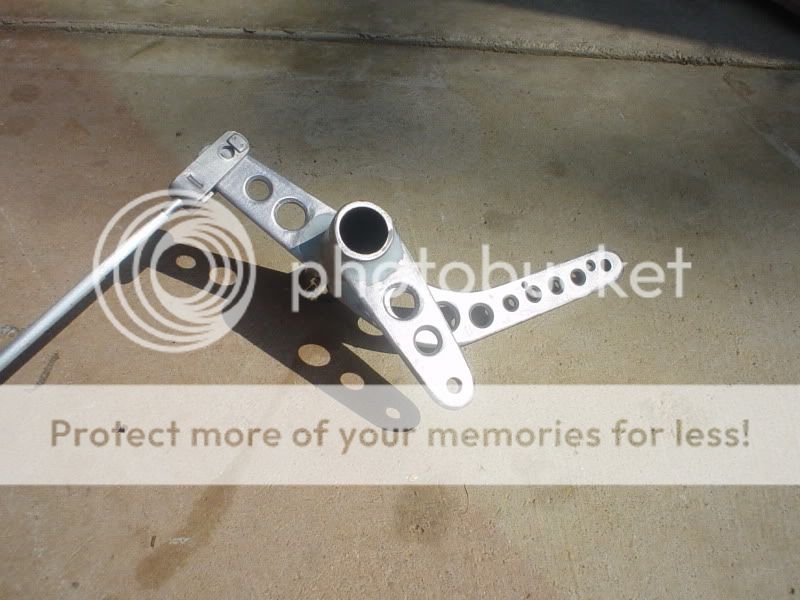
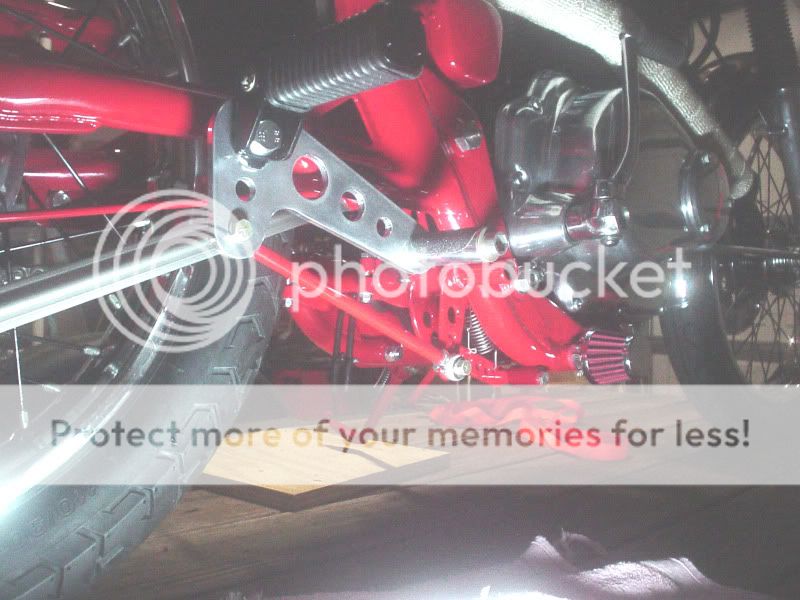
Here's some pix of what I came up with for "take 2" of the rear brake situation. It's pretty much stolen from what several others on the forum have done. Uses the same basic geometry of the stock set-up so this time it actually works . (Thanks Swagger)
I cut my brake lever bellcrank from 1/4" 2024 T3 alum, drilled some holes and pressed in a bearing with a 10mm bore for the pivot. I'm using the stock passenger pegs because I'm cheap and I wanted something that would fold up.
The heart of the system is this bellcrank fabbed up. It pivots around a 3/4" OD tube that goes through the centerstand brackets. I had to enlarge the holes in the centerstand bracket a bit to take the 3/4" tube. The pivot tube was left a little long on either side for use with a future maintenance stand.
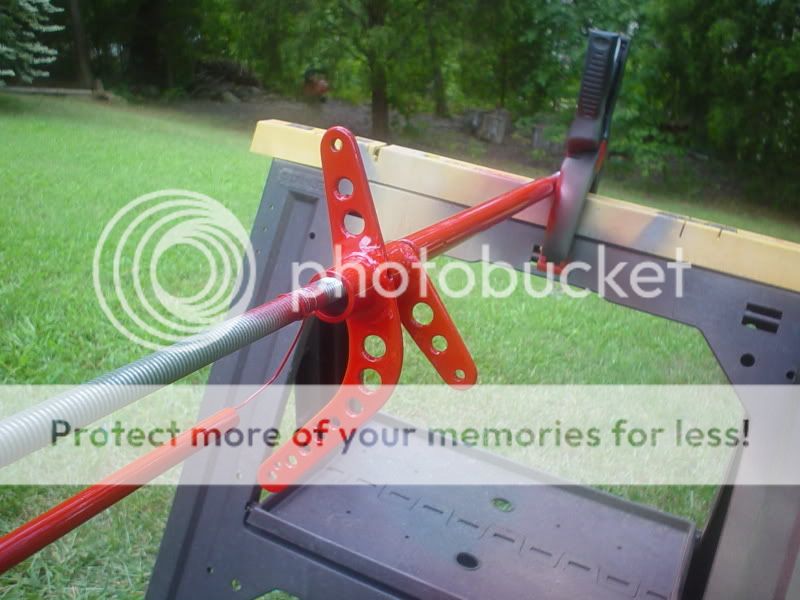
All painted up:
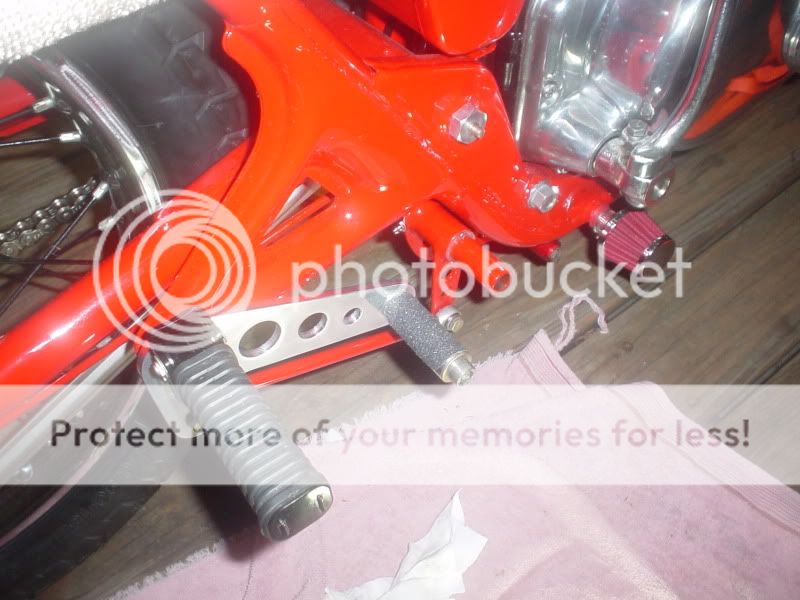
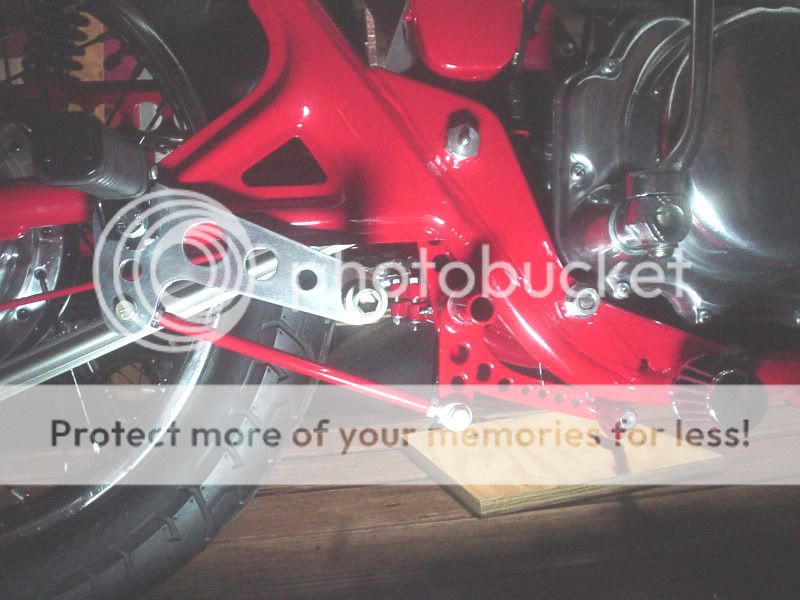
Everything installed and ready to go:
Last night at about 9 O'clock I declared the project finished! Now I'm off to return the trailer I borrowed, buy some gas and take this sucker for a ride.
Wish me luck, CC
. (Thanks Swagger)I cut my brake lever bellcrank from 1/4" 2024 T3 alum, drilled some holes and pressed in a bearing with a 10mm bore for the pivot. I'm using the stock passenger pegs because I'm cheap and I wanted something that would fold up.
The heart of the system is this bellcrank fabbed up. It pivots around a 3/4" OD tube that goes through the centerstand brackets. I had to enlarge the holes in the centerstand bracket a bit to take the 3/4" tube. The pivot tube was left a little long on either side for use with a future maintenance stand.
All painted up:
Everything installed and ready to go:
Last night at about 9 O'clock I declared the project finished! Now I'm off to return the trailer I borrowed, buy some gas and take this sucker for a ride.
Wish me luck, CC
Flugtechnik
My bike is not transportation, it is a respite
Nice! Even have the grease fitting in there.
What's with the filter on the frame where the stock peg mounted? Are you running the engine breather line through that hole?
Good luck with the ride. Take a few beauty shots for us first.
What's with the filter on the frame where the stock peg mounted? Are you running the engine breather line through that hole?
Good luck with the ride. Take a few beauty shots for us first.


