Follow along with the video below to see how to install our site as a web app on your home screen.
Note: This feature currently requires accessing the site using the built-in Safari browser.
We noticed you are blocking ads. DO THE TON only works with community supporters. Most are active members of the site with small businesses. Please consider disabling your ad blocking tool and checking out the businesses that help keep our site up and free.
Geez, I've really been slacking, both on updating this thread and on actually working on this bike. Sometimes life just gets in the way of fun stuff. I sold the Hooptie a couple months ago, so now I really need to get this one done so I can have something to ride around town again.
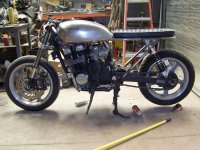
I mentioned that the seat was being upholstered, and I got it back a few months ago. Looks great and fits perfect. I also stripped the old paint off the tank.....and discovered that it needed some major work. The top of it had a dent that was easily half an inch deep in bondo, and more on both sides. Not real happy about this, but oh well.
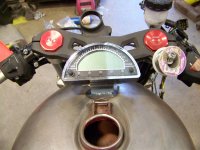
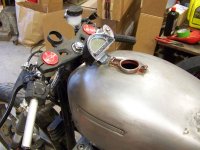
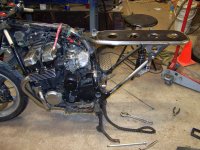
Next on the agenda was finishing up some of the wiring. I got my new gauge cluster and spent some time picking through the wires to get everything hooked up, then made a simple little bracket to mount it to the tank. On the last one I used a smaller dash mounted on a bracket on the top clamp, but I thought it would be cleaner for this one to be mounted solid so there are fewer wires going all over the fork.
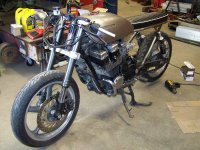
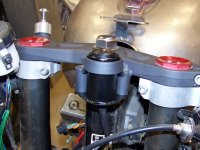
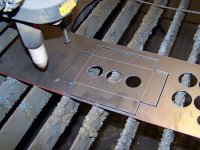
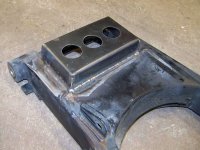
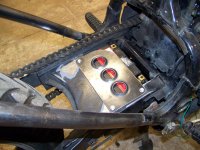
Since the fork didn't come with an ignition switch, and the stock one probably wouldn't fit anyways I needed to find another solution. I also wanted something to fit in the spot where the kawi switch would have gone since the top crown has a big casting for it, and it looks stupid empty. Honda uses a simple 2 wire setup for the ignition so I just picked up a cheap aftermarket switch for a CRF50 and fabbed up this bracket to make it fit in the same place as the stock Kawi switch. Looks nice and clean now.
OK first of all, I dont know a damned thing about nothing...that said.
The only part I would even try to question is the thickness of the gussets the shock mounts are welded too.
Otherwise, the appearance of the welding and tube fitting...phenomenal.
The little details you are adding now...cooler than shit.
In my book its a friggen WINNER.
Just the seat seems a little long to me. I think you coulda stopped just behind shock mounts.
I like your key switch solution, it's trick little details like that one that others don't always notice but will keep them finding new things every time they look at your bike to be amazed with. Looks good man!
The gussets are 1/8" thick, but the shock mounts dont simply weld to them. They run through a hole and also weld all the way around directly to the diagonal tube. The gussets are mainly to reinforce the corner where the tubes come together and pretty things up. The part you cant see is where the real strength in the shock mounts is.
I also plan on carrying a passenger on this bike, so the long seat has a purpose. Also on the last bike I started out with something shorter like you suggest, and it just didn't look right to me. Goin for a long and low look. Hopefully it all works out.
I do have a couple questions for the peanut gallery. Now that the bike is getting close to completion I'm really having a hard time deciding what colors I wanna do. I really love the bare metal look, but I know that's simply not an option for the long term, I live in the desert but I also spend a lot of time down by the harbor and that salt air would eat this thing alive. I've seen a couple bikes with plated frames, and I'm really tempted to do this one in nickel. Just not sure what color I wanna paint the tank to tie it all together. Gonna keep the motor black (stock) and with the dark forks It's begging for something in the dark grey realm, but that just seems too dull. I think this bike needs a little more pop. Just not sure if it should be white, or red, or what....
Thanks for the compliments! I'll get some more recent updates on here soon.
Dark Grey was the first thing that came to mind, but it just seems a little dark and subtle. I want this one to be a little more eye catching, without screaming at you.
I'm attempting to get out to the shop and work on this thing some more today. We'll see how it goes. Here's what I did a couple days ago. Finally got around to pulling the swing arm off and building the battery box. The opening at the front of the swing arm is just the right size for the little battery I picked up on Amazon when they had a sale. I'm hoping it's big enough.
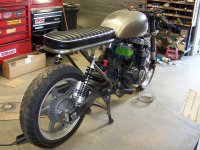
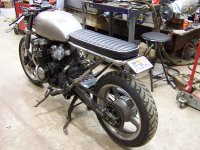
Got to work on the rear shock mounts today. It was a little tricky getting everything to line up right, but in the end it came out great. It's nice to have the bike back at a point where I can roll it around again too. Now I just gotta finish mounting the tank, do some electrical work, and build a seat. then I gotta do all the final work on the front end as well.
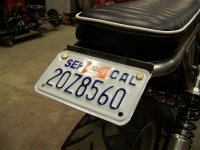
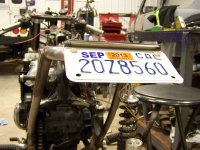
So today I worked on a bunch of little details. Finally got the rear plate and taillight mount done. The taillight is a super slim little LED thing with integrated turn signals that will fit on that little tab above the plate. Should be pretty invisible when it's not lit.
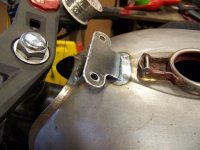
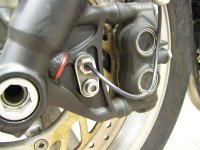
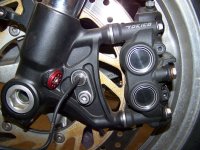
The gauge cluster I'm using has a magnetic pickup for the speedo, and it just so happens that the bike that the fork came off of had ABS and there was a sensor mounted through a hole in the caliper mount. This made it super easy to cleanly mount the new speedo pickup using just a little tab and the stock bolt.
The master cylinder I'm using is a Brembo that's off and R1 I believe, and the fluid reservoir didn't have anything to mount to so I made a little tab for that too.
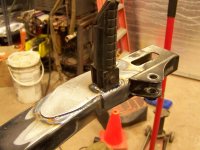
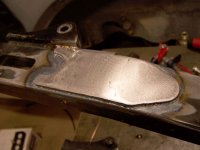
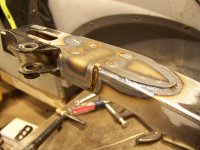
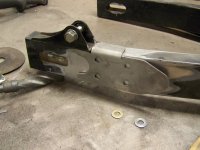
Here is the real project from last night. I decided to mount the passenger pegs to the swingarm, but when I started looking at it I realized the metal was super thin, and I was a little nervous about damaging the arm simply from someone standing on the pegs. So I cut out some reinforcement plates to spread the load a little.
I've always had mixed feelings about foot peg being mounted to a part of the bike that moves. Of course I can't say that I've ever ridden with my feet on said pegs. So....
I had my doubts about it as well, but I've seen it on a few other bikes, and I'm just not willing to build some giant monstrosity of a bracket for a passenger peg that will probably only get used a few times a year.
I had my doubts about it as well, but I've seen it on a few other bikes, and I'm just not willing to build some giant monstrosity of a bracket for a passenger peg that will probably only get used a few times a year.
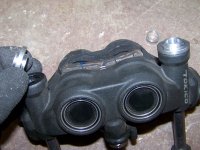
Been working on details the last couple nights. One detail I kept forgetting about was the brake caliper. It just barely rubbed on the outside edge of the rotor when you fully tightened the bolts. There are a couple little sleeves that fit into bores in both the caliper and the mount to align everything so I just turned out some new ones with a flange in the middle to space the caliper out a touch. I had also forgotten that I wanted to put longer bolts in the rotor because of the spacer. I had bolts of the proper size from one of the Ninja wheels I used for another project, but the heads were too large to fit into the recesses on the rotor so I turned those down as well.
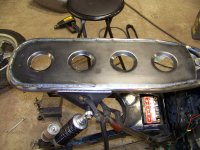
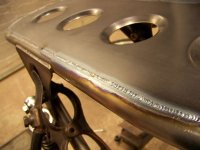
Since the temperature here has finally started to drop at night, and it was a little chilly in the shop last night I decided to warm it up by spending some time doing the finish welding on the seat pan. I wasn't cold anymore after running those beads.
This site uses cookies to help personalise content, tailor your experience and to keep you logged in if you register.
By continuing to use this site, you are consenting to our use of cookies.