Project CB690 (KTM 690 engine in a CB550f frame)

Tidied up some wiring. The three-way blocks go to the turn signals, which have integrated brake lights. The wiring kit I used is very cheap and the crimps don't always roll over perfectly, so I crimped and soldered them all for extra assurance.
 

Attachments

  • IMG_4453.jpeg
    IMG_4453.jpeg
    2.1 MB · Views: 219
  • IMG_4454.jpeg
    IMG_4454.jpeg
    1.7 MB · Views: 216
  • IMG_4455.jpeg
    IMG_4455.jpeg
    2 MB · Views: 193
  • IMG_4456.jpeg
    IMG_4456.jpeg
    2.2 MB · Views: 225
Fabricated the headlight ear/blinker bracket, and installed headlight shell. The front blinkers have an integrated white light, to compliment the integrated brake lights on the rear. So far I'm pretty happy with them.
I am not entirely sure I like the headlight where it is. The ears seem too narrow, and the headlight seems to project forward too much. Next I will fabricate a dash mount.
 

Attachments

  • IMG_4457.jpeg
    IMG_4457.jpeg
    2.5 MB · Views: 223
  • IMG_4458.jpeg
    IMG_4458.jpeg
    2.4 MB · Views: 223
  • IMG_4459.jpeg
    IMG_4459.jpeg
    2.5 MB · Views: 214
  • IMG_4460.jpeg
    IMG_4460.jpeg
    2.6 MB · Views: 211
  • IMG_4461.jpeg
    IMG_4461.jpeg
    2.4 MB · Views: 218
  • IMG_4462.jpeg
    IMG_4462.jpeg
    2.5 MB · Views: 209
Just a quick one, made the little helper lever for the centre stand.
 

Attachments

  • IMG_4466.jpeg
    IMG_4466.jpeg
    2.8 MB · Views: 194
  • IMG_4467.jpeg
    IMG_4467.jpeg
    2.1 MB · Views: 219
There are a few things that would be easier with the bike on the ground, so I took it off and moved the bench. Cramming all the wires in the headlight shell I think will be easier on the ground, plus I can now work out the steering stops.
 

Attachments

  • IMG_4477.jpeg
    IMG_4477.jpeg
    2.8 MB · Views: 207
  • IMG_4478.jpeg
    IMG_4478.jpeg
    2.5 MB · Views: 215
  • IMG_4479.jpeg
    IMG_4479.jpeg
    2.3 MB · Views: 236
Last edited:
Impressive build...just came across your thread and have spent half the morning reading the whole thing!
Particularly interested as I had a similar idea a few years back.....classic styled big single ....and have now made several of them...
 

Attachments

  • 002 (11).JPG
    002 (11).JPG
    134.9 KB · Views: 243
nice work. I recently picked up a 2015 690 enduro. I'm so impressed by the engineering and characteristics of these engines.
 
Thanks guys! Unclerob I really like how those turned out. Do they have a build thread?

Just a list of things to do on the bike.

  • Tank, including mounting, fuel lines, petcock, fuel tank vent, fuel level switch
  • Dash mount
  • Radiator fan mount
  • Sidestand switch mount
  • Exhaust mount
  • Rear brake master and pedal
  • Two more seat mounts
  • Steering stop and lock
That's about it, really. Then it should be a runner, and ready for the MOT.
 
Needed a muffler mount. The top pictures shows the bracket welded to the muffler, I'll open up one end of the slot so I can fit this threaded adapter in. I made the rectangle bit on the Haas. The counterbore chamfer will be tigged up and sanded flat.
 

Attachments

  • IMG_4533.jpg
    IMG_4533.jpg
    2.1 MB · Views: 215
  • IMG_4534.jpg
    IMG_4534.jpg
    1.5 MB · Views: 202
  • IMG_4535.jpg
    IMG_4535.jpg
    1.4 MB · Views: 190
  • IMG_4536.jpg
    IMG_4536.jpg
    1.3 MB · Views: 209
Impressive! I've been planning a KTM-powered Cafe racer for years. Maby time so source parts:)

Skickat från min Mi 9T Pro via Tapatalk
 
Some glamour shots while it was outside.
 

Attachments

  • IMG_4543.jpg
    IMG_4543.jpg
    3.7 MB · Views: 213
  • IMG_4544.jpg
    IMG_4544.jpg
    3.9 MB · Views: 216
  • IMG_4545.jpg
    IMG_4545.jpg
    3.8 MB · Views: 201
Finished up the muffler mount. Last picture shows the cutout that was required to be able to install the mount.
 

Attachments

  • IMG_4548.jpg
    IMG_4548.jpg
    1.4 MB · Views: 200
  • IMG_4549.jpg
    IMG_4549.jpg
    1.2 MB · Views: 191
  • IMG_4557.jpg
    IMG_4557.jpg
    1.5 MB · Views: 175
Installed the passenger pegs. They are a bit forward, which I thought would look better visually when they are in the stowed position. But, there is actually little room to allow for the passengers feet, they have a tendency to collide with the front riders feet. These may get moved.
 

Attachments

  • IMG_4550.jpg
    IMG_4550.jpg
    2.7 MB · Views: 179
  • IMG_4552.jpg
    IMG_4552.jpg
    1.7 MB · Views: 179
  • IMG_4553.jpg
    IMG_4553.jpg
    1.7 MB · Views: 193
  • IMG_4558.jpg
    IMG_4558.jpg
    2 MB · Views: 186
  • IMG_4559.jpg
    IMG_4559.jpg
    2.2 MB · Views: 197
Could you swap side left and right so when they are stowed they align with the tubes?
 
If you installed them as Doc said but right at the corner I think they would flip up and match the angle of the top part of the hoop almost perfectly. Instead of matching the angle of the main frame. That might look good and give you room for feet.
 
Hi Doc and Maritime,
I do like that idea, I may cut them off and weld them on as you say. That and I will beadblast and paint the footpeg bodies black for less visual impact.
 
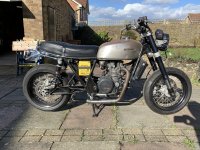
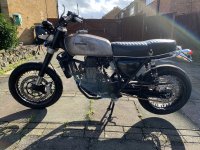
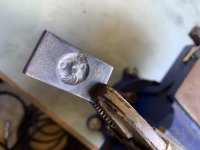
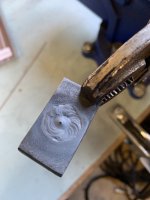
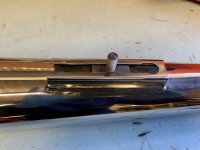
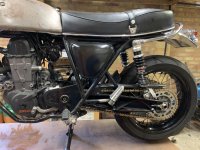
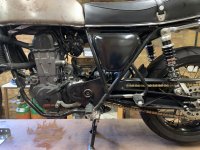
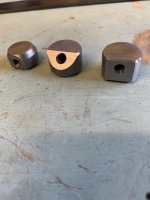
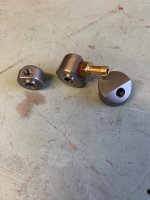
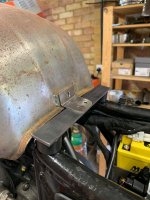
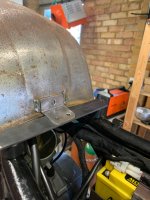
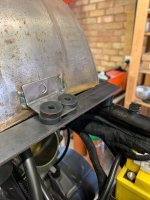
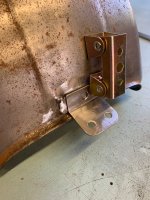
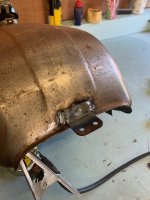
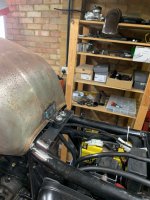
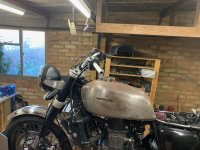
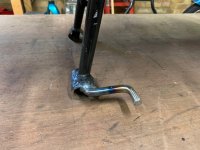
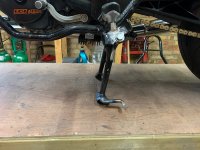
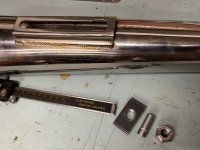
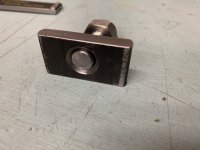
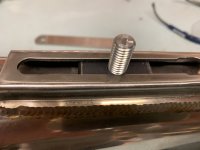
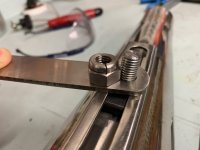
The external fuel pump needs to be vented, so I made this piece to install on the fuel tank. It will go high on the tank on the tunnel, and it won't be seen. I ended up making three; one with a big chamfer, one at 45 degrees, and a tall one. I was at work and didn't bring the barb with me, so wasn't sure what the best shape would be. The one with the big chamfer would not have enough room to be welded onto the tank, and 45 degree one had the barb fouling the frame. The tall one it is. I was going to tig braze it to the tank, but did a test piece with solder and it worked really well, so I will use that.
 

Attachments

  • IMG_4713.jpg
    IMG_4713.jpg
    361.3 KB · Views: 169
  • IMG_4714.jpg
    IMG_4714.jpg
    383.2 KB · Views: 156
  • IMG_4719.jpg
    IMG_4719.jpg
    475.6 KB · Views: 144
Rear tank mount! Idea number one was to make a support bar that would go across the frame, with nylon standoffs, held to the frame with bolts. I created a rear tank mount and welded it on. The mockup shows the rubber spacers.
 

Attachments

  • IMG_4723.jpg
    IMG_4723.jpg
    509.1 KB · Views: 143
  • IMG_4724.jpg
    IMG_4724.jpg
    520.2 KB · Views: 138
  • IMG_4725.jpg
    IMG_4725.jpg
    514.3 KB · Views: 145
  • IMG_4728.jpg
    IMG_4728.jpg
    737.4 KB · Views: 140
  • IMG_4730.jpg
    IMG_4730.jpg
    501.3 KB · Views: 137
Idea number two, just bend the support bar and weld it to the frame. It turned out great, the tank is nice and solid, but still moves the way a rubber mounted tank would wiggle a bit.
 

Attachments

  • IMG_4732.jpg
    IMG_4732.jpg
    477.7 KB · Views: 149
  • IMG_4733.jpg
    IMG_4733.jpg
    510.5 KB · Views: 139
Back
Top Bottom