The 安いスリル CL360

Re: 安いスリル CL360

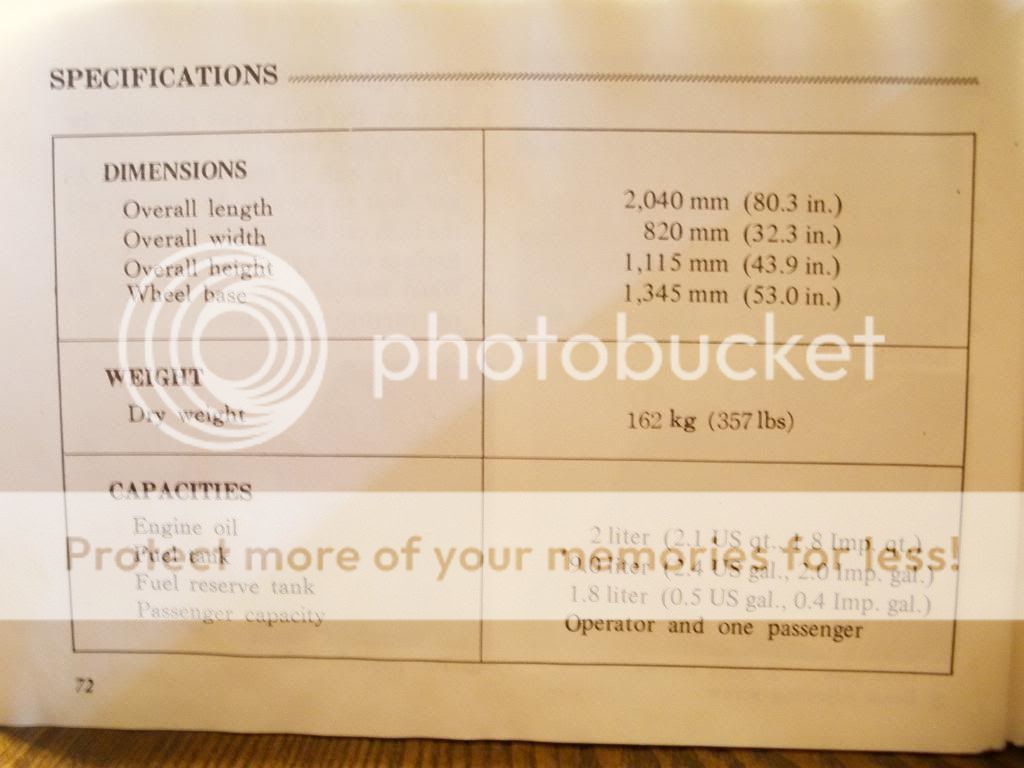
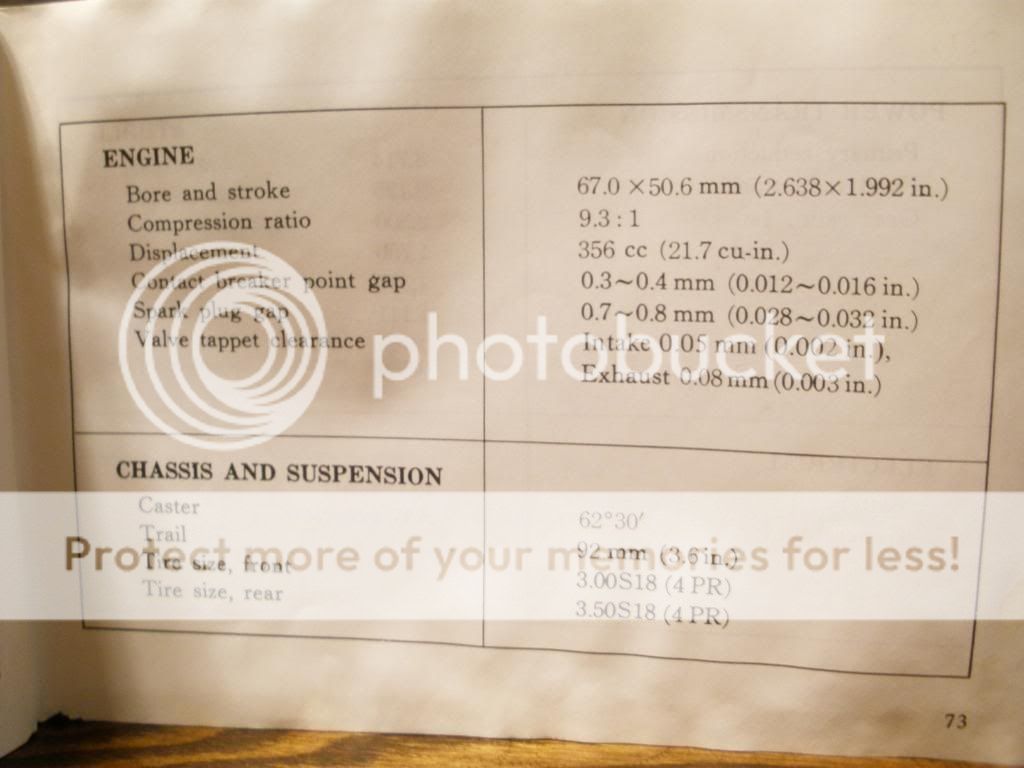
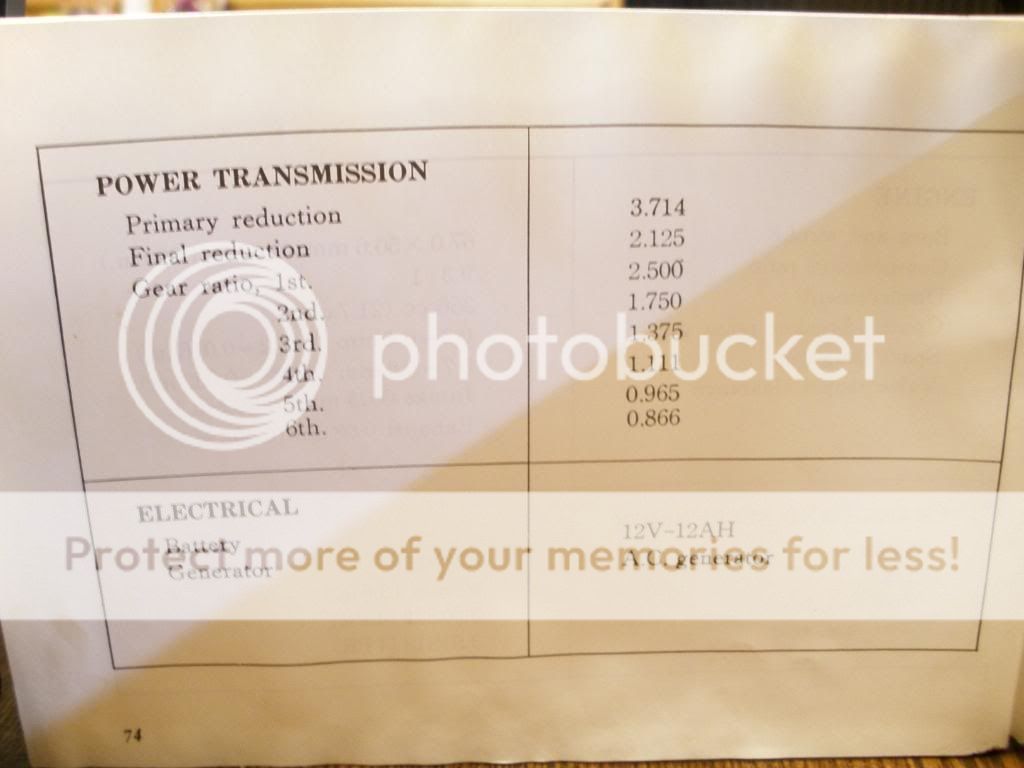
Here are some more pictures from the owners manual just for future reference. I swear that manual has a page fall out every time I look at it. My hope is that by posting the more interesting/helpful pages, I won't have to look at it as often and hopefully it won't disintegrate in my hands. :LolLolLolLol:

57-1.jpg

58-1.jpg

59-1.jpg

60.jpg
 
Re: 安いスリル CL360

Buy 2 cheap poster frames from Target or somewhere. Pull all the pages apart, and tape them one of the piecses of plastic in order. Than stick the other piece of clear plastic on and snap the frame in place. Hang it on the garage wall. Just flip it over to read the other side.
 
Re: 安いスリル CL360

I tried the electric start this afternoon by touching the red/yellow wire to the start button and it didn't work. It just made a clicking noise and the brake light went dim when this happened. I think everything is connected right but I suppose I should check things over again. Excuse my ignorance with this question, but would the points system have anything to do with this? Before I put the cover over it I noticed that the contacts were a little rusty. I never did anything with it at the time becuase I wasn't concerned with it then. I suppose I should try and do something with that.

I made a video of me trying the electric start but for some reason photobucket isn't letting me upload it so I'm not sure how to do it. Any ideas? Can I just upload it straight from my laptop to the website?
 
Re: 安いスリル CL360

racing geek said:
I tried the electric start this afternoon by touching the red/yellow wire to the start button and it didn't work. It just made a clicking noise and the brake light went dim when this happened. I think everything is connected right but I suppose I should check things over again. Excuse my ignorance with this question, but would the points system have anything to do with this? Before I put the cover over it I noticed that the contacts were a little rusty. I never did anything with it at the time becuase I wasn't concerned with it then. I suppose I should try and do something with that.

I made a video of me trying the electric start but for some reason photobucket isn't letting me upload it so I'm not sure how to do it. Any ideas? Can I just upload it straight from my laptop to the website?

The clicking will be the solenoid, so that's getting power. The starter may not be engaging because there's not enough juice in the battery? How dim did the brakelight go? Like out completely? Charge the battery, make sure all your connections are good and the proper gauge wire, then try again. You could also just jump the starter directly from the battery to see if it will spin. It should if your engine is free. The next thing to do is remove the starter and just jump it on its own. If you still get nothing after all this, then it's not looking good for the starter :(

cheers
ian
 
Re: 安いスリル CL360

So I took the points cover off and this is what I found...
65.jpg


After a little cleaning, this is what it looked like...
66.jpg

There is a little pitting on that center round thing which can be seen a little easier in this picture...
67.jpg

There is a slightly larger spot of the pitting on the other side of the of the round thing.

Based on these pictures is there something wrong (other then the rust)? Should stuff be replaced? If so, what? It would be great if I can get it to fire by the end of the weekend but that is probably not going to happen.


I got an e-mail back form my mom saying the lady she works with doesn't have access to the VIN checking thing anymore so I guess I'll just have to apply for a lost title and hope for the best.


bikeboy said:
The clicking will be the solenoid, so that's getting power. The starter may not be engaging because there's not enough juice in the battery? How dim did the brakelight go? Like out completely? Charge the battery, make sure all your connections are good and the proper gauge wire, then try again. You could also just jump the starter directly from the battery to see if it will spin. It should if your engine is free. The next thing to do is remove the starter and just jump it on its own. If you still get nothing after all this, then it's not looking good for the starter :(

cheers
ian

-- It very well could be that the battery doesn't have enough juice.
-- It didn't go out completely but it did dim a good amount.
-- I would think everything is the proper gauge wire because all the wiring looks stock. I'll charge the battery tonight.
-- How would I jump the starter directly from the battery? gsf1300 started explaining it to me but never finished.
 
Re: 安いスリル CL360

racing geek said:
-- How would I jump the starter directly from the battery? gsf1300 started explaining it to me but never finished.

if the starter is still fitted, all you should need to do is get a (thick) wire from the +ve battery terminal, and hit the post on the starter that has the thick cable attached to it. It will pick up the negative from the frame earth. It will spark some, but if it spins and engages, then it's good to go. If it spins and doesn't engage you either don't have enough juice, or something is broke.

You may want to give those points contacts a clean and gap-check before you try to fire her up. They may be OK, but it can't help to be sure. That pitting shouldn't effect their operation too much-if at all.

cheers
ian
 
Re: 安いスリル CL360

bikeboy said:
if the starter is still fitted, all you should need to do is get a (thick) wire from the +ve battery terminal, and hit the post on the starter that has the thick cable attached to it. It will pick up the negative from the frame earth. It will spark some, but if it spins and engages, then it's good to go. If it spins and doesn't engage you either don't have enough juice, or something is broke.

You may want to give those points contacts a clean and gap-check before you try to fire her up. They may be OK, but it can't help to be sure. That pitting shouldn't effect their operation too much-if at all.

cheers
ian
Thanks again for the info. ;) One thing though... there looks to be only 1 wire going in/out of the starter. Am I missing a wire, or are they both in the one "wire". It's a really thick black cable so they could both be in it. I'm done in the garage for the night so I'll get a picture tomorrow morning.

I'll try that tomorrow with a Harley battery that has been charging all night. I did go back and re-gap the points but I should check the valves and timing anyway so the points will just need to be gaped yet again. I've got a book here that gives a run down of the basic maintenance procedures for many different bikes throughout the years and it goes over this stuff so hopefully it will be doable for me. I haven't read it yet, but will I need any special tools or shims that I don't have?

Since the lady my mom works with can't check the VIN, she's going to ask one of the cops that always comes in. I'm also going to call my uncle tomorrow and ask if he has a headlight, turn signals, or a horn for me to have or borrow. He has collected quite the pile of parts over the years so he should have something. I'll probably be getting stuff from him Saturday night if he has anything.
 
Re: 安いスリル CL360

I can't remember if I've asked before, but where are you located?
 
Re: 安いスリル CL360

racing geek said:
Thanks again for the info. ;) One thing though... there looks to be only 1 wire going in/out of the starter. Am I missing a wire, or are they both in the one "wire". It's a really thick black cable so they could both be in it. I'm done in the garage for the night so I'll get a picture tomorrow morning.

No. there should only be the one. It's the positive that comes via the solenoid from the + side of the battery. That's the one you jump. The 'other' lead is the negative, or earth side, and is taken care of by virtue of the fact that it is bolted to the motor, which in turn is bolted (or should be) to the negative side of the battery. So in this case, there is no 'wire', just a big ol' lump of conductive metal completing the circuit.

The solenoid is just a big electromagnetic switch to handle the heavy current-draw needed to power the starter motor. They can turn the magnet on and off using the normal (light) wire they use for everything else, and when the magnet makes contact (that clicking you heard) the full power runs through that big black cable to your starter. To just test it, a smaller wire will do the job before it has a chance to heat up and melt ;)

cheers
ian
 
Re: 安いスリル CL360

bikeboy said:
No. there should only be the one. It's the positive that comes via the solenoid from the + side of the battery. That's the one you jump. The 'other' lead is the negative, or earth side, and is taken care of by virtue of the fact that it is bolted to the motor, which in turn is bolted (or should be) to the negative side of the battery. So in this case, there is no 'wire', just a big ol' lump of conductive metal completing the circuit.

The solenoid is just a big electromagnetic switch to handle the heavy current-draw needed to power the starter motor. They can turn the magnet on and off using the normal (light) wire they use for everything else, and when the magnet makes contact (that clicking you heard) the full power runs through that big black cable to your starter. To just test it, a smaller wire will do the job before it has a chance to heat up and melt ;)

cheers
ian
You are my new best friend! ;D lol

I'll have more questions in the morning but I'm going to try and get some sleep now.
 
Re: 安いスリル CL360

racing geek said:
You are my new best friend! ;D lol

I'll have more questions in the morning but I'm going to try and get some sleep now.

all part of the service ;)

when you're working on old electrics, sleep can be your best friend.

ian
 
Re: 安いスリル CL360

Don't worry about rust on points cam, the points heel shouldnt touch it.
The points look like they need a good cleaning before checking timing though?
PJ
 
Re: 安いスリル CL360

  • I was tired of doing work and wanted to take some "fun" pictures so I cut a piece of 2"x4" to stick under the end of the gas tank (to level it) and I cut a hunk of 2"x6" to act as a seat. I also installed one of the rear pegs (only had 1 matching bolt) to act as a make-shift rear set for the time being. Keep in mind that I'm 6'3" and 210# so I know I look like a monkey fucking a football... I wish I was shorter...

    69.jpg

    70.jpg

    71.jpg

    72.jpg

    I will probably look more comfortable in the last photo once I have the drag bars to hold onto. My back will be a little more straight when the drag bars are installed because I won't be trying to support my weight and having my arms just hang there. In the last picture I was trying to squeeze the tank between my knees so I wouldn't fall forward.


    After looking at these pictures I realized three things.
    1. I can't leave the exahust the way it is when I use the back pegs or any kind of rear sets
    2. I can easily get away with clip-ons and drag bars thanks to my ape arms
    3. I REALLY need a hair cut. ;D
 
Re: 安いスリル CL360

Looks like a good start. I wanted to do high pipes on my 360 cafe, but I think I'm going to run into the same problem.
 
Re: 安いスリル CL360

CL360 To Do List:

GET TITLE
- Rebuild forks
- Drag bars
- New top triple
- Rebuild rear shocks?
- Rebuild drum brakes
- Drill stock drums?
- New foot brake lever
- New plug wires
- New points system?
- Rebuild carbs?
- Find more nuts and install with new metal seal things
- Make cone baffles for exhaust
- Pod filters
- New battery
- Hide battery and wiring
- New chain and sprockets
- New starter or ditch it
- Paint Scheme
- - -dark green?
- - -silver?
- - -orange?
- - -dark blue?
- custom rear fender/no rear fender?
- remove extra tabs off frame
- New tail light (KTM?)
- New rear turn signals
- Install mirrors from CK
- Custom rear sets
- Two "special" headlights
- Lower speedo and tach
- Shorten back of subframe
- Cut stock seat foam for custom seat
- Custom black leather seat cover
- Tank
- - -remove dents
- - -remove rust
- - -seal

I just came up with this stuff off the top of my head quick so I'm sure there is more that I'm forgetting and there is probably some stuff that can already come off the list. Sorry about the weird formatting.


According to the cop that ran the VIN numbers, nothing came up on it so I can claim it as lost title without any issues. I also tried jumping the starter and found out that it's dead.
 
Re: 安いスリル CL360

I found some more CB360 builds on ADVrider and oddly enough, they all look pretty much the exact same when they started.

http://www.advrider.com/forums/showthread.php?t=424325
http://www.advrider.com/forums/showthread.php?t=473470
http://www.advrider.com/forums/showthread.php?t=546981
 
Re: 安いスリル CL360

racing geek said:
CL360 To Do List:


- Rebuild rear shocks?

you can cross this one off your list and replace it with

- get some more rear shocks ;)

they're not rebuildable. economically anyway. There's a guy on the 1100F forums doin' it, but it's a *major* pain, and not worth the hassle if you don't need OEM. Which is wrong for your bike anyway.

They do look cool tho' don't they ;)
 
Re: 安いスリル CL360

bikeboy said:
you can cross this one off your list and replace it with

- get some more rear shocks ;)

they're not rebuildable. economically anyway. There's a guy on the 1100F forums doin' it, but it's a *major* pain, and not worth the hassle if you don't need OEM. Which is wrong for your bike anyway.

They do look cool tho' don't they ;)

I'm hoping I don't have to rebuild them that they are still in good shape hence the "?" but I know of a guy with some low mile standard looking shocks (no external reservoir) that he offered to me for free. The only downside is that they are all chrome.
 
Re: 安いスリル CL360

So, I was working on the Camaro today but it started fighting back so I decided to let it sit.

After supper I played a little Call of Duty on the PS3 until my little brother kicked me out of his room. That's when I decided to try and open the bowls of the carbs again. All I can say is

WOW!!
My only guess is that the previous owner went through the carbs before I go the bike. The bowls are quite literally spotless. I spent some time cleaning the outside of the but these pictures were taken maybe 3 or 4 minutes after I opened them up. Check out the pictures.

75.jpg

76.jpg

77.jpg

78.jpg


What's with the messed up float on the right? The other one in the same carb is a little worn but the other carbs floats has no wear at all as you can see in the pictures.

Here are the diaphragms...
79.jpg

80.jpg


Should I bother taking apart the carbs any further or are they pretty much good to go? I plan on cleaning the yellow/brown stuff from the one bowl but that is pretty much it. I suppose I need new gaskets for the bowls too don't I? Where can I find just the bowl gaskets?
 
Back
Top Bottom