
We noticed you are blocking ads. DO THE TON only works with community supporters. Most are active members of the site with small businesses. Please consider disabling your ad blocking tool and checking out the businesses that help keep our site up and free.
You are using an out of date browser. It may not display this or other websites correctly.
You should upgrade or use an alternative browser.
You should upgrade or use an alternative browser.
xxxtra picante...just bought a frickn trainwreck kz750
- Thread starter rich
- Start date
MotorbikeBruno
Over 1,000 Posts
Well hey! I thought you had the wrong model but didn't want to say anything... 
Ok, Now, for the starter motor. Yes it will turn and spin if you jumper across it...if it has power! You don't need a harness at all if it has power going in and grounded, and then you jump across it. I'll go back and re-read for more suggestions on the wiring, and see about more pics.
Ok, Now, for the starter motor. Yes it will turn and spin if you jumper across it...if it has power! You don't need a harness at all if it has power going in and grounded, and then you jump across it. I'll go back and re-read for more suggestions on the wiring, and see about more pics.
MotorbikeBruno
Over 1,000 Posts
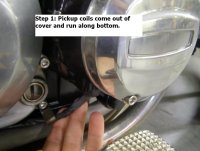
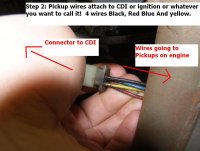
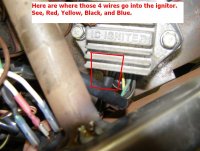
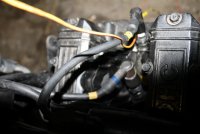
Here is my picture list of how the pickups get to the IC or ignitor or whatever.
Starts at pickups inside cover. Follows wire along bottom of engine. Has 4 pin connector, and connects with 4 pin mating connector that comes DIRECTLY FROM the IC Ignitor. See pics.
Starts at pickups inside cover. Follows wire along bottom of engine. Has 4 pin connector, and connects with 4 pin mating connector that comes DIRECTLY FROM the IC Ignitor. See pics.
Attachments
MotorbikeBruno
Over 1,000 Posts
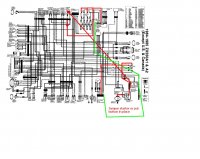
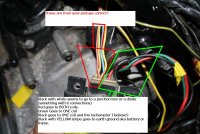
Now, this next part is going to be a bit crazy because of the fact that it is hard to read etc...but the first pic, is kind of how the power is going right now, through switches etc...
Second pic, is a cheater way to make the damn thing run. As far as a carbureted bike goes. It needs fuel, and spark, and the spark has to be at the right time. So power wise, you only NEED power to the coils, and the IC Ignitor. The last thing you NEED is GROUNDS ON THOSE. So, please chime in people if I missed a step, since I'm not doing my own harness at this time (mines done)
From the battery, take HOT aka positive, and put it to a switch. This switch will then run that hot through it and power the coils and IC Ignitor unit. The next HOT line you need is to your starter motor. So, use the starter solenoid wired in with a switch to make it work, OR jumper it to turn the bike over, preferred to have a button, but thats not always easy for new guys to electrical. Last HOT line I tossed in was the stator or Regulator/Rectifier line. Since this is used to "charge" the battery as it runs.
Now, ALL OF THE ABOVE need GROUNDS TOO. So, the battery should be grounded to the FRAME of the bike too, so the engine is grounded. Then make sure you ground the Reg/Rec, and the IC Ignitor too. Most likely will be a Black with Yellow line, as others will use the Black with Yellow as ground too.
Hopefully I'm not insane and I hope all goes well. Note how I still ran the 20 amp fuse in line on the drawings! Wow I need a beer after this for sure! If all else fails, I have to tear my electrical out when I send the frame to get powdercoated soon, since I did NOT make it pretty before. I have to get rid of the nest thats in there of wires. We'll get it squared away.
Second pic, is a cheater way to make the damn thing run. As far as a carbureted bike goes. It needs fuel, and spark, and the spark has to be at the right time. So power wise, you only NEED power to the coils, and the IC Ignitor. The last thing you NEED is GROUNDS ON THOSE. So, please chime in people if I missed a step, since I'm not doing my own harness at this time (mines done
) From the battery, take HOT aka positive, and put it to a switch. This switch will then run that hot through it and power the coils and IC Ignitor unit. The next HOT line you need is to your starter motor. So, use the starter solenoid wired in with a switch to make it work, OR jumper it to turn the bike over, preferred to have a button, but thats not always easy for new guys to electrical. Last HOT line I tossed in was the stator or Regulator/Rectifier line. Since this is used to "charge" the battery as it runs.
Now, ALL OF THE ABOVE need GROUNDS TOO. So, the battery should be grounded to the FRAME of the bike too, so the engine is grounded. Then make sure you ground the Reg/Rec, and the IC Ignitor too. Most likely will be a Black with Yellow line, as others will use the Black with Yellow as ground too.
Hopefully I'm not insane and I hope all goes well. Note how I still ran the 20 amp fuse in line on the drawings! Wow I need a beer after this for sure! If all else fails, I have to tear my electrical out when I send the frame to get powdercoated soon, since I did NOT make it pretty before. I have to get rid of the nest thats in there of wires. We'll get it squared away.
Attachments
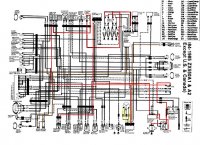
MotorbikeBruno said:Now, this next part is going to be a bit crazy because of the fact that it is hard to read etc...but the first pic, is kind of how the power is going right now, through switches etc...
Second pic, is a cheater way to make the damn thing run. As far as a carbureted bike goes. It needs fuel, and spark, and the spark has to be at the right time. So power wise, you only NEED power to the coils, and the IC Ignitor. The last thing you NEED is GROUNDS ON THOSE. So, please chime in people if I missed a step, since I'm not doing my own harness at this time (mines done
From the battery, take HOT aka positive, and put it to a switch. This switch will then run that hot through it and power the coils and IC Ignitor unit. The next HOT line you need is to your starter motor. So, use the starter solenoid wired in with a switch to make it work, OR jumper it to turn the bike over, preferred to have a button, but thats not always easy for new guys to electrical. Last HOT line I tossed in was the stator or Regulator/Rectifier line. Since this is used to "charge" the battery as it runs.
Now, ALL OF THE ABOVE need GROUNDS TOO. So, the battery should be grounded to the FRAME of the bike too, so the engine is grounded. Then make sure you ground the Reg/Rec, and the IC Ignitor too. Most likely will be a Black with Yellow line, as others will use the Black with Yellow as ground too.
Hopefully I'm not insane and I hope all goes well. Note how I still ran the 20 amp fuse in line on the drawings! Wow I need a beer after this for sure! If all else fails, I have to tear my electrical out when I send the frame to get powdercoated soon, since I did NOT make it pretty before. I have to get rid of the nest thats in there of wires. We'll get it squared away.
Bruno..here I am thinking that I'm going around in circles and you methodically document and write up exactly what I need. You put me to shame. Since I left my laptop at work (oops) Im just going to have to go and do this right now and document it properly.
Damm you're good.
rewiring ze ignition
ok
From the battery, take HOT aka positive, and put it to a switch. done
This switch will then run that hot through it and power the coils and IC Ignitor unit. hmm
The next HOT line you need is to your starter motor. So, use the starter solenoid wired in with a switch to make it work, OR jumper it to turn the bike over, preferred to have a button, but thats not always easy for new guys to electrical.
yep too hard...dont have a button anyway
Last HOT line I tossed in was the stator or Regulator/Rectifier line. Since this is used to "charge" the battery as it runs.
will do but dont need this yet
Now, ALL OF THE ABOVE need GROUNDS TOO. So, the battery should be grounded to the FRAME of the bike too,
I think- since I have the original connectors that this is grounded- but I lashed another to the frame
so the engine is grounded. Then make sure you ground the Reg/Rec, and the IC Ignitor too. Most likely will be a Black with Yellow line, as others will use the Black with Yellow as ground too.
black and yellow runs to negative at the battery
BIG QUESTIONS
WHERE DOES THE HOT WIRE GO IN THE IC
IS black yellow to negative the ground for the IC
DO THE COIL LEADS NEED TO SWITCH OVER PHYSICALLY I.E THICKASS CABLES TO PLUGS OR JUST THE THIN POWER LEADS
HOW DO I RIG UP A STARTER BUTTON THAT DOESN'T SHORT OUT THE STARTER SOLENOID
When I short out the starter the lead from positive starts melting is this bad
sorry about the capitals..wanted these questions to stand out...
AND NOW
ok so all this seems connected - now I guess I try again for spark - I think that the wires to the coils may be an issue
right -black red
left red green
red goes to two different sides of ic
black goes to right of IC
green goes to Ignitor
Attachments

MotorbikeBruno
Over 1,000 Posts
Re: rewiring ze ignition
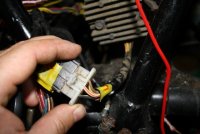
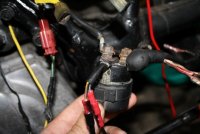
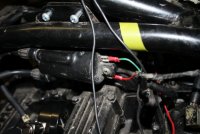
Yes you need the BIG plug wires. I noticed that they are all out of place though....While sitting on the bike 1 is on the left, then 2,3,4. Your wires are NOT labeled that way and so are in the wrong spots. The left coil usually does 1 and 4, while the right coil usually does 2,3.
Anytime something starts melting it is bad! haha. There are 2 small leads coming out of the solenoid (as in your picture). You should be able to put a switch across those to make it work. Again NO melting should be happening. If there is melting, a ground is touching a positive or the other way around (usually)
I'm trying to base all of this off A 1984-85 Z750L...because that's the closest one I have to your model. Find me the right diagram for your bike and we'll get this sorted much faster! haha.
I went back through the thread to re-read some things...what EXACTLY is your model again? You said H? And what year again? 1983 is H4....
rich said:BIG QUESTIONS
WHERE DOES THE HOT WIRE GO IN THE IC
IS black yellow to negative the ground for the IC
DO THE COIL LEADS NEED TO SWITCH OVER PHYSICALLY I.E THICKASS CABLES TO PLUGS OR JUST THE THIN POWER LEADS
HOW DO I RIG UP A STARTER BUTTON THAT DOESN'T SHORT OUT THE STARTER SOLENOID
When I short out the starter the lead from positive starts melting is this bad
Yes you need the BIG plug wires. I noticed that they are all out of place though....While sitting on the bike 1 is on the left, then 2,3,4. Your wires are NOT labeled that way and so are in the wrong spots. The left coil usually does 1 and 4, while the right coil usually does 2,3.
Anytime something starts melting it is bad! haha. There are 2 small leads coming out of the solenoid (as in your picture). You should be able to put a switch across those to make it work. Again NO melting should be happening. If there is melting, a ground is touching a positive or the other way around (usually)
I'm trying to base all of this off A 1984-85 Z750L...because that's the closest one I have to your model. Find me the right diagram for your bike and we'll get this sorted much faster! haha.
I went back through the thread to re-read some things...what EXACTLY is your model again? You said H? And what year again? 1983 is H4....
Attachments
MotorbikeBruno
Over 1,000 Posts
Your igniter came up as this on ebay, I searched for it and found the one that looks like yours in the pic. Now I'm trying to track down other people that have dismantled their's to see if I can find pics of their wiring, that should help.
http://www.ebay.com/itm/gpz750-zx750-kz750-cdi-ecu-ecm-igniter-ignitor-/4564067370?pt=Motorcycles_Parts_Accessories&vxp=mtr&hash=item1100a242a
It also comes up with a KZ750A-1 or KZ750E too
http://www.ebay.com/itm/Kawasaki-KZ750E-84-igniter-FUJI-21119-1119-/330420486205?pt=Motorcycles_Parts_Accessories&vxp=mtr&hash=item4cee98803d
MotorbikeBruno
Over 1,000 Posts
http://www.kawasakigtclub.com/Tech/starter.html
Go here and scroll down.....I think this will help a ton!
Go here and scroll down.....I think this will help a ton!
MotorbikeBruno
Over 1,000 Posts
Here is an excerpt from that page:
2) Clutch Lockout switch.
Mounted in the left handle bar lever housing, operated directly by the lever action. If kept clean, these also rarely fail electrically. When the lever is pulled in, the Ignitor and Starter Control Relay winding are both connected directly to Earth, so allowing the Starter to work. If it doesn’t turn, it means the Clutch Switch is not connecting the Y/Gn wire to the Bk/Y Earth wire.
If pulling the clutch lever in makes no difference, the Switch assembly can be withdrawn fairly easily from the lever housing for checking, then if necessary carefully prised open and the contacts cleaned or repaired. A small quantity of Vaseline on the contacts will help future operation. This will save buying a new Switch.
My own clutch switch failed mechanically when the little plastic plunger which pushes on the clutch lever broke off, presumably due to fatigue. I repaired it by using a short length of 12 BA brass screw as a stud, glued into a thread I tapped into each of the two pieces of the plunger. This is now stronger than the original. By the way, I think it is good practice to pull the clutch lever in whenever I start the engine, particularly from cold; it reduces the load on the starter and gives the battery an easier life.
3) Side-stand switch.
It’s this one that usually gives most problems. This switch should make (i.e. CLOSE) when the side-stand is UP; as a safety feature the switch is OPEN when the stand is DOWN. Assuming you have started the engine with the clutch lever IN and side-stand DOWN, when you let the clutch lever OUT this switch is the ONLY route to Earth for the Ignitor circuit, so NO SPARK and the engine promptly stops, which stops you driving off with the stand down. This is very laudable in a perfect world.
Unfortunately, this switch is also positioned low on the bike, in fact in just the right place to get kicked, hit by stones, sprayed with water, grit and all sorts of crap!! This clever bit of design means that the switch contacts can get dirty or corroded, or the plunger broken off, with the effect that when the side-stand is UP, the switch contacts ARE APPARENTLY STILL OPEN instead of closed. Result, the bike runs with the clutch pulled in and a gear engaged (i.e. not neutral), but it stops as soon as you try to pull away!
This is the one that most people get frustrated with, and they have been known to just chop the wires at the switch and join them together. PLEASE don’t be persuaded that this is the only answer, it isn’t. To prevent the need for this, keep the switch body clean and exercise the plunger several times by hand. Once again the switch can be opened and the contacts cleaned. In situ the switch can be sprayed with Electrolube or a similar contact lubricant should do the job. The plunger can be repaired mechanically as described before.
http://www.kawasakigtclub.com/Tech/sparks_html_m5ee2c660.gif
Thanks Bruno
You my friend are a legend
the problem I have is that there is chopped and missing stuff everywhere- the circuit you sent me is gold and I'll use it- but I'm missing
the cutout switch for the handlebars and the cutoutswitch for the stand
as well as various wires to the diodes and other places
Im officially putting the wiring on hold until another manual arrives so I can redo the wiring strand by strand by strand-Ill work through the diagram you gave me in bits and pieces and firm up the connectors until it does- I might also recover the seat.
stay tuned
then
MotorbikeBruno
Over 1,000 Posts
No problem. I wish I could help further, but I don't have the right wiring diagram! haha. Lots of other things can be done while you wait for that wiring book though! Have fun, and I'm subscribed to this thread so I'll keep an eye open for updates!
Thiiings are moving...
Just got some wiring books in the mail and now have a process to try and isolate whatever the issue is with the wiring. Gonna measure voltage drop through the coils and IC. I suspect its the IC or the dreaded invisible lockout switches as I've replaced the starter solenoid- theres power everywhere but no spark so gotta get technical now and test it all.
The coils are the third option and relatively easy to test- I've tried already and they seem to be reading low.
Thanks to Bruno who pointed out the coils were numbered backwards from right to left instead of left to right
I've been busy fanging it on the VTR and am up for a roadworthy and rego so got that into the shop on Wednesday, I also picked up a sidestand switch and wired it through those tiny little wires under the bike- with four centimetres of play that required me to grow tweezers for fingers. Doesnt help that I'm missing a couple of fingers.
I'll update with some photo's later in the week - I've also got a go-pro vid of me crankin it through the burbs (legally of course)
On the weekend I've got an advanced riding course.
Big Questions - what do people think of this location map on our profile pages- call me paranoid but endless photo's of the content of my garage and a nice and accurate map of my exact location beamed worldwide makes me a bit paranoid. Can you turn it off?
AlphaDogChoppers
Science is true whether you believe in it or not.
Yeah, we are all trolling the forum to find garages where we can steal your remarkable array of tools and your highly valuable vintage motorcycle... :-D
MotorbikeBruno
Over 1,000 Posts
As for the GPS, I put my city not my address! haha. I'd ask TIM since he's the man behind and in front of the curtain here at DTT.
Glad you got some things going, I know one thing, make sure your battery is good! haha. I wish you good luck sir.
Glad you got some things going, I know one thing, make sure your battery is good! haha. I wish you good luck sir.
AlphaDogChoppers said:Yeah, we are all trolling the forum to find garages where we can steal your remarkable array of tools and your highly valuable vintage motorcycle... :-D
yeah I did think that Alpha Dog man, each to their own, I've already worked out the commute from your place is too long even for you, which is good really coz if i had to listen to you in real life I't'd drive me crazy..
but you've probably got a point-I thought a broken 1984 z was a priceless bargain- Ive seen working models go for at least twice what I paid
my tools however,came from all over china- they've gotta be valuable coming that far.
thanks Bruno, The battery's on 12.8...MotorbikeBruno said:As for the GPS, I put my city not my address! haha. I'd ask TIM since he's the man behind and in front of the curtain here at DTT.
Glad you got some things going, I know one thing, make sure your battery is good! haha. I wish you good luck sir.


